Pages

Sunday, May 30, 2010

Banana Split Cupcakes


I sometimes envy those who have friends they have grown up with their whole lives. As an Army brat, having an old friend is a little more difficult due to the fact that we move around every 2 or 3 years, but it can be done!


My friend Beth and I met in 2nd grade when we were living in North Carolina and we have managed to stay good friends through various moves and many years; we try to get together at least once a year, and keep in touch through emails and messages here and there. A couple weeks ago as we were chatting she asked me if I could come up with a way to turn her favorite banana split into a baked good. I immediately embraced the challenge and wrote down my thoughts in my little recipe book waiting for the perfect time to try em out. I finally got around to creating the cupcake this weekend and I think she'll be quite pleased with the result.


Unfortunately I wasn't going to be able to send Beth any of the final product due to the whipped cream topping- I don't think she'd be very happy if a box of cupcakes with sour whipped cream arrived on her door step one day! Despite this dilemma, Beth understood and was just as happy with a recipe she could make on her own. I have such great friends :)


These cupcakes are chock full of all the goodies that go into a true banana split with the exception of ice cream... but who's to say these cupcakes shouldn't be enjoyed with a scoop of some?!


Banana cupcakes, homemade hot fudge, whipped cream and sprinkles, all topped off with a cherry on top!


Banana Cupcakes
slightly adapted from Hello Cupcakes! by Karen Tack and Alan Richardson
Makes 18 standard cupcakes
Oven: 350 Bake Time: 15-20 min

1 2/3 cups AP flour
1 tsp baking powder
1/2 tsp baking soda
1/4 tsp salt
3 medium ripe bananas
1/3 cup buttermilk
1 stick butter
1 cup white sugar
1/4 cup brown sugar
2 large eggs
1 tsp vanilla extract

Whisk together flour, baking powder, baking soda and salt in medium bowl.
In another bowl, mash bananas and buttermilk.
In another bowl, beat butter and sugar until fluffy. Add eggs one at a time. Mix in vanilla.
(Make sure the bowl you use for this mix is the largest- If you're using a Kitchen Aid mixer, beat the butter, sugar and eggs in there and add the other bowls ingredients to it)
Once the butter, sugar and eggs are beat, add the flour mixture alternatively with the banana mixture, beginning and ending with the flour mixture. 
Spoon batter into paper lined muffin tin and bake for 15-20 minutes or until a toothpick comes out clean.
Transfer to a cooling rack and cool for at least an hour before assembling.


Hot Fudge Sauce
recipe from The Craft of Baking by Karen DeMasco & Mindy Fox
Makes 2 cups of sauce 
*I halved the recipe for the cupcakes, but if you don't want to do that the sauce can be kept in an airtight container in the fridge up to 2 weeks- just reheat over low heat when ready to use

1 cup heavy cream
1/2 cup whole milk
1 cup light corn syrup
1/2 cup sugar
1/4 cup cocoa powder
1 tsp salt
1 1/2 ounces bittersweet chocolate, chopped
1/2 tsp cider vinegar or white vinegar
2 TBS unsalted butter
1 tsp vanilla extract

In a large sauce pan bring cream, whole milk, corn syrup, sugar, cocoa powder and salt to a boil. Whisk in a little more than half the chopped chocolate and vinegar.
Reduce heat low-medium and cook for about 12-15 minutes or until the sauce starts to thicken and has the elasticity of hot fudge.
At this point, remove pan from heat and whisk in remaining chocolate, butter and vanilla. 
Use immediately or store in fridge until ready to use.

Stabilized Whipped Cream
1 cup heavy whipping cream
1/4 cup powdered sugar
1 tsp vanilla
1 tsp unflavored gelatin
2 TBS water

Pour water into a small saucepan and sprinkle gelatin over top- Mix until gelatin starts to dissolve. 
Place saucepan over low heat and bring to a slight boil. 
Remove from heat and set aside to cool/stabilize.
Whip cream with hand mixer until it starts to thicken.
Add powdered sugar and vanilla and beat until incorporated. 
Pour gelatin into whipped cream and continue to beat until stiff peaks form.
Place in fridge for at least 15 minutes before using, however you can keep in the fridge for a few days (covered). 

Assembling Banana Split Cupcakes:


1. Take your cooled cupcakes and using the cone method to cut out small holes from the top of your cupcakes. This will give your hot fudge sauce somewhere to stay. (Feel free to eat your little cut out pieces of cupcake)
2. Pour hot fudge sauce in centers of cupcakes
3. Whipped cream topping- I piped mine on top using a zip lock bag, but you could just as easily drop the whipped cream in dollops on the cupcakes with a spoon or spatula. 
For those interested in the ziplock bag idea: Place whipped cream in a large zip lock bag and secure top. Cut the tip off one end (about half an inch) and pipe onto cupcake just as you would with a pastry or icing bag.
4. Garnish with sprinkles, chopped peanuts, or whatever else you might like! And no Banana Split is complete without a cherry on top :)


Happy Baking!

Saturday, May 29, 2010

Tuxedo Muffins

It's been a busy week.

For a long time now I've been promising one of my co-workers I would attempt to make him a replication of his favorite muffin that he sometimes gets from a local coffee shop. Sadly, we found out a couple weeks ago that he is leaving our office here in Texas and moving on up to our headquarters located in New York. But what a perfect opportunity to finally make him a batch of some deliciously sweet Tuxedo Muffins to help get him through his long drive!

For those of you unfamiliar with Tuxedo Muffins let me explain.. When you think Tuxedo, black and white should immediately come to mind. While these moist little muffins are not black per say, they are as close as you're going to get when you're working with chocolate-y goodness wrapped around a slightly sweetened, almond flavored, cream cheese filling. Hungry yet?

I like to picture my muffins in little tuxedos because
 it says they may be sweet, but they're here to party. 

Tuxedo Muffins
Adapted recipe from 'Old Fashioned Bake Sale' 
Oven temp: 375 Bake Time: 25 minutes
Makes 12 muffins


2 1/2 cups AP flour
1 cup packed brown sugar
3 TBS cocoa powder
1 tsp baking powder
1/2 tsp baking soda
1/2 tsp salt
1 1/3 cup buttermilk
6 TBS oil
2 eggs, beaten
1 vanilla
1/2 tsp almond
1/2 cup semi-sweet chocolate chips, melted
1 cup white chocolate chips


Cream Cheese Filling
4 oz cream cheese
1/4 cup powdered sugar
1/2 tsp almond
1/2 tsp vanilla
1 TBS cornstarch


Make cream cheese filling by beating all ingredients in a small bowl until smooth and set aside.

In a large bowl whisk flour, brown sugar, cocoa powder, baking powder, baking soda and salt.
In another bowl, mix buttermilk, oil, 2 beaten eggs, vanilla and almond.
Pour wet ingredients into dry ingredients and mix until just combined.
Melt semi-sweet chocolate chips in microwave on high for 1 minute stirring in 30 second intervals.
Stir melted chocolate into batter until fully incorporated.
Fold in white chocolate chips.

Fill muffin tin with a spoonful of batter.
Place a spoonful of cream cheese filing in center of muffin cup on top of batter (try not to let filling touch the sides of pan)
Cover filling with spoonful of remaining batter in each muffin cup (make sure filling is completely covered).
Transfer filled muffin pan to oven and bake for 25 minutes.

Packaged and ready to head to New York.
Happy Baking! 

Thursday, May 27, 2010

DB May Challenge: Piece Montée

Let me start by saying, if anyone can actually pronounce this for me properly it would be greatly appreciated :)

Every time I talked about this challenge with MM I think I pronounced it a different way. Piece Montée literally means 'mounted piece' and is traditionally a pyramid or cone shaped construction of cream filled puff pastries, dipped in chocolate and decorated with caramel. Don't let the construction intimidate you though.. it's really not as difficult as you may think!

I was so intrigued and excited when I first took a peek at May's Daring Baker's Challenge. I had seen this creation a few times on the various cooking shows I often find myself watching, but always assumed it must be an extremely time consuming and difficult task. However, I was pleasantly surprised when everything started coming together so easily earlier this week in the kitchen.
Although the assembly of the piece may seem a little time consuming, the components of the Piece Montée are relatively simple, not to mention delicious. I never knew puff pastries could be so easy!

Since the challenge calls for cream filled pastries, the cream filling seems the best place to start:

For the Vanilla Crème Patissiere 
1 cup whole milk
2 TBS. cornstarch
6 TBS sugar
1 large egg
2 large egg yolks
2 TBS.  unsalted butter
1 tsp Vanilla
In small bowl, dissolve cornstarch in ¼ cup of milk. Combine the remaining milk with the sugar in a saucepan and bring to boil; remove from heat.
Beat the whole egg, then the yolks into the cornstarch mixture. Pour 1/3 of boiling milk into the egg mixture, whisking constantly so the eggs don't start cooking.
Return the remaining milk to boil. Pour in the hot egg mixture in a stream, continuing whisking.
Continue whisking until the cream thickens and starts boiling again. Remove from heat and transfer to stainless steal bowl.
Beat in the butter and vanilla until smooth.
Cover with saran wrap or in airtight container and place in refrigerator until ready to use. (I made mine the night before to ensure it was cool)

I used both vanilla and coffee créme patissiere.. simply mix 1 1/2 tsp instant coffee or espresso powder with 1 TBS boiling water and add to finished vanilla créme.

The puff pastry is next. Although you can make this a day ahead and keep in an airtight container, it is best to make the day you'll be serving it. 

Pate a Choux (makes about 28)
¾ cup water
6 TBS unsalted butter
¼ tsp salt
1 TBS sugar
1 cup AP flour
4 large eggs
For Egg Wash: 1 egg and pinch of salt

Pre-heat oven to 425 degrees. Line baking sheet with parchment paper.
Combine water, butter, salt and sugar in a saucepan over medium heat. Bring to a boil, stirring occasionally. One boiling, remove from heat and sift in the flour, stirring to combine completely. Return to heat and cook, stirring constantly until the batter dries slightly and begins to pull away from the sides of the pan.
Transfer to bowl and stir with wooden spoon for about a minute so it slightly cools.
Add an egg- making the batter appear loose and shiny.
Put some muscle into it and mix the batter till it starts to become the consistency of mashed potatoes. 
At this point add the next egg, repeating this process until all 4 eggs are incorporated.
Transfer dough to pasty bag with open tip (I piped directly from bag instead of adding a tip) and pipe out choux about 1 inch apart and 1 inch high.
Brush tops with egg wash and place in oven.
Bake at 425 for 10 minutes or until slightly golden. At this time, turn oven down to 350 and continue to bake for 20 minutes.

Cool on rack for about 20 minutes.

The assembly is broken down into a few steps..

Filling the pastries
When you're ready to assemble, use a plain pastry tip and pierce the bottom of each choux. Fill the choux with pastry cream using a regular or star tip, and place on a paper-lined sheet. Make sure not to overfill your pastries- you should be able to feel when they're full.

The last piece in the Piece Montée is the glaze used to keep the structure together. I used a combination of caramel and chocolate, so both recipes follow:

Chocolate Glaze
8 oz. semi-sweet chocolate
Melt chocolate in microwave- 1 minute, stopping to stir at 30 seconds. If not completely melted, place back in microwave for 30 second intervals.

Hard Caramel Glaze:
1 cup sugar
½ teaspoon lemon juice
Combine sugar and lemon juice in a saucepan. 
With a metal kitchen spoon stir until the sugar resembles wet sand. 
Place on medium heat; heat without stirring until sugar starts to melt around the sides of the pan and the center begins to smoke. Begin to stir sugar. Continue heating, stirring occasionally until the sugar is a clear, amber color. 
Remove from heat and use immediately. (This stuff honestly starts to harden almost instantly so make sure you have everything ready before you make this.. I had to return it to the stove top a couple times to make it warm enough to use again)

Construction
Use a piece of parchment paper cut into an 8-inch circle or a round cake board as a template for the bottom layer of pastries. Dip pastries in chocolate and place larger pastries on the bottom layer (about 7 or 8). Drizzle with caramel. Repeat this process assembling next layer of pastries atop the bottom layer, reducing the number of pastries in each layer creating a cone or pyramid shape. Once all pastries have been used drizzle with remaining chocolate and caramel.

Yet another amazing Daring Baker Challenge.. can't wait for June!!  

Bon Appetit!


Wednesday, May 26, 2010

Peanut Butter-Banana Breakfast Bake


Earlier this week I work up craving something warm for breakfast, but wasn't in the mood for pancakes (I know, crazy) and didn't have the time to make muffins. And then I saw one perfectly ripe banana sitting on top of the microwave just waiting to be eaten and it got my gears going.  I tried to go for something a little on the healthier side and ended up with something pretty delicious if you ask me.

This little bake takes absolutely no time at all to whip up and only about 25 minutes to bake, so if you have a few extra minutes in your morning routine I suggest you use it wisely! As soon as I woke up I wandered to the kitchen, put on a pot of coffee, created this Peanut Butter-Banana Breakfast Bake, popped it in the oven, and let the oven do its magic while I got ready. Twenty minutes later I sat down to a delicious breakfast before driving to work.

Just another adventure in the kitchen of EEB. 

Peanut Butter-Banana Breakfast Bake
Bake time: 25 minutes  Oven: 350
Makes perfect amount for 2-3 people

1/2 cup rolled quick oats
1/4 cup white whole wheat flour
1/2 tsp baking powder
2 TBS wheat germ
4 tsp whey protein powder (completely optional)
3 TBS honey
1 tsp cinnamon
4 TBS applesauce
1 large ripe banana
1-2 TBS peanut butter

Preheat oven to 350.
In a small bowl, mash banana with a fork. Stir in honey, applesauce, peanut butter and cinnamon.
In a larger bowl, mix quick oats, flour, baking powder, wheat germ and protein powder.
Pour banana mixture into dry mixture and mix with wooden spoon until combined.
Pour into small baking dish sprayed with cooking spray (I used a 5x5 casserole dish) and bake for 25 minutes.

Enjoy along side a small bowl of vanilla yogurt, drizzled with honey and some extra cinnamon...what a great way to start the day :)

Happy Baking!

Monday, May 24, 2010

Carrot Cake with White Chocolate Cream Cheese Icing

Earlier this month one of the girls at work asked me if I could make her mother a cake... her parents were coming from South Carolina to check out her new digs in the Great State (aka Texas) and it just so happened they would be celebrating Mother's Day a few weeks late and her mother's birthday a few months early.

And what better way to celebrate any occasion than with a swEEt cake :)


So I share with you, Carrot Cake with White Chocolate Cream Cheese Icing.


Carrot Cake
A collaboration of recipes from allrecipes.com 
Oven temp: 350 Bake: 40 min
Makes 2 8-inch round cakes

3/4 cup oil
1/2 cup applesauce
1 cup brown sugar
1/2 cup white sugar
4 eggs
1/2 tsp salt
2 tsp vanilla extract
2 cups AP flour
2 tsp baking powder
1 tsp cinnamon
1/2 tsp nutmeg
1/4 cup buttermilk
3 cups shredded carrots
1/2 cup walnuts, plus more if using for decoration

In a bowl mix sugars and slowly stream in oil until combined. Add applesauce and vanilla.
Mix in eggs on at a time, mixing after each addition.
In separate bowl, whisk flour, baking powder, salt, cinnamon and nutmeg.
Combine flour mixture with sugar mixture, alternating with buttermilk- always begin and end with flour!
Fold in shredded carrots (too easy if you use a food processor) and walnuts.
Pour into 2 prepared 8-inch round pans and transfer to oven.
Bake for 40 minutes, until toothpick comes out clean.
Transfer to cooling rack. After about 10 minutes remove cakes from pans and continue cooling.

White Chocolate Cream Cheese Icing
1/2 stick butter, softened
8 oz. cream cheese, softened
2 tsp vanilla extract
3 cups powdered sugar
1/4 cup heavy whipping cream
1/2 cup white chocolate chips

Heat cream in microwave until bubbly, pour over white chocolate chips and whisk until smooth- you're basically making a quick ganache. (side note: I heat my white chocolate chips about 45 seconds in the microwave first because white chocolate can be tricky sometimes) Set aside to cool.
Beat butter, cream cheese and vanilla until fluffy and smooth. Add powdered sugar and beat until smooth. Slowly pour in melted chocolate and keep beating until smooth and creamy consistency.

*If the icing seems too soupy, add more powdered sugar. Everyone likes their icing a little different.. if you don't want it as sweet don't add the white chocolate and/or don't ad as much powdered sugar. I on the other hand, like my cream cheese icing almost to just have a hint of cream cheese flavor so I use lots of sugar.

Assembly:
If your cakes have uneven or rounded tops, always make sure to level them off with a sharp bread knife. Place one layer on serving platter (or cake board) and fill with cream cheese icing. Place second layer softly/neatly on top and finish by icing the top and sides of the cake. For a fancy looking, yet super easy decorating technique, press crushed walnuts along sides of cake.

If not eating right away, make sure to refrigerate!


Happy Baking!  

Saturday, May 22, 2010

Chili, Cheese and Tomato-Pesto Biscuits

Friday morning before I left for work I asked MM to go through A Passion for Baking by Marcy Goldman and find something scrumptious to make for breakfast Saturday morning. When I returned home from work he had page 98 marked and what a good choice it turned out to be.

"I chose something a little different for us to make tomorrow morning," he said to me Friday afternoon, and different it was indeed. When it comes to breakfast baked goods I almost always go for something sweet, so these were a little out of my comfort zone... I mean, this is swEEts by e!? I'm not going to lie, I was a little hesitant when I started reading through the ingredients. I couldn't help but think there was just too much going on, but I was absolutely proved wrong.

Mountain Mans choice of Chili, Cheese and Tomato-Pesto Biscuits? Delicious, yes. Sweet, no.

A perfect companion for some scrambled eggs and bacon, these biscuits are sure to please on a warm spring morning when you're in the mood for something savory and a little different than your average pancake or muffin. A word of warning though, the prep for these bad boys is a little time consuming.  There are a lot of veggies and herbs that go into the dough which require a lot of chopping and measuring... a perfect opportunity to make use a sous chef ;)

Chili, Cheese and Tomato-Pesto Biscuits
Adapted from A Passion for Baking
Oven temp: 425 Bake Time: 18-20 minutes
Makes about 12 biscuits

2 cups AP flour
1/2 cup cornmeal
1 TBS sugar
1 tsp salt
1 TBS dry mustard
4 tsp baking powder
1/2 tsp baking soda
1/8 tsp black pepper (basically a sprinkle)
1/2 cup unsalted butter, cut into cubes
about 3/4 cup buttermilk
1 egg
1/4 cup finely chopped green onion
3 TBS finely chopped cilantro
1/2 cup canned corn (drained)
2 cups shredded cheddar and jack cheese combo
2 TBS minced canned green chilis
3 TBS sun-dried tomato pesto*

Preheat oven to 425.
Stack 2 baking sheets together and line top with parchment paper.
In food processor, combine flour, cornmeal, sugar, salt, mustard, baking powder, soda and pepper. Pulse a few times to mix.

Add butter cubes and pulse until grainy consistency is made. Transfer mixture into a large bowl.

Pour a little more than half the buttermilk to mixture, add egg and mix lightly with a fork.
Add all your veggies and drop in bits of pesto. *We couldn't find tomato-pesto so we made our own by mixing 6 sun-dried tomato halves and 2 spoonfuls of pesto in the food processor.

Use your hands to mix together into a soft dough. Add more buttermilk if necessary.

Turn out dough on lightly floured surface and roll out until it is about 1 inch thick. Using a round cookie cutter, cut into circles and transfer to prepared baking sheets.

Place in oven and reduce temp to 400. Bake for 18-20 minutes.

Happy Baking!

Wednesday, May 19, 2010

Mango Raspberry Upside Down Cake

I'm not exactly sure how we did it, but somehow MM and I got everything unpacked and organized in just one day.. yes you heard me correctly.. ONE DAY! A mighty big Goodwill pile, lots of creativity, two absurdly full closets and a couple minor arguments later, everything somehow found its place in our tiny two bedroom apartment.

Sunday afternoon (after all the unpacking was complete) we perused the grocery store isles where we picked up some gorgeous looking mangoes. MM might have had other things in mind for these tropical beauties, but I knew that these bad boys were going to make their way into something baked and delicious.

Just as we got it all settled, MM had to turn around and leave for a couple of days for an interview a couple hours away. And to celebrate the prospect of a job and the beginning of our adventure as cohabitants I thought I would make him something special for his return in the form of Mango Raspberry Upside Down Cake.
If you ask me, Mountain Man is a pretty lucky guy...I mean, he gets to come home to a cozy little apartment with his adoring girlfriend waiting for him AND a lip-smacking totally tasty freshly baked cake!?

I'm pretty much the best girlfriend ever... OK maybe not EVER, but I'm pretty darn close ;)

Mango Raspberry Upside Down Cake
Oven: 350  Bake Time: 40 min
Cake recipe found in: A Passion for Baking by Marcy Goldman


2/3 cup unsalted butter, cut in chunks
1 1/3 cup sugar
3 eggs
2 tsp vanilla extract
1 cup warm milk
2 cups AP flour
2 1/2 tsp baking powder
1/2 tsp salt

1 large mango, peeled and sliced
1/2 cup fresh raspberries
1 TBS white sugar
4 TBS brown sugar
3 TBS butter, melted
2 TBS hot water
1/2 lemon squeezed for juice

Preheat oven to 350.
Fruit: Lightly spray a springform pan (or 8-inch cake pan) with nonstick cooking spray.
In a small bowl, melt butter in microwave- about 30 seconds. Add brown sugar and mix until smooth (add hot water to thin)
Pour sugar mixture into bottom of springform pan, spread to evenly coat pan.
Arrange sliced mango in prepared pan and squeeze lemon juice over mangoes.
Puree raspberries and sugar in food processor or blender (I have a Ninja making it very simple for small batches of ingredients, but if you don't have this you could easily mash raspberries in a deep bowl with the back a spoon).
Pour raspberries over mangoes and set aside.


Cake: In a food processor, pulse butter chunks and sugar until blended.
Add eggs and vanilla, pulsing until blended.
Stir in milk, flour, baking powder, and salt and pulse until incorporated.
 Pour batter over mangoes and raspberries.
Move to oven and bake for 40 minutes, until barely brown and toothpick comes out clean.
Transfer to cooling rack.
Once cool, invert cake onto a serving plate.


Happy Baking!


Mango Raspberry Upside Down Cake on Foodista

Tuesday, May 18, 2010

Make Your Own Granola 2 (MYOG) and Bars

After discovering how simple it is to make my own granola and granola bars, whenever I walk down the snack isle at the grocery store I smile to myself knowing that I can make something just as tasty and I'm saving money! Plus, there is something about being able to pick and choose what I want to go into my creations that always adds a certain level of excitement and joy to my day (yah, I know what you're thinking...'that make her happy? wow' but sadly it's true.. I'm a sucker for good ingredients and creativity).

This baking adventure was two-fold; with just a single batch I made a basic granola mix and some granola bars as well. If bars aren't your thing, feel free to stop after the granola has baked for something to sprinkle over your morning bowl of yogurt...if you are looking for something you can hold on to well then by all means, double up and make a whole batch of bars- too easy :)

This recipe makes the basic granola, which is then used in the granola bars I made as well.

Basic Granola 
Oven: 350 Bake Time: 15 minutes
Makes about 4 cups of prepared granola

2 cups quick oats
2 TBS flax seeds
1/4 cup pumpkin seeds
1/4 cup wheat germ
1/4 cup sliced almonds
1/4 cup applesauce
2 TBS honey
2 TBS organic pure maple syrup
1 TBS oil
2 tsp cinnamon
optional: 1/4 cup dried cranberries and 1/4 cup dried blueberries

Mix oats, seeds, wheat germ, and almonds till all are evenly distributed.
Add applesauce, honey, syrup and oil. (tip: If you measure out the oil in your measuring spoon first, the honey and syrup will transfer to the bowl easier)
With wooden spoon, mix until dry ingredients are well coated.
Transfer to parchment paper lined baking sheet and place in oven to bake for 15 minutes.
After granola has been baked and cooled, mix in dried berries.
Place in airtight container for keeping.


'All Sorts of Things' Granola Bars
2 cups prepared Basic Granola
1 1/2 cup Rice Krispies
1 cup Extras* I recently purchased a pre-mixed combo of dried cranberries, dark chocolate chips, peanuts, almonds, pumpkin seeds, dried apples, and sunflower seeds that I used, but you could potential use any combination of things- get creative the possibilities are endless! *
1 TBS oil (to coat pan)
3/4 cup almond butter
2 TBS corn syrup
3 TBS honey

In large bowl, combine rice krispies, granola and extras.
Coat a small sauce pan with 1 TBS of oil- over medium heat continually stir almond butter, corn syrup and honey until warm and smooth.
Pour warm mixture over dry ingredients and mix until combined and starting to stick together.
Transfer to parchment paper lined baking dish, pressing into pan.
Place back in oven and bake for 15 minutes.
Remove from oven and place on cooling rack for about 20 minutes before placing into fridge for further cooling.
Once completely cooled, cut into small squares- wrap in saran wrap, foil or wax paper to ensure shape is maintained.
 Happy Baking!

Sunday, May 16, 2010

'We Made It!!!' Coffee Cake Muffins

After about 20 hours side by side, trailer in tow, kayak and bikes on top, lots of snacks and some great BBQ we made it! That's right ladies and gentleman, Mountain Man is now the lovely co-habitant of the little apartment in Temple, TX... the big question now? What the heck are we going to do with all his stuff?!
Even before we got to the apartment yesterday evening MM already had breakfast on the mind.. I think I've told you before how much we enjoy a good breakfast and this just goes to show how serious I really was. Yesterday afternoon, while stopping for some delicious BBQ in some little town in the middle of nowhere Texas, MM looked at me in all seriousness and asked "So what are you making for breakfast tomorrow morning?" I laughed at the question, but the scary part was that I actually had already thought about it..sad huh??

So in celebration of our long journey Coffee Cake Muffins made the menu for Sunday morning breakfast. I tried to make them a little healthy, but I think I counteracted all the healthy ingredients with the deliciously sugar/butter filled streusel. We have a lot of unpacking and reorganizing to do, so hopefully these yummy little muffins will give us the energy to get through it all :)

Coffee Cake Muffins 
Oven: 375 Bake Time: 25 minutes
Makes 12 muffins

1 cup white whole wheat flour
1 cup all purpose flour
3/4 cup turbinado sugar (or regular sugar)
2 tsp baking powder
1/2 tsp salt
1/4 cup butter, softened
1/4 cup unsweetened applesauce
1 egg
1 cup buttermilk
1 1/2 tsp vanilla extract

Streusel 
1/4 cup butter, softened
1/4 cup all purpose flour
2 tsp cinnamon
1/4 cup packed brown sugar
1/4 cup regular sugar


Streusel: In small bowl mix flour, sugars and cinnamon. Add butter and using a fork (I actually used 2 forks), mash until combined. Once everything is mashed and mixed you'll get a thick paste- place in fridge while you make the batter.


In large bowl, combine/whisk flours, sugar, baking powder and salt.
Cut butter into small cubes and using paddle attachment mix into dry mix until butter in fully incorporated.
Mix in applesauce.
Add egg, buttermilk and vanilla extract- mix until smooth.

Remove streusel from fridge. In a prepared muffin tin (spray with Pam), place a spoonful of batter into each mold. Use your fingers and sprinkle streusel over batter (about 1-2 teaspoons). Cover with another spoonful of batter. Top with remaining streusel.
Transfer to oven and bake for 25 minutes.
Remove from oven and place on cooling rack for 10 minutes before serving.


Let the unpacking begin!!
Happy Baking!

Friday, May 7, 2010

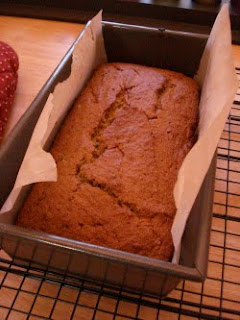
Banana Avocado Bread

You heard it right everybody, banana and avocado meet again...this time in bread form! If you haven't had the opportunity to try this delicious duo I suggest you do so as soon as your taste buds can get you there. I don't know what it is about these two fruits, but I think they just work together wonderfully.


The first time I saw a recipe for avocado bread I was intrigued. I absolutely love avocados, but I just wasn't sure how they would hold up when baking. A few months ago I saw some delicious looking avocado bread on one of the many food sites I visit and immediately bookmarked the idea in my mind. It wasn't until I saw the ripe avocados staring at me in the fridge this week that the idea came back to me. After conducting a good search I found a recipe that looked worth trying and the rest is history :)
With the addition of the ripe banana in my freezer just begging to be used, the baking Banana Avocado Bread wafted through my kitchen as I tried to get my stuff together for my little vacay. After spending a week at the beach with my family, Mountain Man and I will be making our way back to Texas and he'll be staying for good!! 18 hours in a truck pulling a UHAUL... if that's not quality time, than I don't know what is.


Although the addition of the banana was definitely a good choice, the flavor was a bit overpowering. I kind of wish the bread was a little more avocado-y... next time I'm going to let the avocado fly solo. SO I'll totally understand if you want to substitute the banana with another small avocado.


Banana Avocado Bread
Oven: 350 Bake time: 45 minutes
Yields 1 loaf
Adapted from a recipe found at allsands.com


1 cup white whole wheat flour
1 cup all purpose flour
1 tsp baking powder
1/2 tsp baking soda
1/4 tsp salt
3/4 cup turbinado sugar (or regular sugar)
1/4 cup oil
1/2 cup buttermilk
1 egg
1 small ripe avocado, mashed
1 ripe banana, mashed


Preheat oven to 350.
Whisk flours, baking soda, baking powder and salt in large bowl.
Mash avocado and banana in a food processor or by hand if you don't have a food processor.
In a medium bowl mix egg, oil, buttermilk and sugar until combined. Add avocado/banana and mix until incorporated.
Add avocado mixture to flour mixture and mix until blended.
Pour into prepared loaf pan.
Place in oven and bake for 45 minutes or when top is browned and firm to touch. Test for doneness with a toothpick and bake longer if necessary.
Remove from oven and place on cooling rack.
The next time you hear from me I'll be a whole lot tanner and a whole lot happier with my MM by my side :)


Happy Baking! 
Monday, May 3, 2010

Chocolate Chip Cookie Dough Cupcakes for Brad

My friend Brad LOVES chocolate chip cookies.. I mean he really loves them...the other night after dinner I basically watched him chain eat cookies along side of his mint chocolate chip ice cream..did I mention the ice cream alone was about 6 cups worth of the stuff?! It was awesome. So when I realized that his birthday was coming up I knew exactly what kind of cupcake I was going to make for him... Chocolate Chip Cookie Dough Cupcakes. 


As nerdy as it sounds, I get a huge buzz out of creating something for someone based on the things they like. I look forward to getting to know someone's taste buds, finding out what they just can't get enough of, what they can't resist and most importantly what is going to make them happy.

So here's to you Brad, lover of everything chocolate chip, HAPPY BIRTHDAY! :)

Word of warning, these cupcakes take a good amount of time because the cookie dough used has to be completely frozen. I suggest making the dough a day or two ahead of time so you don't have to worry about it. I would also like to suggest purchasing Alton Brown's book if you're at all interested in baking and the science behind it all- again, I'm a nerd and totally enjoy that kinda thing.


Chocolate Chip Cookies (dough)
recipe by Alton Brown- I'm Just here for More Food
Chocolate Chip Cookie #10
Yields 3 dozen cookies (I made half the recipe)

2 1/4 cup AP flour
1 tsp baking soda
1 tsp salt
3/4 cup sugar
3/4 cup brown sugar
1 cup (2 sticks) unsalted butter, melted and slightly cooled
2 large egg yolks, beaten
1 tsp vanilla extract
2 cups chocolate chips (I used mini)

Whisk flour, baking soda, and salt.
In separate bowl, mix sugars, butter, yolks and vanilla.
Add wet ingredients to dry ingredients and mix until combined.
Add chocolate chip and mix until incorporated/distributed.
Using a teaspoon, scoop cookie dough into small balls. Place in a zip-lock bag or airtight container that can go in the freezer. Freeze until solid.

*I had cookie dough left over after filling the cupcakes so I baked the rest for a little cupcake accessory. If you want to do the same, preheat oven to 375 and bake for 15 minutes. Let cookies cool for 2 minutes and then transfer to cooling rack to continue cooling.

Brown Sugar Cupcakes
Recipe from Cupcake Bakeshop
Oven: 350 Bake Time: 20 minutes
Makes 12 cupcakes

3/4 cup (1 1/2 sticks) unsalted butter, softened
3/4 cup light brown sugar
2 eggs
1 1/3 cup all purpose flour
1 tsp baking powder
1/4 tsp salt
1/2 cup milk
1 tsp vanilla 

Preheat oven to 350. 
Whisk flour, baking powder and salt.
Beat butter until smooth and add sugar beating until light and fluffy.
Add eggs one at a time, beating until combined each time.
Mix in flour mixture, alternating with milk and vanilla, beginning and ending with flour.
Using an ice cream scoop, scoop batter into prepared cupcake pan.
Get cookie dough balls out of the fridge and place in cupcake, pushing down into center of batter.
Bake for 20 minutes.
When checking to see if done, make sure not to put your toothpick in the middle or you'll get cookie dough.
Transfer to cooling rack.
Frost with chocolate buttercream, chocolate swiss meringue or chocolate ganache

HAPPY BIRTHDAY BRAD!!