Thursday, March 31, 2011

Banana Crumb Muffins

It's finally getting warm here in Texas.

Spring time is in our midst, although you would never know that on the east coast.. I can't believe they are still getting snow!

With the flowers starting to bloom and the sun staying out a few extra hours, we can start looking forward to all that spring entails...more sun, allergies, flowers, a little rain, and cookouts.

But one of the best parts about the changing of seasons, other than the weather, is the new ingredients it brings along. If you're a foodie then you understand; I can't wait to start working with all the warm weather fruits and vegetables.

One fruit that never really goes out of season though is the oh-so-delicious banana. So while we wait out the last few freezes and Mother Nature actually allows Spring to take off, we can still enjoy these banana muffins.


Banana Crumb Muffins
Recipe from The Sono Baking Company Cookbook
Oven: 375 Bake time: 20 minutes
Makes 12 muffins or 6 large muffins

2 cups AP flour
1 tsp baking powder
1 tsp baking soda
1 stick unsalted butter, softened
1 cup sugar
1 1/2 tsp salt
2 eggs, at room temperature
2 tsp vanilla
2-3 very ripe bananas, mashed
1/2 cup vanilla yogurt

Crumb
from the wonderful Lindsey at Gingerbread Bagels
1/2 cup butter, melted
1 1/3 cup AP flour
1/4 cup sugar
1/3 cup light brown sugar
1 1/2 tsp cinnamon
1/8 tsp nutmeg

Preheat oven to 375 and spray muffin tin with cooking spray.
Make crumb by mixing all ingredients together and set aside.
In a medium bowl, whisk together flour, baking powder, baking soda and salt.
In another bowl, beat sugar, butter, and vanilla until light and fluffy.
Add eggs one at a time, beating after each addition, then add bananas.
Slowly add dry ingredients to banana mixture, mixing until incorporated.
Use an ice cream scoop and divide batter evenly among muffin tin (1 scoop for regular sized muffins and 2 scoops for large muffins).
Sprinkle crumb over each muffin.
Bake in oven for 18-22 minutes or until toothpick comes out clean.
Allow to cool in pan for about 10-15 minutes before removing.


Happy Baking! 

Sunday, March 27, 2011

Chocolate & Meringue Coffee Cake


After spending the week in Philly for business, I took the train early Friday morning back home to spend some much needed quality time with my girlfriends.

Few people can say they still have close relationships with their friends from high school, but I’m lucky enough to not only have a fabulous group of girlfriends from my glory days, but a wonderful group of girls from college as well.

Because of this, time spent at home can be stressful at times, as I try to make sure to see as many as possible when the trips are few and far between.

This weekend however, as short as it was, was perfect.

Friday I spent the evening preparing dinner and chatting the night away with my girlfriends from high school, while Saturday would be dedicated to my ladies from college.

I woke up early Saturday morning anticipating that with the arrival of the girls, something sweet would be necessary.

I knew exactly what would be made…


The March 2011 Daring Baker’s Challenge was hosted by Ria of Ria’s Collection and Jamie of Life’s a Feast. Ria and Jamie challenged The Daring Bakers to bake a yeasted Meringue Coffee Cake.

Chocolate & Meringue Coffee Cake
Ria’s original recipe yielded 2 cakes, but this is the recipe for 1.

Yeast cake:
 2 cups flour, plus a little more for kneading
3 TBS sugar
¼ tsp salt
½ package active dried yeast
6 TBS milk
3 TBS water
¼ cup butter
1 egg, room temperature

Meringue:
2 large egg whites
¼ tsp salt
½ tsp vanilla
¼ cup sugar

Filling:
1/2 cup semi-sweet chocolate chips
2 TBS sugar
1 tsp cinnamon

Preparing the dough
In a large bowl, mix 1/2 cup flour, sugar, salt and yeast.
In a saucepan, combine milk, butter, and water and heat over medium heat until warm and butter has completely melted.
With an electric mixer, gradually add warm liquid to flour/yeast mixture, beating until blended. Increase mixer speed and add egg and 1/2 cup flour, beating for about 2 minutes.
Using a wooden spoon, stir remaining flour to make a dough that holds together- you may end up using more than 2 cups. 
Turn dough out onto floured surface and knead dough for about 8-10 minutes until dough is soft, smooth and elastic, adding as much flour as needed.
Place dough in lightly greases bowl, turning to coat all sides. Cover bowl with saran wrap and place in empty oven with light on to double in size (about 45-60 minutes).

After an hour, make meringue
In a large mixing bowl, beat egg whites and salt until frothy. Increase speed to high and continue to beat until foamy and opaque. Add vanilla and sugar, one tablespoon at a time as you beat, until very stiff, glossy peaks form.

Assembling the coffee cake
Turn dough out on lightly floured surface. Beat down and roll out dough into a 20x10 inch rectangle. Spread meringue evenly over top the rolled out dough and sprinkle cinnamon, sugar and chocolate evenly over meringue. 

Roll up dough, jellyroll or cinnamon roll style, starting on long side forming a log. 
Very carefully transfer filled log onto baking sheet or pizza stone and bring ends of log around, sealing ends together, forming a ring, tucking one end into the other and pinching to seal.
Using kitchen scissors, make cuts on the outside edge at about 1 or 2 inch intervals.

Cover coffee cake with plastic wrap and return to empty oven to allow to rise again for 45-60 minutes.

Preheat oven to 350. Brush tops of coffee cake with egg wash and bake for 25-30 minutes until risen and golden brown. The dough should sound hollow when tapped.


When I originally read this recipe I was intrigued as to how the meringue would fit with a coffee cake, but I must say, this is one of the most delicious breakfast treats I’ve made to date. Light, fluffy, and perfectly sweet this yeasty cake was a great companion to a morning cup of coffee.

Happy Baking!


Thursday, March 24, 2011

Chocolate Peanut Butter Pie


Warning: This pie is for chocolate and peanut butter lovers only. I repeat, if you do not like the oh-so-chocolately-peanut buttery flavor this pie is not for you. 

Still here?

Good.


Even for peanut butter lovers, this is a very rich, very decadent pie, absolutely not for the faint of heart. But if you love peanut butter as much as I do, then you'll absolutely enjoy a slice, even if it is a small one.

We start with a chocolate cookie and peanut crust...


topped with a layer of peanut butter filling...


 and finished off with chocolate whipped cream.


Wonderful, right?

All I have for you here is pictures though... If you want the recipe you're going to have to head on over to Little Bitty Bakes where this pie is featured in Liz's Chocolate Chip Thursday. I do hope you'll drop by.. Liz has a great little site full of some delicious treats and I was so excited to participate in her monthly guest post spot!


What are you waiting for?? Go eat pie!
Happy Baking!

Monday, March 21, 2011

Apple Turnovers for Breakfast

I have a secret.

I have a secret that I'm just dying to tell people, but I can't!

Slightly jaded from the countless hours of 'Say Yes to the Dress,' I was waiting for tears to pour down my face when I turned to look in the mirror while wearing the one.. but it didn't happen.

Despite my lack of tears, I still knew..the last dress of the afternoon, my heart started pounding and I could actually see myself dancing the night away in my fabulous gown...and I knew.

Much to the dismay of some close friends, after a little deliberation with my dress shopping companions, we decided it would be fun to keep the dress a secret.

Do you know how difficult this is going to be!?

It was so exciting to find the one the second day trying on dresses, but when friends ask I tell them they have to wait... just like Mountain Man.

But on the inside, I want to shout it from the rooftops...not to mention dance around for hours in it... I didn't even want to take it off to purchase it.

Something I won't keep a secret though are these Apple Turnovers....light and flaky, perfect for a lazy Sunday or a Spring brunch.


Quick Puff Pastry
adapted from Annie's Eats
Oven: 357 Bake time: 30-35 minutes
Makes 8 turnovers

1 1/2 cups AP flour
1 TBS sugar
3/4 tsp salt
3/4 cup unsalted cold butter, cut in cubes
1/4 cup plus 1 TBS ice water

Apple-Cinnamon Filling
2 medium sized apples (I used Gala)
2 TBS brown sugar
1 TBS sugar
1 tsp cinnamon
1 TBS flour
1 TBS butter

In a food processor, add flour, sugar and salt and pulse to combine.
Slowly add butter, a few cubes at a time and pulse until incorporated- butter should be about pea sized.
Transfer mixture to bowl.
Add ice water to mixture and using your hands, mix until dough begins to clump together. At this point, turn mixture out onto a lightly floured surface- the dough will still be crumbly.
Using your hands, knead the dough until it all starts to come together. (Annie does a fabulous job demonstrating this, so I'll leave you to the expert if you need a photo tutorial.)

Once the dough comes together, press into an 6x3 inch rectangle, wrap with saran wrap and refrigerate for an hour.
Place dough on lightly floured surface and roll out into about an 10x6 inch rectangle.
Fold the dough length wise in thirds (again, Annie has a great tutorial) then starting from smaller end, roll up dough like a cinnamon roll.
Press it back down into about a 6x3 rectangle.
Repeat process of rolling out and folding one more time and once you've rolled your dough up for the second time, press into 6x3 rectangle again, wrap and place back in the fridge for about an hour.

While dough is chilling, you can begin to make your filling.

Peel and core both apples.
Thinly slice apples and place in medium sized bowl.
Combine sugars, cinnamon, flour and apple slices- lightly tossing to coat.
In a large skillet, melt 1 TBS butter over medium heat.
Add cinnamon sugar apples and cook until apples are tender- about 5 minutes.


Remove from heat and set aside to cool.

Roll out into a large rectangle about 1/8 inch think- about 12x8 inches.


Using a pizza cutter, cut dough into 6 equal sized squares- about 4x4 inches (you may have to stretch them a little individually).


Place squares on parchment paper lined baking sheet.
Add a heaping spoonful of cooled apple mixture to center of each pastry square.
Lightly moisten edges of pastry and fold corner to corner.
Use a fork to crimp edges.


Repeat on each turnover.
Place back in fridge for about 15 minutes before baking.
Preheat oven to 375.
Bake for 30-35 minutes or lightly browned.


Happy Baking!
and
Happy First Day of Spring!


Wednesday, March 16, 2011

Leprechaun Treats

One thing's for sure, St. Patrick will not go un-celebrated by us this year.

This past weekend we went up to Dallas to celebrate good ole St. Patrick in all his glory: a sea of green on Dallas' Greenville Street (somewhat like Savannah's River Street festivities) complete with green beer.


Tomorrow's celebration will be a little more subdued: lunch at the office complete with corned beef and cabbage and rye bread and these Leprechaun Treats...


And Friday we're having a little BBQ at the house in the Irishman's honor and to christen our new (green) smoker...


St. Patty is getting more love than Santa this year!

You don't even have to be Irish to appreciate this sweet and salty twist on an American classic.

These little Leprechaun Treats are sure to be eaten up amongst all the mischief that St. Patty's Day brings; not to mention, they're incredibly easy to whip up.


Leprechaun Treats
swEEts original
Fills a 9x13 baking pan

3 cups Rice Krispies Cereal
1 1/2 cups pretzel sticks (slightly crushed)
1 cup corn or rice chex
1 cup green m&ms
1 bag mini marshmallows
1/4 cup peanut butter
2 TBS butter, melted
3-4 drops of green food coloring

Spray a 9x13 baking pan with cooking spray and set aside.
In a large bowl, mix cereals, pretzels and m&ms.
In a large microwave safe bowl, heat marshmallows and butter for 2 minutes.
Stir in peanut butter and green food coloring until smooth.
Pour over dry ingredients and with a buttered spatula mix until combined.
Press mixture into prepared baking pan using a buttered or sprayed spatula.
Cool and cut into squares.

Looking for something else to make this shamrock shaking holiday?
How about some Guinness Bailey's Swirl Brownies?
Or perhaps Guinness Cake with Bailey's Buttercream?
And you can never go wrong with Irish Soda Bread.

*Please note that the above recipes were in the very beginning of my blogging so feel free to poke fun at the lack of photography skills.. the recipes are still delicious though I promise!

Monday, March 14, 2011

Quick & Easy Whole Wheat Cinnamon Rolls


We were running late.

It was my turn to do breakfast for the weekend and we still needed to eat and make it to church by 930...it was 8am.

When I say these cinnamon rolls are quick AND easy, I'm not lying...

and they're whole wheat?? You're welcome.

They probably took me all of 15 minutes to prep, popped em in the oven for 25 and we were sitting pretty scarfing down cinnamon rolls by 850am just in time for church.

It's Monday and that means there's lots to do so I'll be keeping this post short and sweet.. just like these fabulous cinnamon treats! :)


Whole Wheat Cinnamon Rolls
Adapted from Brunch: The Perfect Weekend Treat
Oven: 350 Bake time:30-35 minutes
Makes 8 rolls


Dough:
2 1/2 cups whole wheat flour
pinch of salt
2 1/2 tsp baking powder
1 tsp cinnamon
3 1/2 oz butter, melted
2 egg yolks
3/4 cup milk

Filling:
1 tsp cinnamon
1/4 cup brown sugar
2 TBS sugar
1 TBS butter, melted

Icing:
1 cup powdered sugar
2-3 TBS milk

Preheat oven to 350. Grease an 8-inch cake pan and line with parchment paper.
Mix flour, slat, sugar, and cinnamon in a bowl.
Whisk egg yolks, butter and milk together and combine with dry ingredients, mixing until a soft dough is made.
Turn dough out on a lightly floured surface and roll into a rectangle 12x10 inches.
Make filling by mixing all ingredients together.
Spread evenly over dough and roll up, jelly roll style, to form a log.
Using a sharp knife, cut dough into 8 even slices and place in prepared pan.
Brush with TBS of milk.
Transfer to oven and bake for 30-35 minutes or until golden brown.
As rolls are cooling slight, make icing by stirring milk, one tablespoon at a time, into powdered sugar until glaze consistency is reached (add more milk if necessary). Drizzle over cooling cinnamon rolls.
Devour.

Happy Baking!

Thursday, March 10, 2011

Homemade Funfetti Cupcakes and Fudge


Do you ever feel like you need a little more fun in your life?

Sometimes while stalking browsing facebook, I get to some pages and think, "Man, they look like they are having so much fun!"

Then I start wondering about what they do, how do they manage to have so much fun all the time? where do they work? how do they get all that vacation time? can I get a job there? do they go to work every Monday morning exhausted? how do they save any money? Why does it seem like they're having so much more fun than me?

Do you ever wonder if people are looking at your life and asking those questions?

Now don't get me wrong.. I have fun. It's true..ask my friends..I'm generally a fun person.

 Does this look like the face of someone NOT having fun?

Every now and again I get stuck in a rut though (that's normal right?)...stuck in the day to day routine of work and don't get enough play and just feel like I need a little more fun in my life.

When it comes to baking, nothing says fun like funfetti cake.. I mean, it's in the name for goodness sake.

Of course, now that I have a blog, I feel like I'll be judged for using a boxed cake so when I found this recipe on ReFresh for Homemade Funfetti Cupcakes I just had to try them out...sadly Kori stopped posting and her site no longer exists, but luckily I got this recipe before she took it down.


Homemade Funfetti Cupcakes
Recipe from ReFresh
Oven: 350 Bake time: 15-20 minutes
Makes 12 cupcakes

1 1/4 cup AP flour
1 1/2 tsp baking powder
1/4 tsp salt
3/4 cup sugar
6 TBS butter, softened
2 eggs
1 tsp vanilla
1/2 cup whole milk
3-4 TBS rainbow sprinkles

Preheat oven to 350 and line cupcake pan with liners.
In a large bowl, sift flour, baking powder and salt.
In large bowl, beat sugar and butter until light and fluffy.
Add eggs one at a time, beating well after each addition. Stir in vanilla.
Gradually add flour mixture, alternating with milk, beginning and ending with flour.
Fold in sprinkles.
Using an ice cream scoop, fill each cupcake liner with one heaping scoop.
Transfer to oven and bake for 15-20 minutes or until toothpick comes out clean.
All to cool slightly before removing from pan.
Frost with your favorite buttercream.

But we're not done having fun yet!!

Funfetti Fudge anyone?

Liz is a genius..if you haven't stopped by her blog Little Bitty Bakes you just have to go see what she's up to.. and I can't wait for the guest post I'm doing for her later this month!


Funfetti Fudge
recipe from Liz with a few alterations
Fills an 8x8 pan

1 can condensed milk
2 cups white chocolate chips
1/4 plus 1 TBS funfetti cake mix (yes, I had a box of cake mix when i made the homemade ones)
sprinkles

Line baking pan with parchment paper. Sprinkle bottom of pan with powdered sugar and set aside.
In a small sauce pan, stir chocolate chips and condensed milk over low heat until smooth.
Stir in cake mix, some extra sprinkles and spread into pan.
Place pan in fridge and allow to cool for about an hour.
Once fudge has chilled, use a small spoon or mini ice cream scoop and form into little balls and return to fridge for about 30 minutes.

Do you ever feel like you need a little more fun in your life?
Happy Baking!

Monday, March 7, 2011

Fresh Mango Curd


A few months ago Mountain Man was returning home from a trip and happened to be sitting next to a girl that lived not too far from us. As they got to talking, she told him about how she was getting married this summer and they were trying to be as local as possible when it came to vendors.

Being the amazing fiance that is he, MM used the opportunity for a shameless plug and gave the young lady my site address.

A couple days after the trip I went to check my email and there it was- Subject: "Wedding cake baker needed".. Oh my goodness, I thought to myself.. it worked!

Although Diana's wedding isn't until May, we began the cake conversation and she told me about a delicious orange cake she had with mango filling and an amaretto frosting.

Being a little new to these flavors, we decided a tasting was in order, enter: Mango Curd.

Lucky for me, Deb of Smitten Kitchen made a mango curd for a wedding cake she did, so I knew it was going to be good.

I'm only sharing the mango curd for now, but I promise a full wedding cake post come May.

Mango Curd
Recipe from Smitten Kitchen
Makes 1-2 cups of curd

1 large mango or 2 smaller mangoes, peeled, pitted and cut into small cubes
1/3-1/2 cup sugar (depending on how tart(1/3) or sweet (1/2) you want it)
3 TBS fresh lime juice
4 large egg yolks
1/4 cup butter, cut into small cubes

Puree mango, sugar, lime juice and salt in a food processor.
Add yolks and pulse to combine.
If lumpy, strain through sieve or transfer too large metal bowl.
Set metal bowl over saucepan of simmering water and whisk puree until thickened and thermometer reads 170 degrees, about 10 minutes.
Remove from heat.
Whisk in butter, 1 piece.
Cover and refrigerate overnight.

Happy Baking!

Oh and the wedding dress shopping was a complete success :)

Wednesday, March 2, 2011

Hello Kitty Birthday Cake and Cupcakes


I got to give out my first business card!

About a month or so ago MM brought over a guy that he worked with who was in need of a cake- his daughter was turning 5 and was having a Hello Kitty themed birthday. Of course, (as all men should know) he knew his wife needed the final say, so a few quick words, a handshake and a business card later he said his wife would be getting in touch.

A few weeks later a couple of emails were shared, a phone call was made and the order was placed- a Hello Kitty themed cake and two dozen Hello Kitty cupcakes.


Remember the Animal Birthday cake I made for Lucas? Well that cake and this one were being delivered the same day, not 30 minutes apart, which meant lots of time management when it came to all the decorations.

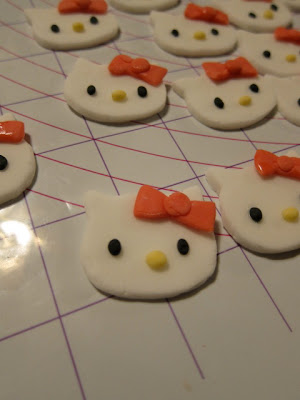
About the same time that I started working on all the animals, I also started working on these little Hello Kitty heads.


 I searched high and low for a character cookie cutter, but since no such luck was to be had,  I had to resort to individually hand cutting fondant into heads, eyes, noses and bows... talk about time consuming.. as our friend that's staying with us watched me, she likened it to an assembly line of Hello Kitty's.


The cake was my favorite  White Cake with Vanilla Buttercream and the cupcakes were Dark Chocolate Cake also with Vanilla Buttercream.


I was so happy with the final product, but more importantly the birthday girl, Haley was happy too!


As for me.. I'm headed east for dress shopping tomorrow!!
I hope you all have a lovely rest of the week and weekend too :) Wish me luck!
Happy Baking!!