Wednesday, August 25, 2010

Cantaloupe Sorbet


We're going to start this post with joke for all you gardeners (mom this is for you!) and fruit lovers out there.. 

Why do melons have fancy weddings?.....  Because they cantaloupe! 

Wheew.. I don't know why I spend so much time baking when I should obviously be a comedian! ;)

But on a more serious note.. this Cantaloupe Sorbet is the real deal. 

When we were kids back to school time meant the end of summer- the end of fun in the sun. When you're in the real world however, there is no summer.. no days off to spend lounging at the pool, no long vacations, and there is certainly no break in responsibilities... No siree... when we find ourselves in the working world summer time just means hot weather and crowds and back to school time means great sales at the mall and tax-free time in Texas.

But one thing about the summer that never changes no matter how old you are? The abundance of ice cream, sorbets and sherbets. Mountain Man loves him some of these chilled desserts and although we don't use it as often as we should, the ice cream maker has definitely come in handy a time or to this past summer.

The other day we realized the cantaloupe we had just recently purchased was way past its prime. A little too smooshy (that's scientific term) for my liking, I suggested MM give it a go in the ice cream maker- sorbet style. What resulted was a fabulously refreshing dessert.. perfect for the remaining warm summer nights...and in Texas summer doesn't end until about October, so we're still good.


Cantaloupe Sorbet

1 cantaloupe, skin removed and cut into chunks
2/3 cup sugar
1/2 cup corn syrup
6 TBS fresh lemon juice (about 2 lemons)

Add all ingredients to a food processor and puree.
Place pureed fruit in fridge over night.
Pour into ice cream maker and get that bowl spinning!

I'll leave you with just one more...

Cantaloupe? Then cohabitate :) 

Thank you, thank you.. I'll be here all week!


Monday, August 23, 2010

Cupcake Smackdown 2.0 Austin


When I found out about the Cupcake Smackdown 2.0 in downtown Austin I knew attendance was a must. How could a passionate baker, cupcake lover and blogging enthusiast not? Admission was free, although donations benefiting Lights, Camera, Help,  Mobile Loaves and Fishes, and Keep Austin Dog Friendly were suggested. The days line up had great promise: there were a couple opportunities to participate in the breaking of Guinness World Records, some awesome local bakeries to try out, a cupcake pinata and a cupcake cannon!

Not only did I get to taste some awesome cupcakes, but I also had the opportunity to write up a report of the days events for Cupcakes Take the Cake- a great blog about everything cupcakes! I didn't have a chance to do much baking this weekend due to some good quality time on Lake Austin so recipes will be coming later this week, but in the mean time head on over and keep reading about the Cupcake Smackdown!

Happy Monday and Happy Baking!!

Saturday, August 21, 2010

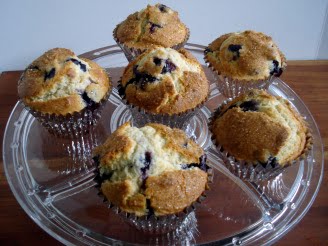
Blueberry Muffins

Nothing beats the smell of warm blueberry muffins baking in the oven...

The other day as I was browsing the blog world I stumbled upon Tia at Buttercream Barbie (super cute site that you should totally check out) where some blueberry muffins caught my eye. The recipe was from Marcy Goldman's book,  A Passion for Baking, which is pretty much my go-to baking book, so I knew they had to be good. (Oh and if you don't have the book, I highly suggest you go to Amazon right now and buy it...right now!)

This weekend MM's brother is visiting and he loves muffins, so I knew these little guys would be the perfect beginning of a jam (no pun intended, but I am making jam this weekend for Steph Chows 2nd Annual Jam Exchange!) packed weekend.

Oh and before I post this fabulous recipe.. don't forget to go over to The Sweetest Kitchen and vote for my cupcake in the Mystery Box Challenge- you have 5 days!! The competition looks great.. but let's be honest folks, those Brown Sugar Cinnamon Cupcakes are pretty much the best :)

But on to the star of the show this morning: Marcy Goldman's Blueberries and Cream Mall Muffins. I halved the recipe, since there are only 3 of us, so I'll be posting the original recipe and altered.


Blueberries and Cream Mall Muffins
Yields 12 large muffins or 24 regular
*I halved the recipe and got 6 large muffins and 3 regular sized

2 1/4 cups sugar (1 cup)
1/2 cup veggie oil (1/4 cup)
1/2 cup butter, melted (1/4 cup)
4 large eggs (2 egg)
1 TBS vanilla (1/2 TBS)
5 cups, approximately, AP flour (2 1/2 cups)
1 TBS baking powder (1/2 TBS)
1/4 tsp baking soda (1/4 tsp)
1/2 tsp salt (1/4 tsp)
1 cup buttermilk (1/2 cup)
1/2 cup sour cream (1/4 cup)
2 cups semi frozen blueberries (1 cup blueberries)
 sugar for dusting

Preheat oven to 425 and line large muffin tin or standard muffin tin with paper liners. Place fresh blueberries in freezer.
In a large bowl, blend sugar with oil and melted butter. Whisk in eggs and vanilla. Fold in flour, baking powder, baking soda, and salt. Slightly incorporate before adding buttermilk and sour cream and blending completely.
Get berries out of freezer and gently fold berries, trying not to break them apart.
Using an ice cream scoop, fill muffin cups with good amount of batter (almost full).
Dust tops of muffins with sugar.
Bake in oven for 15 minutes at 425 and then reduce temperature to 350 for another 12-15 minutes. The muffins tops should be golden brown and spring back when pressed.
Let cool for 5 minutes before removing from pan.

Have a great weekend everyone!
As for us? We're off to the Cupcake Smackdown 2.0 in Austin!

Thursday, August 19, 2010

'Choco-Nana-Nutter' Vanilla Pudding Pie

I got a little crazy with the chocolate syrup..
Yes, I just made up a word.. 'Choco-Nana-Nutter.'

Choco-Nana-Nutter (n): chocolate, banana and peanut butter (aka the best combination ever)

A few days ago one of my friends sent me a message to tell me about the Chocolate Pudding Pie she made to prove to her mom that she can cook.. if someone walked into my office while reading this little message they probably would have thought I was crazy, as I was smiling from ear to ear.

Why you ask? Because I love the feeling of being associated with sweets and desserts and cooking/baking adventures.

It makes me so happy to get calls and messages from friends regarding stories in the kitchen or baking questions.. just the other day MM's mom called me about zucchini bread..I like being the person people can turn to when they have questions like that...it makes me feel special, like I know something.

But back to the pudding pie! Although Darcy's intention was just to tell me a silly little story, she inspired me- I immediately started to think about making my own pudding pie when I got home from work.

Much to my dismay, chocolate pudding was no where to be found in my very full cupboards, but I did find a vanilla mix. Plain vanilla? that just wouldn't do.. I needed something more exciting than that.

I quickly got to making a graham cracker crust while the cranks kept turning for the perfect combination of ingredients for my pudding pie.. with chocolate on the mind I knew it had to be in there somewhere, but still I longed for more. I opened the cupboard and stared for a bit then moved onto the kitchen counter. The rest...was history.

Chocolate? check.
Bananas? check.
Peanut Butter? check.

'Choco-nana-nutter' Vanilla Pudding Pie
swEEts original


1 graham cracker crust (recipe below)
1 package of instant vanilla pudding
1 3/4 cup whole milk
1 cup semi-sweet chocolate chips
1/4 cup peanut butter
1 banana, sliced
chocolate syrup (optional)

Prepare graham cracker crust (can also be made a couple days in advance).
Prepare vanilla pudding according to package (using pie directions with less milk) and place in fridge to set and thicken.
Once your crust is cool and you pudding is set, it's time to make the chocolate layer.
Place chocolate chips and peanut butter in a small bowl and microwave for about 1 1/2 minutes, stopping to stir every 30 seconds, until chocolate is melted and mixture is smooth.
Pour chocolate-peanut butter mixture into pie crust and using a spatula, spread along crust.
Place banana slices on top of chocolate-peanut butter layer.
Finally, spoon in the pudding, using a spatula to smooth the top.
Garnish with extra slices of banana and chocolate syrup (optional).

Graham Crack Crust
Oven: 350 Bake Time: 20 minutes

1 sleeve graham crackers, crushed
1/4 cup sugar
1/3 cup butter, melted

In a bowl, combine crushed graham crackers, sugar and melted butter and mix until crackers start to stick together.
Press into lightly Pam coated pie pan.
Transfer to oven and bake for 20 minutes.
Allow to cool for at least 30 minutes before adding filling (I placed mine in the fridge)


As I whipped all of this together shortly after I got home from work,  MM was a little skeptical of the banana addition, but in one bite he just looked at me, mouth full, with that look.."awesome" was all I could make out as he munched on his piece of pie.

If you're looking for a quick dessert look no further..

Happy Baking!  

Tuesday, August 17, 2010

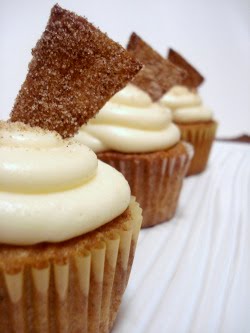
Brown Sugar Cinnamon Cupcakes with White Chocolate Cream Cheese Frosting


phhheeewww...now you can breath!

Sorry for the long cupcake title, but it just didn't feel right to leave anything out..

While in correspondence with Lisa from The Lunch Box Project, she informed me of Jamieanne of The Sweetest Kitchen and her Mystery Box Cupcake Challenge.  I immediately made my way to her site and boy am I glad I did!

Every month Jamieanne hosts The Mystery Box Cupcake Challenge, where she introduces a mystery ingredient on the 1st of the month to be used in a cupcake competition. Contestants have 20 days to come up with a delicious cupcake using the mystery ingredient and the next day Jamieanne presents all the cupcakes entered for voting ...aka you need to go there on the 21st and vote for my cupcake!! And don't worry I'll remind you :)

This months mystery ingredient was White Chocolate.

So I present to you.. this month's top choice (in my opinion) for The Mystery Box Cupcake Challenge..

Brown Sugar Cinnamon Cupcakes 
with White Chocolate Cream Cheese Frosting

Brown Sugar Cinnamon Cupcakes
Oven: 325 Bake time: 20 minutes
swEEts original 
Yields 20 cupcakes

3/4 cup butter, softened
3/4 cup brown sugar
1/2 cup white sugar
3 eggs
1 1/2 cup AP flour
1 1/2 tsp baking powder
1/2 tsp salt
2 tsp cinnamon
1/2 cup buttermilk
1 tsp vanilla extract

Preheat oven to 325. Line pan with cupcake liners and set aside.
In a large bowl cream butter and sugars until fluffy.
Add eggs one at a time, beating after each addition.
In a small bowl, whisk flour, baking powder, salt and cinnamon.
Add vanilla extract to buttermilk.
Mix dry ingredients into butter/sugar mixture, alternating with buttermilk, beginning and ending with flour mixture.
Using an ice cream scoop, fill each cupcake liner with one scoop of batter.
Transfer to oven and bake for 20 minutes or until cupcakes bounce back to touch or toothpick comes out clean.
Immediately turn out onto table and place on cooling rack for at least 30 minutes before frosting.

White Chocolate Cream Cheese Frosting
1 8oz package of cream cheese
1/2 cup (1 stick) butter, softened
4 cups powdered sugar
1/4 cup whipping cream
1 tsp vanilla extract
1 cup white chocolate, melted
1 TBS crisco

In a large bowl, cream butter and cream cheese until smooth and creamy.
Slowly add sugar, whipping cream and vanilla extract- beating until smooth and creamy consistency is reached.
Melt white chocolate and crisco using a double boiler or in the microwave* make sure to watch your white chocolate as it is much more finicky than its darker counterpart. If microwaving stop to check on it every 30 seconds or so and if using a double boiler constantly stir until crisco melts in.
Allow white chocolate to cool slightly before adding it to icing mixture.
Add melted white chocolate to frosting mixture and beat on high for a few minutes.
Place frosting in fridge for a few minutes before using.
Use piping bag to frost cupcakes.

For garnish:
Cook one tortilla cut into small triangles in skillet over medium heat (with 2 TBS oil).
Make cinnamon-sugar mixture and place in small bowl.
Place cooked tortilla triangles in cinnamon-sugar mixture and mix to coat.


Don't forget to vote for me on the 21st!
Happy Baking!  

The winner of August’s Mystery Box Cupcake Challenge will receive prizes from:

Thank you to all our prize sponsors!

Sunday, August 15, 2010

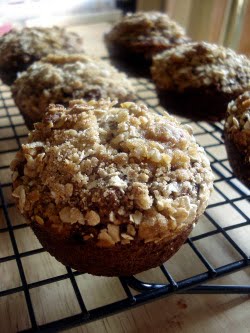
Good Morning Muffins


I realized I hadn't made muffins for breakfast in a good while so I knew it was time... And what a perfect way to spend the morning after a night full of karaoke (MM and our friend Dan sang 'A Whole New World'- yes, the Disney song- hilarious)

I honestly look forward to the weekend not just for the enjoyment of getting to spend it with my Mountain Man, getting to sleep in, and pool it up, but to bake... especially in the morning.

Since my body hates me and thinks its funny to still wake me up before 8am on the weekends, I usually use this as prime time to get going in the kitchen for breakfast baked goods.

I recently bought a package of flax seed meal (super health food and egg substitute.. who knew?!) and noticed a recipe on the back for muffins...obviously this meant that I had to give them a go with a few minor alterations. I also halved the recipe since it was just me and MM, but still ended up with about 7 regular sized and two large muffins, even though the original recipe said it only yielded 15 (maybe they meant large muffins?). I'll write up the original, but also put the half version in parentheses.

A little bit on the healthier side, these muffins are sure to get any morning started right.

Good Morning Muffins
Recipe adapted from Bob's Red Mill "Bran Flax Muffins"
Yields about 15 muffins (or 10)
Oven: 375 Bake Time: 20 minutes

1 1/2 cup white whole wheat flour (3/4 cup)
3/4 cup crushed bran flakes or oat bran (1/4 cup + 2 TBS)
3/4 cup flax seed meal (1/4 cup + 2 TBS)
1/2 cup brown sugar (1/4 cup)
1/2 cup honey (1/4 cup)
2 tsp baking soda (1tsp)
1 tsp baking powder (1/2 tsp)
1/2 tsp salt (1/4 tsp)
2 tsp cinnamon (1 tsp)
2 apple, peeled and shredded (1 apple)
1 1/2 cup carrots, shredded (3/4 cup)
1/2 cup raisins (1/4 cup)
2 eggs, beaten (1 egg)
3/4 cup buttermilk (1/4 cup + 2 TBS)
1 tsp vanilla

Topping* optional
1/3 cup brown sugar
1/3 cup oats
2 TBS flour
3 TBS chilled butter

Add sugar, oats and flour to a small bowl and mix. Cut butter into small cubes and add to sugar mixture. Using two knives or a fork, cut in butter until distributed and incorporated into dry ingredients. (you're looking for a crumby looking mixture)

Preheat oven to 375. Spray muffin tin with cooking spray and set aside.
Combine all dry ingredients.
Shred apple and carrots (I used a cheese grater for the apple and food processor for carrots).
Add apple and carrots to dry ingredients and mix thoroughly.
Pour honey into mixture.
In a small bowl beat egg, milk and vanilla.
Pour egg/milk mixture into dry-carrot/apple mixture and mix until combined- you'll have a pretty chunky batter.
Fold in raisins.
Spoon batter into muffin tins, filling about 2/3 way up.
Sprinkle with topping *optional.
Transfer pan to oven and bake for 20 minutes.
Let cool in pan for about 10-15 minutes before removing for consumption.


Happy Baking!!

What did you have for breakfast this weekend??

Friday, August 13, 2010

Marble Rye Bread and The Lunch Box Project

Before I get started I wanted/need to share something I think is super cool...A few days ago I became Foodbuzz friends with Lisa Orgler.. Lisa is the designer and illustrator of The Lunch Box Project, an awesome site that started as a means to document her goal to paint an image of food every day for one year (she calls it snacking on food art- love it). She began painting her images on playing cards and coasters and after reaching her goal of a year she decided to continue her journey with different monthly themes. This month, she scoured the foodie blog world for inspiration from peer blogs and one of my posts was lucky enough to get chosen!

How cute!?

All of her paintings are up for grabs on her etsy site too! For a very reasonable price you can browse through her food art and find a print perfect for that little spot right above the kitchen sink. I'm not only going to purchase the art inspired by my food, but I have my eye on a few other paintings as well that are going to make their way into my kitchen! 

So what are you waiting for?? go check out Lisa at The Lunch Box Project! but first.. check out this Marble Rye Bread :)


For a few months now Mountain Man has been on a mission to make the perfect Marble Rye Bread (the first one he made was as hard as a rock). When one of our friends here, who is originally from Connecticut, told us that she can't find the bread anywhere in Central Texas, MM made it his personal mission to recreate her favorite bread.

Mountain Man's bread is usually pretty tasty, but this one (at least in my book) is the best one he's done yet.    I hope that when MM finds a full time job I won't have to stop coming home to fresh baked goodness.

For this edition of 'In the Kitchen with Mountain Man'...

Marble Rye Bread
Yields 2 loaves

Light Rye:
1 1/2 cup warm water (110 degrees)
1 TBS honey
2 TBS molasses
2 tsp yeast
3 TBS shortening
1 tsp salt
1 cup Rye flour
1/4 cup flax seed meal
1/4 cup oat flour
3 cups bread flour

Grease a large bowl with butter or crisco and set aside.
Mix water, yeast and sugars together and let stand for 8 minutes. 
Drop in shortening, salt, rye, oat, flax seed meal and stir with a wooden spoon.
Begin adding bread flour one cup at a time until dough begins to form into a ball.
Turn out on a floured surface and knead in remaining flour.

Knead for 7 minutes and 30 seconds. Put into greased bowl and let rest of 1 hour.

Dark Rye:
1 1/2 cup warm water
3 TBS honey
2 tsp yeast
3 TBS shortening
1 tsp salt
3 TBS cocoa powder
3 TBS water
1 cup Rye flour
1/4 cup flax seed meal
1/4 cup oat flour
3 cups bread flour

Grease a large bowl with butter or crisco and set aside.
Mix water, yeast and sugars together and let stand for 8 minutes.
Drop in shortening, salt, rye, oat, flax seed meal and stir with a wooden spoon.
In a small bowl, mix cocoa powder and water- add to dough mixture and mix until combined.

Begin adding bread flour one cup at a time until dough begins to form into a ball.
Turn out on a floured surface and knead in remaining flour.
Knead for 7 minutes and 30 seconds. Put into greased bowl and let rest of 1 hour.

On a floured surface cut each dough into quarters. Two of each color will be used in each loaf. Roll each quarter out to roughly 9x7  (bigger if you want tighter swirls, smaller if you want thicker swirls but always 9 inches (just roughly over the length of the bread pan).

Begin with the light rye on the bottom and alternated with dark, then light then dark. Roll all layers up together making sure the light rye covers the entire loaf. Pinch the joint together and turn the ends under and drop into greased loaf pan. Cover and let rise until it fills the loaf pan. Repeat with other 4 quarters for second loaf.

Brush with egg wash (1 egg, 1 TBS water) and sprinkle with caraway seeds just before baking in a 375 degree oven for 40 minutes. Allow to cool briefly before enjoying!

Happy Baking!


Wednesday, August 11, 2010

Babies, Birthdays and Cakes

No, I'm not having a baby, but my friend's co-worker is and guess who got asked to make her baby shower cake??

And no, it's not my birthday either, but a customer at The Sweet Factory definitely got a sweet birthday cake...done in record timing I might add.

The past couple of weeks was spent decorating a lot of cakes... Having a mentioned how much I love decorating cakes? Probably.. but just in case you forgot I thought I'd share with you a few decorating adventures that I've been a part of recently and the recipes they include.

Baby Shower Cake

The decorations on the cake were made to match the shower decorations that my friend Dixie had already bought for her friend.

Birthday Cake
The other afternoon a guy came in to The Sweet Factory for a birthday cake.. I took the order, made the cake that night right before I closed up shop and had an hour to decorate the cake when I got back to shop the next evening before he came to get it. I had to make the icing, filling, decorate and package the cake all in a little under an hour.. impressive right? I can say that now, but at the time I thought I was going to lose my mind..I finished it literally just as he was walking in the store to pick it up.. phheeew. Thank goodness he wanted something simple..no flowers, designs, nothing.. just three simple words. These pictures are from my phone (hence the quality) 

The final product.. nothing horribly intricate but in 45 minutes!?
The aftermath...
Deep breath followed by lots of cleaning.

Both of these cakes were Vanilla Butter Cake with Chocolate Buttercream.. weird.

Vanilla Butter Cake
Recipe from the Mermaid Bakery
Oven: 350 Bake time: 25-30 minutes
Makes 2 or 3 8inch cakes 

1 cup butter
2 cups sugar
4 eggs, at room temperature
2 3/4 cup AP flour
2 1/4 tsp baking powder
1/4 tsp salt
1 cup buttermilk
1 tsp vanilla extract

Preheat oven to 350. Prepare pans- grease and dust with flour- and I always line the bottom with parchment paper.
In a large bowl, cream butter and sugar until light and fluffy.
Add eggs one at a time, beating after every addition. Mix in vanilla.
Sift flour, baking powder and salt in a small bowl.
Alternate adding flour mixture and buttermilk to butter/sugar/egg mixture in two parts, beginning and ending with flour mixture.
Pour into prepared pans and bake for 25-30 minutes or until toothpick comes out clean and cake bounces back to touch.
Place on cooling rack for about 20 minutes before removing cakes from pan to continue cooling.

Once completely cooled, assemble layers (don't forget to level the tops of your cakes!) and frost with Chocolate Buttercream.

Chocolate Buttercream
1 cup butter
1 cup crisco
8 cups powdered sugar, sifted
1 tsp vanilla extract
1/4 cup heavy whipping cream
1/2 cup unsweetened cocoa powder
1 1/2 cup semi-sweet chocolate chips, melted 

In a large bowl, cream butter and crisco until smooth and combined.
Melt chocolate chips in the microwave for about 1 1/2 minutes or until smooth, stopping to stir every 30 seconds- set aside to cool.
In a separate bowl, sift cocoa powder and powder sugar- mixing together.
Add cocoa/sugar, heavy cream, and vanilla to butter/crisco and beat on low to medium-low until incorporated.
Slowly pour in cooled chocolate and beat on high for about 3-5 minutes until smooth. 


Happy Baking!


Monday, August 9, 2010

Monkey Bread Muffins


I mentioned a little something sweet on the brunch menu to go along with the frittata and Asiago and Rosemary Scones and this is it. I took the wonderful recipe that is Monkey Bread and transformed it into muffin form.

My wonderful roommate in grad school introduced me to Monkey Bread a few years ago and I almost immediately fell in love. How had I gone almost 23 years through life without having this? For someone who loves everything cinnamon it was almost sacrilege! I found myself pulling piece after piece of the ooey-gooey, cinnamon-y, biscuit based bread, until my stomach ached from all the sugar.

Biscuits, cinnamon, brown sugar, and butter? Heaven.

Normally, Monkey Bread is made in a deep baking dish or a bundt pan, but for brunch I wanted to do something that was easy to serve so I decided to a muffin pan to make individual, portion sized muffins.

Monkey Bread Muffins
Oven: 350 Bake time: 20 min
Makes 6 Jumbo muffins or 12 regular

1 can jumbo biscuits
1/2 cup white sugar
1-2 TBS cinnamon
1/2 cup brown sugar
4 TBS butter

Preheat oven to 350. Line muffin tin with parchment paper or just spray with Pam.
Pop biscuit can and cut each biscuit into fourths.
Roll pieces into balls.
In a small bowl, mix white sugar and cinnamon (make it as cinnamon-y as you like).
Roll biscuit balls in cinnamon-sugar mixture until fully coated.
Place cinnamon-sugar coated balls (6 in each) in individual muffins.
Add brown sugar and butter to bowl of cinnamon-sugar mixture and place in microwave for about 45 seconds to 1 minute or until butter is melted. Mix until combined.
Pour about a tablespoon of brown sugar mixture over each muffin.
Sprinkle with extra cinnamon and sugar if inclined.
Transfer to oven and bake for 20 minutes.
Allow to cool in pan for 10 minutes before serving.

Oh and guess what else?!

I've come to find that Central Texas is full of markets and festivals which is awesome because it's always fun to check out the local digs. After devouring these muffins we headed to the Salado Art Festival and Craft Days where we found some fabulous deals. While there, we walked by an old red barn that happened to be sponsoring the local public library and their book sale. For $5 you could fill a reusable grocery bag with as many books as could fit and guess what I found?? A cookbook section...


All these for just FIVE DOLLARS! These were just half of what I could have taken home.. my issue? I don't have the shelf space for them! Hopefully that'll be changing soon though- MM and I are going to start looking at houses to rent :)

Happy Baking!

Saturday, August 7, 2010

Asiago and Rosemary Scones


While Mountain Man is still out doing adventurous things in the woods of Maine and New Hampshire, I decided to have some of our friends over for brunch before heading to a local art festival.

I always have a hard time deciding what to make.. there are just so many choices for a brunch menu! I knew I was going to be making a frittata (sausage, peppers and goat cheese) but I wanted something to go along with it.. something baked of course. I thought about muffins, scones, finally trying out a pastry, maybe a banana bread? But nothing popped..

Then, as I was browsing the grocery isles, I saw it.. Asiago cheese with Rosemary and Olive Oil.. what a perfect ingredient for a savory scone! This is when I love the fact we had to move MM's entire herb garden with us across country in the back of a U-Haul...

In addition to these savory scones I also made something sweet, but I'll save that for a later post mostly because they're still in the oven as I write this.


Asiago and Rosemary Scones
adapted from The Craft of Baking
Oven: 375 Bake time: 20 min
Makes 8 large scones or 12 mini

1 3/4 cup AP flour, plus more for rolling
1 tsp salt
1 tsp sugar
1 TBS and 1/2 tsp baking powder
6 TBS chilled butter, cut into small cubes
1/2 cup grated cheese
1 TBS fresh rosemary, finely chopped or 1/2 TBS dried rosemary
1 cup buttermilk

2 TBS olive oil
1 tsp dried rosemary

In a large bowl, combine flour, salt, sugar and baking powder.
Add chopped butter and place bowl in freezer for 5 minutes.
Using paddle attachment (or two knives if you don't have a mixer) beat until butter gets incorporated into dry ingredients and crumbly consistency is reached.
Add cheese and rosemary, mix until combined.
I was going to add basil, but decided against after I took this pic.
Slowly add buttermilk and continue to mix until dough starts to come together.
Turn dough out on floured surface and knead for a few more minutes.
Shape dough into a large circle (about 7 inches) and using a knife cut 8 or 12 slices like a pie.
Place slices on baking sheet or baking stone if you have one.
Cover with saran wrap and place in freezer for 10 minutes.
While the scones are chilling, preheat oven to 375.
Brush chilled scones with olive oil and sprinkle rosemary on top of each.
Transfer to oven and bake for 20 minutes.
After baking, transfer to cooling rack.


I can't wait to see what everyone thinks
 I've got to get the rest of the food ready for brunch!

Enjoy your weekend and Happy Baking!

Thursday, August 5, 2010

Margarita Cupcakes... tequila and all

Car troubles aside (still waiting on the part and driving around a pretty sweet red Honda in the mean time) there is baking to be done people!

One of the girls at work pretty much lives for a good margarita. Even though in Texas a good marg is pretty easy to come by,  for her birthday I knew what had to be done.. I had to figure out a way to turn her favorite cocktail into a deliciously satisfying cupcake that could be enjoyed during the work hours.

But don't let these lil rascals fool you...they're still packing heat (shhhh don't tell your boss!).


The funniest part about my trip to the liquor store for the goods? All the alcohol I bought is meant for baking. Sad story right? Who goes to the liquor store and still has baking on the mind? This girl.

The guy at the liquor store must have wondered what I was up to when I walked up to the counter with a bottle of tequila, a bottle of amaretto and a case of oatmeal stout. Random combination I know, but just wait till you see what I have in store for you in the next couple of weeks!

The greatest part about this recipe is that it starts with a boxed cake mix then doctored up with all the fixins for a good ole margarita- I could actually smell the tequila as it was baking.

Margarita Cupcakes
Recipe found on RecipeGirl.com
Bake time: 25 minutes Oven: 350
Makes 24 cupcakes

8 oz. margarita mix (no alcohol)
3 oz. of tequila
1 TBS orange juice
1 box white cake mix
4 eggs
2 TBS oil
zest from 1 lime

Preheat oven to 350. Line cupcake pan with paper liners.
In a large cup mix margarita mix, tequila and orange juice.
In a large bowl add cake mix, eggs, oil and 1 1/4 cup of mixed margarita (you should have a little left over). Mix until combined- don't worry if the batter is a little lumpy.
Using an ice cream scoop, fill cupcake liners (one scoop per).
Bake for 25 minutes.
Let cupcakes cool for 5 minutes in the pan, then remove and allow to cool completely on rack.

Tequila Lime Icing
1/2 cup butter, softened (1 stick)
2 cups powdered sugar
1 TBS tequila
1 TBS whole milk
zest/juice of 1 lime

In a large bowl cream butter. Add powdered sugar, tequila, whole milk and lime zest/juice- beat until well combined and smooth. If icing seems too runny just add a little more powdered sugar until good consistency is met.

Use a piping bag or a spatula to slather this delicious icing on your cupcakes. (One of the girls at work said the icing was the best part- she said it made you forget you were eating a cupcake)

All afternoon I could here the Oooos coming from the foyer where the cupcakes were located...
that's why I bake.. making people happy, one cupcake at a time :)

Happy Baking!
 

Tuesday, August 3, 2010

Terrible, Horrible, No Good, Very Bad Day, Peanut Butter Cookies


Remember the book Alexander and the Terrible, Horrible, No Good, Very Bad Day? Yah? Well mine just happened.

I headed home from work yesterday afternoon very content with the way my Monday had gone. I'm dog sitting this week so I was excited to get home to let the little Irish car bomb (their names are Guinness and Bailey) out before heading to the grocery store and then it happened..

I get back to my car only to be greeted by a wonderful pool of brown liquid leaking from somewhere under the hood. I turn the car on and immediately the flashing light stares me in the face- something to do with the coolant.

Awesome.

At 630pm, why would anything be open? I mean, cars never break down after 5 and they can magically fix themselves after 6pm right? everyone knows that.. ugh.

Luckily the Walmart Service Center was open, but they couldn't do anything about it except add some coolant, which ended in the discovery of a busted hose, which meant no more driving for me, which meant towing in the morning...oh, and did I mention MM is out of town and so are the other 4 people I know in town?

To make matters worse, this morning I had to get back to my car for it to get towed and had to pay a taxi driver in quarters because I didn't have any cash on me...I paid a taxi driver in quarters.

Of course the dealership didn't have any lender cars (why would they?) and they don't know how long the fix is going to take, they had to order the part... I'm stuck at my apartment.

The moral of the story? Peanut Butter Cookies.

Peanut butter cookies make me happy. Peanut butter cookies make me forget that I'm stuck inside my apartment all day. Peanut butter cookies make me forget how much this is going to cost.

Peanut butter cookies give me a little peace in a terrible, horrible, no good, very bad day.


Peanut Butter Cookies
Adapted from a recipe found on allrecipes.com
Oven: 350 Bake time: 10 minutes
Makes about 18 cookies

1 cup peanut butter
1/4 cup white sugar
1/2 cup brown sugar
1 egg
1/4 cup white whole wheat flour
1 tsp vanilla
1-2 TBS white sugar for sprinkling

Preheat oven to 350. Line baking sheets with parchment paper.
In a large bowl add all ingredients and mix until combined.
Roll dough into tablespoon size ball and place on baking sheets.
Sprinkle balls with white sugar and using a fork press criss-cross into top of cookie.
Transfer to oven for 10 minutes, then allow to cool on rack for at least 15-20 minutes.
I might eat this whole plate.. don't judge me.

Ever had one of these days?? I'd love to hear about.. what is your go-to treat in these situations??

Monday, August 2, 2010

Italian Wedding Cookies

Italian Wedding Cookies for an Italian wedding just seemed to make sense...

One of my roommates from college got married this weekend- the first one to take the leap. The wedding was on Long Island, so of course being in Texas now this meant another weekend spent traveling, but what's a little traveling when I get to spend the weekend with some of my favorite girls??
reunited and it feels so gooood
 
My girlfriends and I in college, were well... we were your typical college girls, who just happened to be a part of a fabulous looking sorority and always looking to have a good time. Most of the time 15 girls split between 3 town houses = Trouble (with a captial T) and some this weekend proved that some things never change! Even though we can't make a toweled run for it between houses to borrow an outfit, eat late night munchies every weekend together, have late night dance parties, and study breaks that included Dance Dance Revolution, we still manage to have a good time whenever the chance arises.

The wedding was gorgeous and Dani made an absolutely beautiful bride (we expected nothing less). But spending the weekend catching up, laughing, reminiscing, dancing and celebrating made being extremely exhausted on this fine Monday morning totally worth it!

Italian Wedding Cookies
also known as Mexican Wedding Cookies, 
Almond Butter Cookies and Viennese Crescents
Oven: 300 Bake Time: 30 minutes
Yields at least 3 dozen

1 cup butter, softened
1/4 cup sugar
2 cups AP flour
1 cup Almond Meal
1 tsp vanilla
1 cup powdered sugar

Preheat oven to 300. Line two baking sheets with parchment paper.
In a large bowl, cream butter, sugar and vanilla.
Whisk flour and almond meal- add to butter/sugar mixture.
Mix well until combined.
Roll cookie dough into small balls (a spoonful) or crescents and place on prepared baking sheets.
Transfer to oven and bake for 30 minutes.
After baking transfer to cooling rack for at least 20 minutes (you don't want the sugar to melt when rolling).
Place 1 cup of powdered sugar into small bowl and roll cooled cookies til coated.
Once coated these little guys are ready to eat.
Delizioso!

Happy Baking!!