Wednesday, July 28, 2010

Double Chocolate Almond Biscotti and a Guest Post


I was lucky enough to get a guest spot on a wonderful little blog, The Messie Kitchen, run by a spunky young lady who goes by the name of Jessie. Jessie recently had surgery and is unable to get in the kitchen as much as she would like so she asked for some volunteer guest posts- an avid reader of her humorous and tasty blog,  I immediately sent her a message and was so excited when she accepted my offer!

For my guest post (and to make MM a happy camper- literally, he's going camping and wanted some biscotti to take along the way) I went with Double Chocolate Almond Biscotti- a delicious companion for a big ole cup of coffee.

So head over to The Messie Kitchen (so true of my kitchen as well) and check out my post and while you're there stay awhile and check out all that Jessie has to offer! If you have any questions or just want to let me know what you think please feel free to leave any comments here for me! I really do love hearing from all of you that take a look at the site.. don't be shy :)

Happy Baking!

Tuesday, July 27, 2010

Swiss Swirl Ice Cream Cake- July DB Challenge

Ever have a friend try to set you up with someone and when you ask them what the person looks like and they respond with "I mean, they're cute... and they have a great personality!"? 

That is pretty much this cake's story.. she may not be a looker, but she tastes FANTASTIC!

I feel like every time I do a challenge the dessert featured is my new favorite. This dish is absolutely delicious- definitely a new favorite, but I must admit I did get a little frustrated with it at times...like when I had to scrape the cake out of the bottom of the pan (fail) ...
and start all over again (thank you parchment paper)
 or when I didn't read the directions well enough and ended up with a mess of melted ice cream after trying to spread it over warm hot fudge (woops) or when, because of the melted ice cream seeping through the slices of cake, it would not cooperate during its photo shoot (such a diva)..

Despite all the previous mishaps, this is still a wonderful dessert. Anytime you make your own ice cream and then use it in a cake, time is going to play a key factor. In the end though it was well worth it, but if you are going to try to recreate this cake make sure you follow the directions and give yourself enough time with the ice cream (we learned this the hard way when MM didn't allow the coffee ice cream to chill enough leaving us with a very soft ice cream). I would suggest making this over the span of two days- one day for you ice cream and one day for your Swiss rolls and freezer time.

Since MM was in charge of the ice cream portion (I bought him an ice cream maker for Christmas last year) we switched it up a little bit and made Vanilla Ice Cream and Coffee Ice Cream with a Coffee Infused Hot Fudge Sauce.

The July 2010 Daring Bakers' challenge was hosted by Sunita of 'Sunita's world- life and food.' Sunita challenged everyone to make an ice cream filled Swiss roll that's then used to make a bombe with hot fudge. Her recipe is based on an ice cream cake recipe from Taste of Home.

Swiss Rolls
Oven: 400 Bake time: 12 minutes 
(Makes 2 logs)

6 eggs
1 cup sugar, plus more for rolling
6 TBS AP flour
5 TBS cocoa powder
2 TBS boiling water
oil for brushing pans

Filling:
2 cups heavy whipping cream
1 vanilla pod, cut into small pieces or 1 tsp vanilla
5 TBS sugar

Preheat oven to 400. Brush two 11x9 inch pan with oil and line bottom with parchment paper* a must.
In a small bowl whisk flour and cocoa powder.
In a large bowl, beat eggs and sugar until thick- beaters should leave a trail on surface when lifted.
Add flour mixture in three batches, folding gently until combined. Fold in water.
Divide mixture into baking pans, spreading until smooth.
Bake for 12 minutes or until cake is springy to touch.
Once out of the oven, spread a kitchen towel on the counter and sprinkle with sugar.
Turn the cake onto the towel, peeling away the parchment paper.
Starting from the shorter side, start to make a roll with towel going on the inside. Cool wrapped roll on a rack. Take a look at Sunita's picture if you're having trouble grasping this...


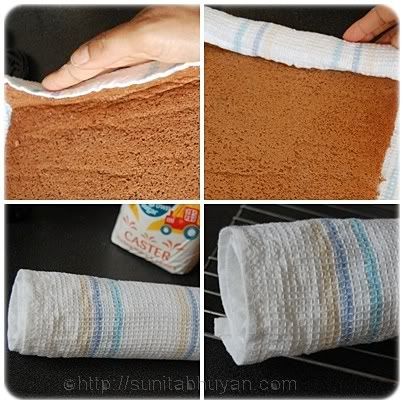
I forgot to take my own pics so these are actually from Sunita's post! 

Repeat for the next cake.

While cakes are cooling, go ahead and make the filling.
Cut your vanilla bean into small pieces.
In a food processor, grind sugar and vanilla pieces until well combined and vanilla pieces are very small. If using vanilla extract, just grind sugar until fine.
 In a large bowl, beat heavy cream and vanilla-sugar mixture until stiff peaks are formed.

Once rolls are completely cooled, open the rolls and spread cream mixture, making sure not to go all the way to the edge.
Roll the cake up again, this time without the towel. Wrap roll in saran wrap and place in the fridge to chill until needed.

Vanilla Ice Cream
1 cup whole milk
2 cup heavy cream
2 tsp vanilla extract
3/4 cup sugar

In a medium bowl, use hand mixer or whisk to combine milk and sugar until dissolved.
Stir in heavy cream and vanilla to taste.
Tun machine on and pour mixture into chilled freezer bowl.
Let mix until thicken about 25-30 minutes.
Transfer ice cream to freezer safe bowl and place in freezer for a few hours of overnight.

Coffee Ice Cream
1 cup whole milk
2 cups heavy cream
3/4 cup sugar
2-3 TBS instant coffee of espresso
1 tsp vanilla extract

In a medium bowl, use hand mixer or whisk to combine milk, sugar and coffee until dissolved.
Stir in heavy cream and vanilla to taste.
Tun machine on and pour mixture into chilled freezer bowl. 
Let mix until thicken about 25-30 minutes.
Transfer ice cream to freezer safe bowl and place in freezer for a few hours of overnight.

Coffee Infused Hot Fudge Sauce
1 cup sugar
3 TBS cocoa powder
2 TBS cornstarch
1 1/2 cup brewed coffee
1 TBS butter
1 tsp vanilla extract

In a small sauce pan, whisk sugar, cocoa powder, cornstarch and coffee.
Place over medium heat and stir constantly until it begins to thicken and is smooth.
Remove from heat and stir in butter and vanilla. Let cool.

Now the fun part..Let the assembly begin!
1. Take Swiss rolls out of the fridge and cut into about 20 equal slices.
2. Line a large glass bowl with saran wrap- this is what your swiss rolls are going to cling to.
3. Arrange two slices at the bottom of bowl, seam sides facing each other. Arrange remaining rolls along the bowl, cover and place in the freezer to firm up (at least 30 minutes)
4. Soften vanilla ice cream and after removing saran wrap from rolls, add ice cream on top about half way up the bowl. Return to the freezer for at least an hour.
5. Add fudge sauce over vanilla ice cream, cover again and freeze another hour
6. Soften coffee ice cream and spread it over fudge sauce. Cover with saran wrap again and freeze this time for about 4 or 5 hours (this is the last time I promise)
7. After hours in the fridge, place the serving plate on top of the bowl. Turn upside down and remove bowl and saran wrap.
8. Keep the cake out of the freezer a few minutes before slicing.

Steps 4-7 is where my patience ran low and I sped through the directions leaving us with a very messy, still extremely delicious, Swiss Swirl Ice Cream Cake.


This is a perfect dessert when you're trying to impress some friends you're having over for dinner, or a boy or a girl perhaps? Just don't do what I did.. read the directions and your cake won't have the diva moments mine did :)

Monday, July 26, 2010

My Very First Wedding Cake: A Success Story

I hope I didn't leave you all in too much suspense over the past weekend! Unfortunately I didn't have much time or access to a computer to be able to share my story along the way, but let it be known that it was a fantastic success! What do you think?? Not to shabby for my first time right?!

I have to admit, I'm like a proud mama when it comes to this cake. For spending hours baking cake, traveling many many miles, switching planes, making 6 batches of icing in one average sized mixer, getting to the church (cakes and icing in tow) sans air conditioning, constructing the cake and decorating cupcakes all before the rehearsal dinner, everything went smoothly...almost too smoothly.

On their way to the airport!

Thanks to MM's wonderfully constructed boxes, the cakes all made it to GA perfectly intact. Friday morning was spent making way too much icing and when I finally arrived to the church around noon I knew it was go time. I had until 5pm to get everything constructed and ready for the big day in order to have time to get back to the house, shower and make it to the rehearsal dinner on time.

As soon as I walked into the kitchen of the church I was in heaven.
..so...much...counter space!

Before she got all done up with fresh flowers.

Cupcakes ready to for display..
Red Velvet and Vanilla Butter Cake with Chocolate buttercream.

I couldn't be happier with the way everything turned out..all the stress I felt on the way to GA almost disappeared as once I finally got into the kitchen to start decorating. The wedding was beautiful, the bride and groom were soo happy, and everyone seemed to love the cake! I heard a little girl tell her mom the cake was 'sooo good' and the caterers couldn't believe I had traveled that far..

Making a wedding cake is a big responsibility and I feel so blessed to have friends like Trevor and Meagan who took a chance and let me make theirs. It made their special day even more special to me :) I wish them only the best in their new life together! 

Wedding cake decorator for hire... who's next?? ;)

Tuesday, July 20, 2010

True Life: I'm traveling 1063 miles with a Wedding Cake


You're probably going through the 5 W's right about now..
Who would travel that far with a cake?
What is she thinking?
When is this happening?
Where is she going?
How is she doing it?

Well my friends, I've got your answers for all these questions and then some.

This is the Ultimate Traveling Sweet.. A Wedding Cake.

It all started when my good friend met the girl of his dreams. A few months later there was already talk of rings and the next thing I know I'm having a phone conversation in my Texas office with a boy in Georgia who is about to ask the most important question of his life to the love of his life. Just before we hung up, I jokingly (but totally serious) remarked that I would love to be the one to make their wedding cake... little did I know what would come next..
the happy couple strolling in Savannah..

Of course I had no idea that a few weeks later I would find myself having another conversation about how they wanted to take me up on the offer -they wanted to have friends involved in the wedding and the wedding cake was a perfect start. I was completely flattered, so excited and so completely caught off guard because, well the truth of the matter is.. I've never made a wedding cake! But that didn't stop me from saying yes! Decorating wedding cakes is a dream of mine and what better way to start than with friends?

Oh, did I mention that the wedding would be in Georgia? I live in Texas.

So now you're probably thinking, well how the heck does she plan on pulling this off? Good question.

After a few more conversations with the bride-to-be and her mother, decorations, flavors and size were determined.. my plan was/is to bake all the cakes ahead of time, freeze them and then fly with them as my carry on... I can't wait to see what the security people have to say when they see two large duffle bags of cake going through the x-ray...
Our poor freezer...we couldn't even make ice all week!

This past weekend was spent in the kitchen baking cakes..big ones, little ones.. oh, and before I forget, I'm also making the groom's cake and cupcakes. So for those of you still following, thats 2 14-inch cakes, 2 10-inch cakes, 2 6-inch cakes, 3 9-inch cakes and 50 cupcakes (which there are no room for in the freezer). Thankfully MM will be with me, so we're heading out on Thursday night, cakes in tow, and I'll be spending all day in the kitchen on Friday assembling the cakes and decorating- I'm making all the icing in Georgia.
Test run.. just to make sure they would all fit!

Did I get in over my head? Maybe. Am I having a great time so far? Absolutely... Talk to me again Friday afternoon..

Now I love a good adventure and if this doesn't qualify as an adventure then I don't know what does..

Say a prayer for me, rub your lucky rabbits foot, pick up a penny, keep a horse shoe handy.. I'll take anything!


Monday, July 19, 2010

Bite-Size S'mores

Our friends had a Summer BBQ this weekend complete with good food, good friends and a whole lot of adult bevs.

Even though the hostess told everyone not to bring anything, how could I not? I mean, I basically live for situations like this- parties are a perfect excuse for desserts! And she knows me well enough to know that I was going to bring something anyways.

I feel like s'mores have recently been making appearances all over the place in the form of cookies and bars, but I have yet to see them like this... a sort of little, mini, bite-size s'mores tart.

I like to think of these Bite-size S'mores as a more gourmet version of the summer and camping classic...don't worry, you still have your graham cracker, chocolate and toasted marshmallow, just in a more convenient one bite form...perfect for the times where some marshmallow-y goodness is necessary, but a fire just isn't happening.
This is the closest these little guys
are going to get to a fire..

Bite-size S'Mores
Oven: 375 Bake time: 15 minutes
Freezer time: 30 minutes
Makes 24 little tarts

1 sleeve graham crackers, crushed
1/4 cup butter, melted
1/4 cup sugar
1/2 cup heavy cream
1 cup semi-sweet chocolate chips
1 jar of Marshmallow Cream

Preheat oven to 375. Line mini cupcake pan with paper liners.

Graham Cracker Crust: In a large bowl mix crushed graham crackers (I used my food processor), melted butter and sugar until consistency of sand is reached and ingredients are well combined. Place a tablespoon of mixture into each cupcake liner and using the back of the spoon, press mixture down until compact- think graham cracker crust on a pie. Bake for 10 minutes then cool for 20 minutes on rack.
Easy Chocolate Ganache: While crusts are baking, heat 1/2 cup heavy cream in the microwave for about 1 minute (until its good and hot). Add cup of chocolate chips and whisk constantly until smooth and creamy. Set aside to cool.
After crusts and ganache are cooled, place a tablespoon of chocolate onto crusts. Place in freezer for at least 30 minutes so chocolate will set.
Toasted Marshmallow: Remove tarts from freezer. Set oven to Broil. Fill a piping bag or large zip-lock bag with a jar of Marshmallow fluff (this is just to make it less of a mess, if you want to spoon it on top, by all means don't let me stop you). Place a dollop of fluff on top of each tart. To get the toasted effect place under broiler, leaving the oven door slightly cracked to tell when you've got that perfectly toasted top.
And Voila! A perfect one bite summer classic.

I love s'mores.... I truly do.  
  Please sir, can I have s'more?
Happy Baking!


Saturday, July 17, 2010

Are you ready for THE BEST Red Velvet Cupcake Recipe?


The search is over.

I found it!

THE BEST Red Velvet Cupcake Recipe.


Yes ladies and gentleman, you heard right.. the best. No question about it... this is the best light, fluffy, moist, red, velvety perfect cupcake.

I mentioned in my previous post that I had a couple recipes for these tricky little cupcakes that I wanted to give a try before I made my final decision for the wedding. On Wednesday I got to The Sweet Factory ready to try one out... everything was going well- the batter had a good texture, good taste, so I filled up the cupcake liners and popped em in the oven, very excited. And then I saw them...2 large, white, staring at me in the face, eggs laying right their on the counter.. I forgot the eggs! FAIL.

Giving myself a couple of days to re-coop from my failure, I told myself the next batch I made would be my last...the best.

One bite. We looked at each other, mouth full and nodded.

One small "Yes" and we knew.

The BEST Red Velvet Cupcake
Recipe from Baked: New Frontiers in Baking found on How to Eat a Cupcake
Bake time: 30 minutes Oven: 325
Yields 24 cupcakes

1/4 cup cocoa powder
2 TBS red food coloring
1/2 cup boiling water
6 TBS butter, softened
2 TBS shortening (crisco)
1 2/3 cup sugar
3 eggs
1 cup buttermilk
1 tsp vanilla
2 1/2 cake flour, sifted
1 tsp salt
1 tsp vinegar (white or apple cider)
1 tsp baking soda (I accidently used baking powder)

Preheat oven to 325. Line cupcake pan with paper liners.
In a small bowl mix cocoa powder, food coloring and boiling water- set aside.
In a large bowl, beat butter and shortening until blended. Beat in sugar until light and fluffy.
Add egg one at a time, beating after each addition.
Stir buttermilk and vanilla into cocoa mix.
Alternate adding flour, salt and buttermilk mixture into butter/sugar mixture.
In another small bowl, sprinkle baking soda over vinegar and mix. Pour over batter and mix until incorporated.
Using an ice cream scoop, evenly distribute batter among cupcakes.
Bake for 30 minutes, until toothpick comes out clean and cupcake springs back to touch.
Remove cupcakes from pan to allow for cooling and place on cooling rack.
Once cooled, frost with Cream Cheese Icing or White Chocolate Cream Cheese Icing.

Never try another a recipe again..
Delicious red velvet cupcakes that 
 just love getting their picture taken.
Happy Baking!

Thursday, July 15, 2010

Lemon Ricotta Cookies


I have mixed feelings about our Food Network friend Giada... there is just something about her... maybe it's the way she over pronounces every syllable or how, out of nowhere, she has an Italian accent when she's talking about certain ingredients and how does she stay so thin when she's making all that delicious Italian food!? It just doesn't make sense! Despite these quirks her food always looks fantastic and I still find myself watching her show when scrolling through the channels.

The first time I tried out one of Giada's recipes it was an epic fail..I found myself drawn to the TV as she went on and on about how great these sandwich cookies were and how the family she used to cook for would beg for them so of course I was intrigued.. I went out and got all the ingredients excited to finally try something of hers out, only to be highly disappointed. Long story short, I ended up throwing out an entire batch of cookies.. they were horrible.

 Lucky for her, I forgive..I'm a big believer in second chances.

She couldn't have redeemed herself any more than with these delicious lemony cookies. In one word? fabulous. They're light and fluffy, a lot like my Black and White Cakies (cakie(n): A light and fluffy cookie that has the consistency much like cake, easily eaten in one or two bites; like eating the top of a cupcake). The lemon flavor is incredible, you could smell it while it was baking and the glaze is even better.

Mountain Man took one bite and let me know "It's a keeper" (the recipe that is).


Lemon Ricotta Cookies with Lemon Glaze
Recipe by Giada found on Food Network.com
Oven: 375 Bake time: 15 minutes

2 1/2 cups AP flour
1 tsp baking powder
1 tsp salt
1 stick butter, softened
2 cups sugar
2 eggs
1 container (15oz) ricotta cheese
3 TBS lemon juice (about 2 lemons)
1 lemon, zested

Preheat oven to 375.
In a small bowl whisk flour, baking powder and salt.
In a large bowl, use a hand mixer and cream butter and sugar until light and fluffy.
Add one egg at a time, beating after each addition.
Mix in ricotta cheese, lemon juice and lemon zest until incorporated.
Slowly mix in dry ingredients until combined.
Spoon cookie dough (about 2 TBS worth) on parchment paper lined baking pans.
Bake for 15 minutes.
Transfer to cooling rack for at least 20 minutes before applying glaze.

Look at that fresh lemon zest!
Glaze:
1 1/2 cups powdered sugar
3 TBS lemon juice
1 lemon, zested

In a small bowl whisk ingredients until smooth.
Spoon over cooled cookies, using back of spoon to spread.
Allow to cool for at least an hour before trying to pack or stack.

A perfect summer cookie.. 
light, refreshing, fabulous.

Who's your go-to Food Network star?
Happy Baking!

Tuesday, July 13, 2010

In the Pursuit for the BEST Red Velvet Cupcake


There are a lot of recipes out there that claim to yield "the best" Red Velvet Cupcake, but in my search I have yet to find that one that just pops. I think the thing that bothers me about these cupcakes in particular is their lack of definition- are they chocolate? are they vanilla? are they vanilla pretending to be chocolate? are they just red? and what does red velvet really taste like exactly!? So many questions!

Anyways.. the fact of the matter is, my friends requested this particular cupcake at their wedding and since I'm in charge of their traditional cake and groom's cake/cupcakes I am in pursuit for the perfect, made-from-scratch, Red Velvet Cupcake.

I have searched the inter web far and wide for what seems like hours in attempts to find the perfect recipe- reading almost every comment or review the recipes have to offer. I thought it was a sure thing when I came across Joy's (of Joy the Baker) post for her favorite cupcakes using Hummingbird Bakery's recipe only to be highly disappointed in a dry and crumbly cake...maybe I did something wrong, but it just didn't do it for me.

Then the other night I caught Bobby Flay throwing down with Cake Man Raven and thought to myself, "That has to be it, Cake Man Raven is known for this famous Red Velvet Cake"...but alas, after reading over 50 reviews everyone said the cake was super oily and actually leaked as it sat.. gross. I didn't even decide to try it after reading this.

This weekend I again searched the internet and came upon a few recipes that claimed to be "the best" recipe and the reviews all agreed that this was indeed one of the best, from scratch, cupcake they had made, so I decided to take my chances. Just as I was getting everything ready I noticed a few recipes on the back of my box of Swans Down Cake Flour- it was the same recipe! This gave me a little more faith that maybe, just maybe I had found it....

After preparing the recipe I waited patiently for the oven buzzer to go off and gave them just enough time to cool before breaking into one.. not bad. They were definitely moist and the texture was nice, just a little crumby which could have been from my over baking them slightly (woops). But definitely a keeper.

Of course I forgot that I didn't have any cream cheese in the fridge so I whipped up some 7 minute icing and iced a few for the girls as a mid-movie treat for when we went to see the latest installment of the Twilight series (yes, I will admit I love the Vamps and Wolves- go team Edward!) and after the movie I had Mountain Man taste-test one (OK, three). All agreed it was a pretty tasty cupcake.

Since 7-minute Icing only lasts one day I decided to make the rest of the cupcakes into cake balls for the folks at the office. I whipped up a small batch of butter cream and got to work- below you'll find the Red Velvet Cupcake recipe and step by step instructions for cake balls..

but I'm not done yet!

Red Velvet Cupcakes
Recipe on back of Swan Down cake flour box
Oven: 350 Bake time: 40 minutes
Yields 18 cupcakes

2 1/2 cups cake flour (sifted)
1 tsp baking powder
1 tsp salt
2 TBS cocoa powder
1/2 cup butter, softened
1 1/2 cup sugar
2 eggs
1 tsp vanilla extract
1 cup buttermilk
1 tsp apple cider vinegar
1 tsp baking soda

Preheat oven to 350. Line cupcake pan with paper liners and set aside.
In a bowl whisk sifter flour, salt and baking powder.
In a large bowl cream butter and sugar until light and fluffy. Add eggs one at a time, beating after each addition.
In a small bowl mix food coloring and cocoa powder and add to butter mixture.
Alternating with buttermilk, add flour mixture to butter mixture, beginning and ending with flour.
In another bowl mix baking soda and vinegar and gently stir into batter.
Using an ice cream scoop divide batter evenly among cupcakes (filling about 2/3 way full).
Transfer to oven and bake for 40 minutes.
Once removed from oven, allow to cool on cooling rack for 15 minutes before removing from pan.

To make cake balls you'll need:
1 batch of cupcakes (about 12)
A small batch of buttercream* recipe to follow
1 bag Wilton's Vanilla Candy Melts

Make a small batch of buttercream-
1/2 cup crisco or shortening
2 cups powdered sugar
1 tsp vanilla
1-2 TBS water
Place all ingredients in a bowl and beat for a few minutes until smooth and creamy.

Remove liners from cupcakes and crumble into a large bowl.
Add dollops of frosting...
And mix until incorporated and balls can be formed.
Using a teaspoon as a guide for size, roll into small balls using the palms of your hands and place on parchment paper lined baking pan.
Place in the fridge, uncovered, for at least an hour or flash freeze for about 20 minutes. They can also be kept in the freezer in an airtight container for 2 or 3 weeks.

In a double boiler, melt a bag of Wilton's Vanilla Candy Melts and 1/4 cup crisco, stirring constantly with a rubber spatula until smooth and creamy. 
You can get these melts at Michael's or other craft stores.. the good thing about the melts is that you can refrigerate the final project and not have to worry about melting as soon as they're out, they're also easier to work with than chocolate because they're made for melting and hardening again.

Drop balls one or two at a time into melted candy and roll around until covered completely- this can be done with the help of your spatula or fork. Lightly lift the balls with a fork (it will allow for extra coating to fall off) and place gently back onto baking pan.

After all balls are coated place back in the fridge. Allow to set for about 10-15 minutes and then try not to eat them all at once!
I'm not done yet though.. I have one more recipe to try out later this week and will make my final decision based on how this next batch turns out. Wish me luck! 

Happy Baking!

Saturday, July 10, 2010

Pralinutta Swirl Banana Bread

You're probably wondering what Pralinutta is.. well ladies and gentleman, it is pretty much a cheaper version of Nutella or at least is was at my grocery store. As I browsed the peanut butter isle during my last trip I got a craving for Nutella, but as I went to pick up a jar I noticed the Pralinutta (about $2 cheaper) I felt inclined to give it a try.

In one word? delicious.

Once it made it into the cupboard it was time to brainstorm.. what kind of baked good did this delicious little jar want be a part of? It came to me at the gym (surprisingly that is where I do a lot of my recipe thinking).... banana bread. Especially perfect due to the 3 bananas waiting patiently in my freezer.

Pralinutta Swirl Banana Bread
Oven: 350 Bake Time: 50-60 min
1 loaf

1 cup white whole wheat flour
1 cup AP flour
1 tsp baking powder
1/2 tsp baking soda
1/4 salt
1/2 cup butter
3/4 cup brown sugar
1 egg, beaten
1 tsp vanilla
1 cup mashed bananas (about 3)
5 TBS milk (whole or butter)
1/2 cup Pralinutta or Nutella

Preheat oven to 350. Spray a loaf pan with cooking spray and set aside.
In a bowl, whisk flours, baking powder, baking soda and salt.
In a large bowl cream butter, sugar and vanilla. Beat in egg, add bananas and mix until incorporated.
Stir flour mixture into wet mixture. Slowly mix in milk.
Place Pralinutta in a small bowl and microwave for about 15 seconds (making it easier to pour).
Pour 1/3 of batter into loaf pan. Drizzle portion of Pralinutta over batter and drag knife through to get the swirl effect. Cover with another layer of batter and Pralinutta and repeat. (You'll do the layering a total of 3 times). Optional: If you have extra bananas laying around place slices on top before going to the oven.

Transfer to oven and bake for 50-60 minutes.
Allow to cool for at least 15 minutes on cooling rack before diggin' in.

Happy Baking!

Thursday, July 8, 2010

Apple Cinnamon & Whiskey Bread Pudding

Bread pudding is a little camera shy...
don't be fooled by her un-photogenic nature...
she's scrumptious.

I fell in love with bread pudding many summers ago while waiting tables at the Black Pearl in Newport, Rhode Island. When the night was ending and the chowder was running out, we would sneak into the kitchen and beg the guys for a piece of the leftover blueberry cinnamon bread pudding (anyone in the area should immediately go and try a piece).

...Ever since then I have always been a sucker for bread pudding.

A few nights ago Mountain Man and I made a wonderful pasta dinner complete with fresh french bread which we definitely didn't finish. With half a loaf left over I knew there was only one thing to do...

Apples Cinnamon & Whiskey Bread Pudding
Oven: 325 Bake time: 50-60 minutes
Fills an 8x8 baking dish

5 cups of cubed french bread (about half a large loaf)
1 cup whole milk
1 cup heavy cream
3 eggs
1 egg yolk
1/2 cup brown sugar
1/2 cup white sugar
2 tsp cinnamon
1 tsp vanilla extract
2 TBS whiskey (optional)
1 apple: peeled, cored and chopped
1/2 cup raisins
1/4 cup brown sugar *for topping
1/2 tsp cinnamon*for topping

Preheat oven to 325.
Spray an 8x8 baking dish with cooking spray.
In a large bowl, place bread, apples and raisins. Toss until ingredients are distributed.
Transfer mixture to baking dish and set aside.
In a large bowl, whisk eggs, milk, cream, sugars, cinnamon, vanilla and whiskey until well combined.
Pour egg mixture over bread, apples and raisins. Use the back of a spoon to push bread down- making sure egg mixture gets soaked into bread.
Sprinkle with brown sugar and cinnamon.
Cover baking dish with aluminum foil and place in a water bath*.
*To create a water bath, place you baking dish in a larger pan and fill larger pan with water about half way up the baking dish- if this doesn't make sense, check out the picture below.
Place the entire contraption in the oven and bake for 40 minutes.
At 40 minutes, remove foil and place back in oven for another 10 minutes or so.
*Make sure custard has set, by press down on pudding- if fully cooked no liquid should seep up.
Serve warm or cooled with Whiskey Whipped Cream.

Whiskey Whipped Cream
1 cup heavy whipping cream
1/4 cup powdered sugar
1 TBS whiskey
1/2 tsp vanilla

In a bowl, beat heavy whipping cream until it begins to thicken. Add powdered sugar, whiskey and vanilla and continue to beat until stiff peaks form.

Happy Baking!! 

Wednesday, July 7, 2010

In case anyone was wondering..

This will be short and sweet (get it...I work at the sweet factory!?... man that was good...)

Just wanted to share my latest creation at The Sweet Factory.. Lawanda (the owner) is trying to get her name out there so we're making little goodie bags with cookies and a few mini cakes to distribute around the area to different businesses. Side note- If anyone has any suggestions for some good marketing techniques, they would be greatly appreciated!

Disclaimer: these pictures were taken with my phone- definitely not Tastespotting or Foodgawker material..

Note the penmanship :)
So what do you think?? If you got one of these at your place of work,
would you be inclined to come check us out??