Showing posts with label buttercream. Show all posts

Thursday, July 14, 2011

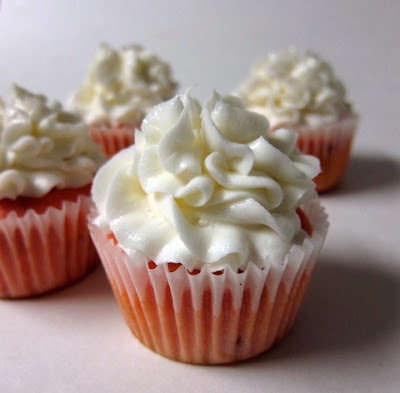
Raspberry & Champagne Cupcakes

Remember when Mountain Man and I got stuck in Atlanta?

wasting our extra day at the aquarium

Well, on top of the fabulous wedding we attended, one of our friends who also made the trip to hotlanta happened to have a birthday that fell on the same weekend.

Now you all know how I feel about birthdays and I absolutely can't let one of my friends go without something sweet, especially when she's having to spend her birthday away from home!  

So I whipped up a batch of cupcakes, found a nifty little disposable cupcake carrier perfect for 6 little sweets and brought them as my carry on.

You'd be amazed at the amount of people who will make comments as you walk through the airport carrying a box of cupcakes, but much to their dismay the cupcakes made it all the way to Georgia and made their special delivery to the birthday girl.


Raspberry Cake 
Oven: 350 Bake time: 20 minutes
Makes 3 8-inch cakes or 24 cupcakes

1 cup butter, softened
1 1/2 cup sugar
1/2 package raspberry jello
4 eggs, separated
2 1/2 tsp baking powder
1/2 tsp salt
2 3/4 cup flour, sifted
1 cup milk 
1/2 cup pureed raspberries  

Preheat oven to 350. Line muffin pan with liners and set aside.
In a large bowl beat butter and sugar until light and fluffy.
Add jello and mix until incorporated (this lends for pretty in pink cake)
Add egg yolks one at a time, beating after each addition.
In a small bowl whisk flour, baking powder and salt.
Alternate flour and milk, incorporating after each addition- beginning and ending with flour.
Using a spatula mix in pureed strawberries.
In separate bowl, whip egg whites until slightly stiff peaks form.
Fold egg whites slowly into batter.
Using an ice cream scoop, fill each liner with one scoop. 
Transfer to oven and bake for about 20 minutes- check with toothpick and adjust time if necessary.
Transfer to cooling rack and allow to cool in pan for for about 10 minutes before removing and allowing to cool completely.


Once cupcakes are completely cooled, frost with the Champagne Buttercream listed below.

Champagne Buttercream
1 cup shortening (I use high-ratio shortening)
1 cup butter, softened
8 cups powdered sugar
1/4-1/2 cup cheap champagne* I used Andre-Blush
1/2 tsp vanilla

Place shortening and butter in a large bowl and beat until combined and smooth.
Add powdered sugar, one cup at a time.
About 4 cups in, add 1/4 cup of champagne and vanilla.
Continue to beat and add remaining powdered sugar and more champagne as necessary. 
Beat/whip on high until frosting is smooth and fluffy.

*The frosting on these cupcakes is amazing- the tartness of the champagne blends well with the normally sweet buttercream.  Even though everyone liked the cupcakes I thought they were a little sweet..I always get such rave reviews on my strawberry cake I thought swapping in raspberries would work too, but there was something just a little off. I think I might go for a more natural raspberry flavor next time.


Happy Baking!

Thursday, April 7, 2011

A Dump Truck Birthday Cake


Marriage counseling has run its course...can you believe it's already been 9 weeks? 


But what does marriage counseling have anything to do with a Dump Truck Birthday Cake you ask? 

Well... everything!

During our first weeks in class, Mountain Man (who I should basically hire for my marketing manager) shared that I like to make cakes in my spare time. One of the ladies facilitating the class got extremely excited about this and the next thing I knew I had two gigs in the making.

The first cake she requested was a simple floral cake for her mother's 80th birthday...


And then a couple weeks later she asked for a dump truck inspired cake for her grandson's 2nd birthday. 

My mind immediately went to a 3D cake.

This was my third attempt at a sculpted cake and it was definitely a learning experience. 

I wish I could have taken a few more pictures of the process for you, but I get in a zone when I'm decorating and stopping to take pictures just wouldn't be possible. 

I started with two 9x13-inch sheet cakes made of my Chocolate Layer Cake that I cut into two 3x10-inch cakes. I sculpted the left overs to form the cab of the truck and the back of the truck as well (which I didn't get pictured)


I then covered the cake in a thin layer of buttercream.


Then came the hours of fondant work... there were definitely a few hiccups in this process so it might be better that there are no pictures involved. Regardless, I got the cake done and couldn't have been more pleased with how it turned out...and the customer was pretty darn happy too!


If anyone out there is thinking about making a 3D truck I have a ton of tips that I'd love to share, so feel free to shoot me an email any time! This cake was a lot of fun.. I love being a part of special celebrations!


Happy Baking!


Thursday, March 10, 2011

Homemade Funfetti Cupcakes and Fudge


Do you ever feel like you need a little more fun in your life?

Sometimes while stalking browsing facebook, I get to some pages and think, "Man, they look like they are having so much fun!"

Then I start wondering about what they do, how do they manage to have so much fun all the time? where do they work? how do they get all that vacation time? can I get a job there? do they go to work every Monday morning exhausted? how do they save any money? Why does it seem like they're having so much more fun than me?

Do you ever wonder if people are looking at your life and asking those questions?

Now don't get me wrong.. I have fun. It's true..ask my friends..I'm generally a fun person.

 Does this look like the face of someone NOT having fun?

Every now and again I get stuck in a rut though (that's normal right?)...stuck in the day to day routine of work and don't get enough play and just feel like I need a little more fun in my life.

When it comes to baking, nothing says fun like funfetti cake.. I mean, it's in the name for goodness sake.

Of course, now that I have a blog, I feel like I'll be judged for using a boxed cake so when I found this recipe on ReFresh for Homemade Funfetti Cupcakes I just had to try them out...sadly Kori stopped posting and her site no longer exists, but luckily I got this recipe before she took it down.


Homemade Funfetti Cupcakes
Recipe from ReFresh
Oven: 350 Bake time: 15-20 minutes
Makes 12 cupcakes

1 1/4 cup AP flour
1 1/2 tsp baking powder
1/4 tsp salt
3/4 cup sugar
6 TBS butter, softened
2 eggs
1 tsp vanilla
1/2 cup whole milk
3-4 TBS rainbow sprinkles

Preheat oven to 350 and line cupcake pan with liners.
In a large bowl, sift flour, baking powder and salt.
In large bowl, beat sugar and butter until light and fluffy.
Add eggs one at a time, beating well after each addition. Stir in vanilla.
Gradually add flour mixture, alternating with milk, beginning and ending with flour.
Fold in sprinkles.
Using an ice cream scoop, fill each cupcake liner with one heaping scoop.
Transfer to oven and bake for 15-20 minutes or until toothpick comes out clean.
All to cool slightly before removing from pan.
Frost with your favorite buttercream.

But we're not done having fun yet!!

Funfetti Fudge anyone?

Liz is a genius..if you haven't stopped by her blog Little Bitty Bakes you just have to go see what she's up to.. and I can't wait for the guest post I'm doing for her later this month!


Funfetti Fudge
recipe from Liz with a few alterations
Fills an 8x8 pan

1 can condensed milk
2 cups white chocolate chips
1/4 plus 1 TBS funfetti cake mix (yes, I had a box of cake mix when i made the homemade ones)
sprinkles

Line baking pan with parchment paper. Sprinkle bottom of pan with powdered sugar and set aside.
In a small sauce pan, stir chocolate chips and condensed milk over low heat until smooth.
Stir in cake mix, some extra sprinkles and spread into pan.
Place pan in fridge and allow to cool for about an hour.
Once fudge has chilled, use a small spoon or mini ice cream scoop and form into little balls and return to fridge for about 30 minutes.

Do you ever feel like you need a little more fun in your life?
Happy Baking!

Wednesday, March 2, 2011

Hello Kitty Birthday Cake and Cupcakes


I got to give out my first business card!

About a month or so ago MM brought over a guy that he worked with who was in need of a cake- his daughter was turning 5 and was having a Hello Kitty themed birthday. Of course, (as all men should know) he knew his wife needed the final say, so a few quick words, a handshake and a business card later he said his wife would be getting in touch.

A few weeks later a couple of emails were shared, a phone call was made and the order was placed- a Hello Kitty themed cake and two dozen Hello Kitty cupcakes.


Remember the Animal Birthday cake I made for Lucas? Well that cake and this one were being delivered the same day, not 30 minutes apart, which meant lots of time management when it came to all the decorations.

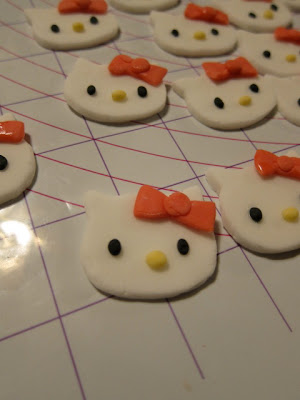
About the same time that I started working on all the animals, I also started working on these little Hello Kitty heads.


 I searched high and low for a character cookie cutter, but since no such luck was to be had,  I had to resort to individually hand cutting fondant into heads, eyes, noses and bows... talk about time consuming.. as our friend that's staying with us watched me, she likened it to an assembly line of Hello Kitty's.


The cake was my favorite  White Cake with Vanilla Buttercream and the cupcakes were Dark Chocolate Cake also with Vanilla Buttercream.


I was so happy with the final product, but more importantly the birthday girl, Haley was happy too!


As for me.. I'm headed east for dress shopping tomorrow!!
I hope you all have a lovely rest of the week and weekend too :) Wish me luck!
Happy Baking!!

Thursday, February 3, 2011

Lemon Cake with White Chocolate Buttercream


For a few weeks it seemed like we were having a birthday (or 2) in the office at least once a week.

I didn't want to bombard you all with cake after cake though, so I've been trying to space them out a bit.

Now that everyone in the office realizes I'll never back down from a challenge, the cake flavors keep getting more and more fun.

When I told one of the new girls at work that she could have any type of cake she wanted for her birthday, she got all excited and said she needed some time to think on it.

"Lemon and White Chocolate," she said when she found me in the halls of the office the next morning.

Game on.

I went with a light Lemon Cake filled with fresh Lemon Curd and a White Chocolate Buttercream and couldn't have been happier with the result.

I also used the opportunity to try a new decorating technique that I had seen recently on Martha Stewart (ps. if anyone is planning a wedding.. her website is ah-mazing). The ruffle technique looks really neat and is sure to impress.. and it was pretty easy too!


Light Lemon Cake
recipe from epicurious.com
Oven: 350 Bake time: 35 minutes
Makes 2 8-inch cakes

1 cup oil
2 cups sugar
4 eggs
2 1/2 cup flour
1/2 tsp salt
2 tsp baking powder
1 cup whole milk
1 tsp lemon extract
1/2 TBS lemon zest

Preheat oven to 350. Grease and flour cake pans and line bottom with parchment paper.
Place sugar in large bowl and while mixer is on low slowly pour in oil until well combined.
Add eggs one at a time, mixing after each addition.
Add lemon extract and lemon zest, mixing well.
In a small bowl, whisk flour, baking powder and salt.
Add flour mixture to wet ingredients, alternating with milk- beginning and ending with flour mixture.
Pour into prepared pans and place in oven for 30-35 minutes or until tester toothpick comes out clean.
Transfer cakes to cooling rack and allow to cool in pans for about 20 minutes before removing from pans to complete cooling.

Once cooled, level and fill with Lemon Curd and frost with White Chocolate Buttercream.

White Chocolate Buttercream
1 cup butter, softened
4-6 oz white chocolate
4-5 cups powdered sugar
1/2 tsp vanilla extract
1/4 cup whipping cream

In a large bowl, beat butter and vanilla until light and fluffy.
In a microwave safe bowl, melt white chocolate for about 2 minutes or until smooth, stirring at 30 second intervals.
Add melted chocolate to butter and mix until combined.
Slowly add powdered sugar, one cup at a time and whipping cream until smooth frosting consistency is reached.


Happy Baking!

Monday, July 26, 2010

My Very First Wedding Cake: A Success Story

I hope I didn't leave you all in too much suspense over the past weekend! Unfortunately I didn't have much time or access to a computer to be able to share my story along the way, but let it be known that it was a fantastic success! What do you think?? Not to shabby for my first time right?!

I have to admit, I'm like a proud mama when it comes to this cake. For spending hours baking cake, traveling many many miles, switching planes, making 6 batches of icing in one average sized mixer, getting to the church (cakes and icing in tow) sans air conditioning, constructing the cake and decorating cupcakes all before the rehearsal dinner, everything went smoothly...almost too smoothly.

On their way to the airport!

Thanks to MM's wonderfully constructed boxes, the cakes all made it to GA perfectly intact. Friday morning was spent making way too much icing and when I finally arrived to the church around noon I knew it was go time. I had until 5pm to get everything constructed and ready for the big day in order to have time to get back to the house, shower and make it to the rehearsal dinner on time.

As soon as I walked into the kitchen of the church I was in heaven.
..so...much...counter space!

Before she got all done up with fresh flowers.

Cupcakes ready to for display..
Red Velvet and Vanilla Butter Cake with Chocolate buttercream.

I couldn't be happier with the way everything turned out..all the stress I felt on the way to GA almost disappeared as once I finally got into the kitchen to start decorating. The wedding was beautiful, the bride and groom were soo happy, and everyone seemed to love the cake! I heard a little girl tell her mom the cake was 'sooo good' and the caterers couldn't believe I had traveled that far..

Making a wedding cake is a big responsibility and I feel so blessed to have friends like Trevor and Meagan who took a chance and let me make theirs. It made their special day even more special to me :) I wish them only the best in their new life together! 

Wedding cake decorator for hire... who's next?? ;)

Friday, June 25, 2010

This Week at the Sweet Factory


Have I mentioned how much I enjoy my part time job? 

I don't even care about having to come into work early a couple days a week.

And my boss at The Sweet Factory is great.. she's always open ears to my ideas and pretty much lets me do my thing in the kitchen when it comes to baking and decorating (awesome).

This week: Lemon Cupcakes with Buttercream and Oreo Cupcakes with Oreo Cream Cheese Icing.


Lemon Cupcakes w/Buttercream  
Adapted from recipe found on CakeCentral.com
Oven: 350 Bake Time: 25 minutes
Makes 24 cupcakes

3/4 cup butter, softened
1/4 cup shortening
2 cups sugar
4 large eggs
2 1/2 tsp vanilla
Juice from 1 whole lemon
lemon zest from whole lemon
1/4 tsp salt
2 3/4 cup AP flour
1 TBS baking powder
1 cup warm half and half or heavy cream

Preheat oven to 350.
Line 24 cupcakes with paper liners.
Beat butter and shortening and sugar until fluffy.
Add eggs, one at a time, beating until incorporated after each.
Mix in vanilla, lemon zest and lemon juice.
In a large bowl, whisk flour, baking powder and salt.
Alternate the addition of flour mixture and warm cream, beginning and ending with flour.
Blend until smooth.
Fill prepared cupcake liners about 2/3 with batter.
Transfer to oven for 25 minutes or until toothpick comes out clean and cake bounces back to touch.
After baking, remove from pan and place on cooling rack.


When cool, frost with Best Buttercream.


Best Buttercream
1 cup butter (2 sticks), softened
1 cup crisco
2 tsp vanilla
1 TBS meringue powder (optional)
8 cups powdered sugar (sifted)
1/4 cup heavy whipping cream
*juice from 1/2 lemon (optional)


Beat butter and crisco until creamy and combined. Stir in vanilla. Add sifted powdered sugar, meringue powder and whipping cream. Beat until smooth and fluffy, about 5 minutes.
(I added juice from about 1/2 a lemon for a hint of lemon flavor)


Oreo Cupcakes w/Oreo Cream Cheese Icing 
Semi-homemade with Duncan Hines Devil's Food Cake Mix
Oven: 350 Bake time: 25 minutes
Makes 24 cupcakes

1 box Duncan Hines Devils Food Cake Mix
4 eggs
1 cup sour cream
1/4 cup water
1/3 cup vegetable oil
1/4 cup sugar
1 cup crushed Oreos

Preheat oven to 350.
Line 24 cupcakes with paper liners.
In a large bowl, beat all ingredients (expect Oreos) until blended and smooth.
Fold in crushed Oreos until incorporated.
Fill prepared cupcake 2/3 full with batter.
Transfer to oven and bake for 25 minutes or until toothpick comes out clean and cake bounces back to touch.
After baking, remove from pan and transfer to cooling rack.

Completely cool before icing with Oreo Cream Cheese Icing.


Oreo Cream Cheese Icing
8 oz. cream cheese, room temperature
1/2 cup butter (1 stick), softened
1 cup powdered sugar, sifted
1/2 cup heavy whipping cream, whipped
1 tsp vanilla
1/2 cup finely crushed Oreos

In large bowl, beat cream cheese, butter and vanilla until smooth and creamy.
Sift powdered into cream cheese/butter mixture and beat until smooth.
In small bowl, beat whipping cream until soft peaks form.
Add whipped cream to cream cheese mixture and beat until incorporated and fluffy.
Fold in crushed Oreos.

You got a sneak peak and a couple recipes out of it...
So.. when are you coming to visit me at the Sweet Factory???

Tuesday, June 22, 2010

Peach Tea Cupcakes (for 2)

6am comes way too early on Monday morning, but that didn't stop me from being inspired even before I could even make coherent sentences.


As I reached to the cabinet for the elixir of life (aka coffee), something caught my eye... Crystal Light Peach Tea. Might I remind you, it was 6am so I of course shrugged it off and continued to make my morning cup of joe. But I found myself unable to stop thinking about it throughout the day until I came up with something... cupcakes.

Instead of making a whole batch of cupcakes, I went a different direction inspired by Christina over at Dessert for Two. Christina has a blog devoted to recipes built for two (genius!), cupcakes included. After browsing through her site and getting ideas I went ahead and attempted to make my own dessert for two- I hope I made Christina proud! :)


Peach Tea Cupcakes (for 2)
inspired by Christina at Dessert for Two
Oven: 375 Bake Time: 18 minutes
Makes 4 cupcakes

2 TBS oil
3 TBS sugar
1 egg
1/4 tsp vanilla
2 TBS vanilla yogurt
2TBS water
2 tsp Crystal Light Peach Tea
6 TBS AP flour
1/2 tsp baking soda
1/4 tsp baking powder
dash of salt

Preheat oven to 375 and line cupcake tin with 4 paper liners.
Whisk oil and sugar. Add egg and beat until combined. Mix in vanilla.
In a small bowl, mix yogurt, water and tea until smooth and tea mix has dissolved completely.
Whisk flour, baking powder, baking soda and salt in a small bowl.
Alternate adding flour and tea mixture, beginning and ending with flour.
Transfer batter to cupcake tin and place in oven.
Bake for 18 minutes or until toothpick comes out clean.
Transfer to cooling rack and cool completely before frosting.

Peach Buttercream
1 peach, skinned, pitted and pureed
4 TBS butter or crisco
1 TBS whipping cream
1 cup powdered sugar
1/4 tsp vanilla
1/4 tsp lemon juice

Beat butter, powdered sugar, whipping cream and vanilla until creamy and smooth. Fold in pureed peaches and lemon juice.
Happy Baking!

Monday, April 5, 2010

In the Kitchen with Mountain Man (and Adventures in Cake Decorating)

Food is something that is very important to MM and I... we are both very passionate about all that is food and love spending time in the kitchen together cooking, eating and even baking. It's great to be able to share those kind of things with someone and it makes meals a lot more fun when it becomes a team effort. 

The more I got to know MM as we first began our relationship the more the kid intrigued me.. already totally not "my type" it was never a dull moment as we were getting to know each other.  It was one lazy Saturday in particular when I realized once and for all that this was the guy for me... we hadn't been dating too long and like I said I was always learning something new about him. As we laid around this particular afternoon, MM started getting ancy (surprise surprise) and insisted we do something, 'Let's make something,' he said, 'Make something? like what?' I retorted (It was Saturday afternoon, all I wanted to do was hang) 'Yeah,' he said, 'Let's make some pies.' [Insert record scratching and music stopping here] Of course, I was intrigued.. a guy who wants to make pies on a Saturday afternoon? Let me rephrase that.. a good looking, normal, cool guy who wants to make pies on a Saturday afternoon? Shortly there after we made our way to the grocery store to get ingredients and baked pies for the afternoon... cherry and apple to be exact. Did I mention he latticed the top and made the crust from scratch? sans recipe? out. of. control. 

In addition to the wonderful pies, MM bakes a mean bread. While he was telling me about some loaves he was making the other evening it dawned on me- what a perfect opportunity to get him involved, do some explaining and be included in this lovely blog! When I ran the idea by him he was totally on board- guest appearances by my MM complete with personal narrations (with a few witty comments by yours truly) I mean, he is an integral part to the bakery we want to own one day... so making his first, but most certainly NOT his last appearance... ladies and gentleman... all the way from Georgia...

Welcome to this addition of 'In the Kitchen with Mountain Man.' 

Sourdough Baguettes and a Loaf

Sourdough is a LOOONG process, but well worth the wait! This project was started on Tuesday when I put together the "starter mixture" and let it begin to sour. Friday afternoon rolled around and I knew by the pleasant beer smell that the starter was ready to be placed into action (this starter takes 3 days to get ready so plan accordingly- recipe is below) . I got this simple recipe from cookingbread.com but unlike my girlfriend, I like to have a little freedom with recipes so I tend to deviate. (he was trying to be funny here and he knows this is crap, since I often change things up and even create my own recipes... we're going to have to work on his blog wit) The recipe began with some of the starter, then I added a little more warm water, a little salt, some whole wheat flour and a lot more bread flour. For those of you that really like specifics here are the exact amounts:

Starter
2 cups flour
2 cups warm water
1 tsp yeast

Mix all ingredients and let sit for 3 days. If you don't want to use it right away, place in an airtight container and put in the fridge.

Sourdough Bread
1/4c starter
2 1/2 c warm water
2 tsp salt
1 cup whole wheat flour
5 1/2 c bread flour
After mixing in the top four ingredients, add the rest of the flour one cup at a time until it was too thick to stir and turn it out on the counter.  This is my favorite part!  Kneading the rest of the flour into the dough takes some time and effort, but I absolutely love this part of the process. 
The way it feels under your hands, the way you can be rough with it, and the fact that the more you knead the better it will be (most of the time) is awesome.  After kneading the bread for about 10 minutes, most of the flour should be incorporated into the dough.  At this point the dough should be elastic and springy, rebounding if you poked it with your finger. Then, let it rest for half an hour.  
Bread in general is such a waiting game and timing is crucial.  All of the pauses and rests are so important in the baking process so if you get impatient, you could end up with some disasters (or really flat bread).  After the rest, I went ahead and formed it into 2 smaller baguettes and half filled a loaf pan.  Then again I waited... this time 12 hours!  When I woke up the next morning they had grown and doubled in bulk, so I popped them into the oven.  
375 degrees for 45 minutes was all it took... along with a little steam to give them that awesome golden brown crust and beautiful slash that is characteristic of baguettes.   


 /\^/\


And there you have it folks.. Mountain Man's first blog spot.

I mentioned my Easter cake in the title and I apologize for the length of this post,
 but I didn't want to have to post more than once this evening so I figured I'd just consolidate it all into one. In the future, MM's posts will probably be their own post.


Adventures in Cake Decorating
This past Friday concluded Lesson 3 in my cake decorating class. Lesson 3 was devoted to learning the art of royal icing flowers, so we didn't have to come with a completed cake till the last week of class which just happened to be Easter. I knew I would be joining my friends down in Austin for Easter Sunday Dinner and it was my task to bring the dessert (obviously). In this last class we were supposed to use all the flowers we had been making for the past few weeks in addition to learning to 'basket weave.' 
I went with a Neapolitan Cake - layers of vanilla cake and chocolate cake with a strawberry buttercream filling and of course covered and decorated with vanilla buttercream.
The flowers were all made from royal icing, making them very edible (Steph and I ate at least half of them after dinner) and the basket weaving was actually not as difficult as it might appear. The Easter Bunny's butt was inspired by the geniuses behind 'Hello Cupcakes' although mine is a little different in regards to where he is and how he was decorated- but I still must give credit where it's due.

Neapolitan Cake
Adapted from Epicurious 
Oven: 350 Bake time: 30minutes


Vanilla Cake
1 cup oil
2 1/2 cups AP flour
1/2 tsp salt
1 TBS baking powder
3/4 cup milk
4 TBS sour cream (If you don't want to buy sour cream, you can just use 1 cup of milk)
1 tsp vanilla extract
2 cups sugar
4 eggs

Chocolate Cake
1/4 cup cocoa 
2 TBS milk

Whisk flour, baking powder and salt.
In another bowl mix milk, sour cream and vanilla extract.
Beat oil, sugar, and add eggs one at a time. Reduce speed and alternate adding flour mixture and wet mixture, beginning and ending with flour mixture. 
Once all is combined, pour half of batter (about 2 and a half cups) into separate bowl and add 1/4 cup cocoa and milk.
Pour batter into prepared pans.
Bake for 30 minutes or until toothpick comes out clean and transfer to cooling rack.
After cooled, slice each cake in half. 
Fill cake with strawberry buttercream, alternating layers: chocolate and vanilla.

Strawberry Buttercream
1 cup crisco
6 frozen strawberries (defrosted, drained-save 2 TBS of juice- and mashed)
4 cups powdered sugar

Beat crisco and saved strawberry juice until combined. Beat in powdered sugar until smooth. Fold in strawberries until incorporated.

Happy Baking!!