Monday, September 19, 2011

Live from the East Coast

Lots of exciting things have been going on since we last chatted (which is why I've been MIA) and there are plenty more to follow in the coming weeks (can you say wedding fever??) so unfortunately I'll be flying under the radar again soon.

I did, however, want to take this time to keep you updated on a few significant life events:

1- My Dad and I made it to the east coast in one piece. Once we got out of Texas we hit rain almost the entire way forcing us to stop more than we would have liked, but it did allow us to go by each of our alma maters and pick up new sweatshirts (it's the little things that make road trips great). We chatted about everything under the sun, from military to politics, religion and family matters.. it was a great couple of days.

2- In the past couple of weeks I've managed to make not 1, but 2 wedding cakes.. check these little beauties out...


Danielle and Ricky wanted something simple with pearl accents and fresh flowers. They went with a small strawberry cake for display and cutting and served guests with a couple of large sheet cakes.. Shortly after dropping this off I picked my Dad up from the airport and we began our trek to VA.


I've been friends with Eric and Steph since high school so making their wedding cake was extra special. They went with alternating tiers of Chocolate Guinness Cake w/ Baileys Buttercream and Wedding White w/ Vanilla Buttercream. I literally started preparing this cake the day after our roadtrip and transporting their cake was quite an adventure, but I was so happy to be a part of their special day.

3- It's go time. The wedding countdown has begun and I have a lot to do in the next 13 days (insert stressful thoughts here) Thankfully I haven't started my new job yet, so I'll be running around all over the place getting things done...I can't wait!!

I'm going to try and get another post in before the wedding, but I can't make any promises.. I've got a "guest book" to make (can't wait to show you the finished project) and lots of other goodies to take care of so I may be MIA for another few weeks. 

Oh, and did I mention that I have to start baking MY wedding cake this weekend??


Happy Baking!

Thursday, September 1, 2011

Margarita Jello Poke Cake

Well folks, it's my last week in Texas.

It's been a good run, but I'm ready to be back on the east coast. Ready to have seasons, be in driving distance to the beach, mountains, friends, family, greenery... and most importantly not have to drive 1 hour to a decent mall!

Let's be honest, I wasn't cut out for Texas. Now don't get me wrong, I love a good chicken fried steak, rocking cowboy boots, two-steeping, and jammin out to some good old Texas country music, but this 107 degree heat for 70+ days straight has been brutal and the highway system they've got going on just doesn't work for me (why don't Texan's know how to merge?).

That doesn't mean that we haven't had a good time while we've been out west and it most definitely doesn't mean we haven't made some wonderful friends these past couple of years.

And that's where this cake comes in. For the past couple years, some of our good friends here have a killer summer BBQ complete with ice luge, corn hole, flip cup, burgers, dogs, and lots of other good food- including this cake.

While perusing the isles one day this summer I came upon this Margarita Jello....(can someone say fantastic idea?)

...and then I found a recipe for a jello poke cake- It was just too good to be true.

Now the sad part is, that when I went back to get some more recently, I couldn't find it :( but that doesn't mean you couldn't substitute it with some lime jello!


The cake was a huge success. So much so, that I didn't even get to get a picture of it in all it's glory among the smorgasbord of foods that afternoon.

Margarita Jello Poke Cake
Recipe adapted from Betty Crocker
Makes one 9x13 sheet cake

1 box white cake (I used Betty Crocker Super Moist White)
1/4 cup water
1/3 cup veggie oil
4 egg whites
1/4 cup margarita mix (non-alcoholic)
1 box Margarita flavored jello*
3/4 cup boiling water
2 TBS tequila
2 TBS triple sec
1/4 margarita mix
Topping
1 cup heavy whipping cream
1/4 cup powdered sugar
2 TBS tequila* opt
1 TBS triple sec* opt

Preheat oven to 350. Spray pan with cooking spray and lightly coat with flour.
In small bowl, mix jello and boiling water. Add tequila and triple sec, mixing until everything is dissolved.


In a large bowl, combine cake mix, 1/4 cup jello mixture, margarita mix, water, egg whites and oil and beat until well combined.
Pour into pan and bake for about 25-30 minutes or until toothpick comes out clean.
Transfer to cooling rack.
While cake is still warm, use a fork to poke holes throughout the whole cake.


Mix 1/4 margarita mix with remaining jello mixture and pour evenly and slowly over cake.


Cool completely, at least 1 hour.
Once cake has cooled, in a large bowl beat whipping cream until soft peaks form. Add powdered sugar, tequila and triple sec and continue to beat until stiff peaks form.
Frost cake while still in the pan. I don't normally keep cakes in the pan, but for a BBQ it was easy to transfer and easy to clean up.


Place in the fridge until ready to serve.
Enjoy!


Daddy Tom gets in on Sunday evening and we begin our trek east, but not before I make a wedding cake for some friends this weekend though!

So while all of you out there are sharing good food and laughs with good friends, we'll be driving..driving into the sunset...well I guess sun rise technically since we're driving east...

But the real question is this: What do you talk to your dad about for 24 hours? I'm open to suggestions.

I'll be MIA just for a bit and the next time you hear from me I'll be back in VA! Until then..

Happy Baking!

Thursday, August 25, 2011

Banana-Coconut Oat Bread


Whenever I look back at my first few months blogging my jaw drops at the poor quality of my pictures and horribly written recipes. It's amazing to me that people actually read the stuff or even started following me for that matter.

I never would have thought that I'd get as far as I have or establish a relationship with my readers that keeps them coming back for more.

And it always puts a huge smile on my face when I hear from old friends or even old acquaintances that they read my blog.. "you know, I have to admit, I totally read your blog," like it's a little secret they're scared to admit, but they're sharing it with me. I absolutely love it and that's why I keep doing what I do.

I also never would have imagined that companies would contact me to do reviews for them.. one of the coolest perks of blogging. It's not like people are knocking down my door to give me their product, but I get something every once and a while and it puts that same smile on my face. Now don't get me wrong, I'd love to get to the point where people are asking me to give away mixers or review things every week, but at this point I'm perfectly content with that unexpected email waiting in my inbox followed by that product filled package waiting on my doorstep.

This bread is a product of one of those products. The wonderful folks at Kelapo contacted me a few weeks back and asked if I'd be interested in trying out some coconut oil. I have to admit, I'm not a huge coconut fan, but Mountain Man sure is so I thought what the heck.. why not!


Truth be told, I actually really enjoyed this bread. I substituted the coconut oil in place of the normal stick of butter I add to my bread and it really did something to the flavor, not to mention added a few health benefits.

For more coconut oil recipes and to learn a little more about the benefits of using coconut oil check out their website: We're Coconuts.


Banana-Coconut Oat Bread
Oven: 350 Bake time: 45 minutes
1 large loaf or 3 mini loaves

1 cup AP flour
1 cup quick oats
1/2 tsp baking soda
1 tsp baking powder
1/2 tsp salt
1/2 cup Kelapo coconut oil, melted
3/4 cup brown sugar
1 egg, beaten
3 bananas, smashed
1/2 cup buttermilk

In a large bowl, whisk flour, oats, baking soda, baking powder and salt.
In a smaller bowl, mix brown sugar and coconut oil until well combined.
Add egg and smashed bananas, mixing until smooth-ish (it's always nice to have a few chunks).
Add wet to dry ingredients and mix.
Stir in buttermilk and mix until combined.
Pour into prepared baking pans.
Bake for 40-50 minutes or until a toothpick comes out clean.
Allow to cool on cooling rack before serving.


Our house is all packed up... nothing left but me, my kitchen aid and a crate full of cake tools. That's right, even in my last week I'll be making a wedding cake for a friend. Once Mountain Man leaves I'll be heading over to some friends to stay out my last week of work and then its road trip time. A little 24-hour QT with the first man in my life, my dad.

These next few weeks may be a little rough for the blog, I'll try to get to things when I can, but I can't make any promises! I'll be back soon though so stick with me!!

Happy Baking!

Monday, August 22, 2011

Big News and Plum Pizza


As if we don't have enough going on this summer, in just a few days we'll be packing up and heading east.

That's right everybody, we're moving!

After 2 years in The Great State, we'll be starting our lives as a newly weds in The State for Lovers: Virginia.

Ever since Shannon's wedding we've been going at lightning speed: The week after we got back from our visit east Mountain Man got offered a position in Washington, D.C., and before we knew it we were searching for houses on craigslist and calling moving companies for quotes.

We've literally had 2 weeks to figure everything out before MM makes the drive, moving truck and all. That means we'll be spending the rest of the week packing up our house by the lake and transitioning to a house in the city.

I know I keep making excuses for my flakiness this summer and this new endeavor isn't helping the situation by any means!

Between our wedding, friend's weddings and now the big move, I've had a lot on my mind this summer.

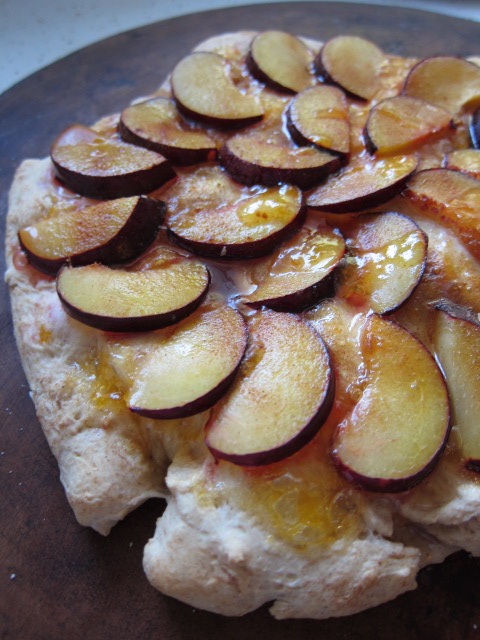
In attempts to win you over, I hope you'll accept this Plum Pizza as a token of my appreciation and love for you all out there despite my inconsistent posts these past few months. I promise as soon as we get settled the posting will get back to normal.

This pizza crust is our go-to classic recipe with an extra addition of cinnamon for the dessert pizza. The recipe yields enough dough to make 2 large regular pizzas and 1 small pizza dessert pizza.

Pizza Crust
Makes 2 large pizzas and one small
Rise time: 1 hour
Oven: 425 Bake time: 30 minutes

2 1/4 tsp active dry yeast (1 package)
2 TBS  honey
1 1/2 cup warm water (about 100 degrees)
1 tsp salt
3-4 cups of AP flour, whole wheat, or combination of both

In a large bowl mix warm water, honey and yeast. Let sit for about 5-10 minutes, waiting for yeast to become active and mixture to bubble.
Stir in salt and 3 cups of flour.
Turn out dough onto lightly floured surface and continue to knead in flour, 1/4 cup at a time until dough is no longer sticky and elastic.
Clean bowl and lightly coat with oil. Place dough ball in bowl, cover with saran wrap and let sit for about 1 hour or until dough has doubled in size.
Turn dough out on lightly floured surface and punch down.
Cut dough into three pieces- 2 large balls and 1 small.
Let rest for a couple of minutes and your dough is ready to be rolled out and topped.


Plum Pizza
2-3 fresh plums
1 1/2 tsp cinnamon
2 TBS white sugar
2 TBS brown sugar
1/4 cup apricot jam

Sprinkle 1 tsp cinnamon and 1 TBS white sugar over dough and knead in until just combined.
Roll out or stretch small piece of dough to form pizza crust on pizza stone or pan.


Place apricot jam in a small bowl and warm in microwave for 15 seconds.


Pour jam over crust and spread evenly (like you would pizza sauce).


Thinly slice fresh plums and place evenly around crust.


Sprinkle plums with remaining sugar and cinnamon.


Pop in oven and bake for about 20 minutes.


Monday, August 15, 2011

White Chocolate & Blackberry Cupcakes


I can't believe this summer is almost over.

The television is full of ads about back to school shopping: book bags and pencils galore. It brings me back to the days of picking out that perfect outfit for the first day of school, getting the newest Trapper Keeper and being up to date with the latest Lisa Frank folders.

It was such a bittersweet time- the excitement of new outfits, new classes and new friends, but the sadness that there would be no more long days at the pool and sleeping in.

Those were the days...

These cupcakes are bittersweet too, but in a different kind of way..

The light and oh-so-sweet white chocolate cake is topped with a tart blackberry buttercream; the perfect "bittersweet" flavors of the summer time.

I liked this cake so much that I've even decided to use it as one of my flavors at my wedding! 


White Chocolate Cake 
recipe from Epicurious
Makes almost 30 cupcakes 
or 3 8-9 inch cakes

8 oz white chocolate, chopped
2 1/4 cup AP flour
2 1/4 tsp baking powder
1/4 tsp salt
10 TBS butter, softened
1 1/3 cup sugar
4 large eggs, room temperature
1 1/2 tsp vanilla extract
1 1/4 cup whole milk

Preheat oven to 350 and prepare muffin tin with cupcake liners.
In a double boiler, stir white chocolate over simmering water until melted and smooth. Remove from heat and set aside.
In a medium bowl, sift flour, baking powder and salt. 
In a large bowl, beat butter and sugar until light and fluffy. 
Add eggs, one at a time, beating after each addition.
Beat in vanilla.
Add dry ingredients alternating with milk in 3 additions, beginning and ending with dry. 
Add warm white chocolate and beat until just blended.
Use an ice cream scooper and fill cupcake liners 2/3 way full.
Transfer to oven and bake for about 20 minutes or until toothpick comes out clean.

Blackberry Buttercream
1/2 cup butter (1 stick), softened
1 cup shortening (preferably high-ratio)
4 1/2 cups powdered sugar
1/2 fresh blackberries, pureed
1/2 tsp vanilla

In a large bowl, beat butter and shortening until well blended.
Add half of powdered sugar and beat until fluffy.
Add pureed blackberries, vanilla and remaining powdered sugar, beating until light and fluffy.
*Don't be afraid to add more powdered sugar if its too thin or a little water or milk if too thick*

Pipe a nice big dollop of frosting on each cupcake and top with a fresh plump blackberry.


Thursday, August 11, 2011

Mango-Lime Sandwich Cookies


I thought I discovered my favorite sugar cookie dough a few years ago, but my thoughts have changed.

Have you ever seen the decorated sugar cookies that Bridget does? I should have assumed that the recipe for the actual cookie would be just as good as the decorations she adorns them with.

Seriously, her cookies are a work of art.. I would have to start practicing now to be as good as she is in about 20 years...at least.

And her sugar cookie recipe is to. die. for. 

They're the perfect consistency and perfect for cut outs.

Definitely my new go-to sugar cookie recipe; they're even good when you jazz them up a bit...


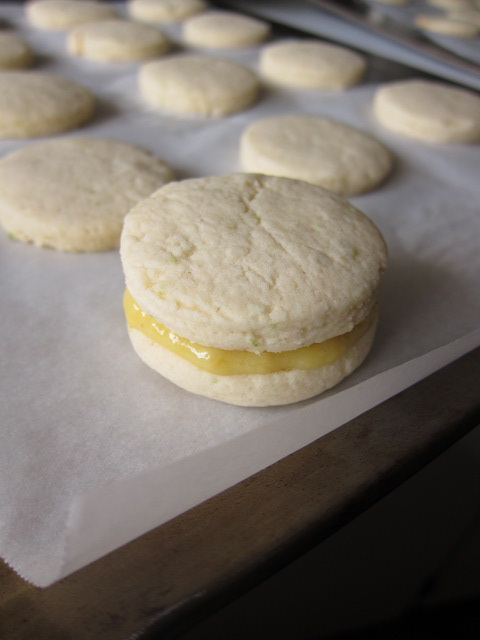
Lime Sugar Cookies with Mango Curd
recipe adapted from Bridget @Bake at 350
Oven: 350 Bake time: 10-12 minutes

3 cups AP flour
2 tsp baking powder
1 cup sugar
2 sticks butter
1 egg
3/4 tsp vanilla extract
1 tsp lime juice
zest of one lime

Preheat oven to 350 and line baking sheets with parchment paper.
Lightly whisk flour and baking powder in a small bowl and set aside.
In a large bowl cream sugar and butter. 
Add egg and extracts and mix until combined.
Gradually add flour mixture and mix until blended- dough will be slightly crumbly.
Before rolling out, knead with with hands until dough forms a solid ball.
Roll out on a lightly floured surface and cut into desired shapes.
Place on prepared baking sheets and transfer to freezer for about 5 minutes or fridge for about 10-15.
Immediately place cold cookies into oven and bake for 10-12 minutes.
Transfer to cooling rack and allow to cool completely before icing or filling.

Once cookies are cooled its time to make the summery little sandwiches.
I used my Fresh Mango Curd, but you could use any jam or jelly.
Flip cookie over and fill with tablespoon of filling.


Place second cookie on top and push down lightly. Repeat with remaining cookies.


What kind of filling would you put in these zesty little cookies??

Happy Baking!


Monday, August 8, 2011

Traveling Wedding Cake- Take 2

I apologize for being a little flaky last week, but one of my best friends got married this past weekend.

That's a good excuse, right? Did I mention I also made the cake??

And not just any cake.. a traveling wedding cake.

Of course, as with all the weddings we've gone to thus far, we were required to travel quite a bit.

Not only did I travel with the pre-baked, un-frosted, cakes from Texas, decorate it in my mother's kitchen using the various tools and tubs of buttercream I managed to smuggle onto the plane, we then had to drive another 2 hours with the finished cake in tow.


 But it doesn't matter, because all that being said, I'll do anything for my wonderful girlfriends!

When Shannon asked me to make a little cake for her and her hubby's ceremonial cut, I was honored- it didn't matter how many airplanes and automobiles it had to travel on.

All of my friends have been so great about giving me artistic freedom with their cakes and Shannon was no exception. She gave me just a few things she wanted and sent me on my marry way: chocolate cake, yellow decorations, and a flower.

This was my first attempt at a large gumpaste flower, but I really wanted to recreate the flower that was on her dress..


You're not going to believe this, but with all the hustle and bustle surrounding the wedding and trying to set up the cake before meeting friends for lunch, I forgot to take a photo of the cake after I set it up originally. The best shot I got was during the reception when the lights were dimmed and things were all over the table (they had the small cake sitting on their table with them).


I'm really hoping the photographer got a good one before everyone got into the reception and the lights were dimmed. No matter the quality of the picture, Shannon loved it and the hubby couldn't believe the flower was edible.

Another successful wedding cake for the books! And many more to come!

Happy Baking!

*And if you would- I have a new facebook page for all my cake creations- I'd love for you to "like" me :) I'll be posting pictures of cakes and possibly some tutorials along the way!


Monday, August 1, 2011

Garlic & Herb Knots


It's not very often that I feature something savory on here..

But what better to break that streak with some garlicky herb knots perfect for a summer pasta?

I have to be honest, Mountain Man does a majority of the cooking in our household mostly because he is a phenomenal cook.

Watching him in the kitchen is like watching an athlete in the zone.. he just gets in there and goes at it. You never know what he's going to come up with and sometimes he doesn't either. That's why he does the cooking and I do the baking.

He doesn't do recipes..no measuring cups...it's all by feel he says- everything is a new creation, a new set of flavors, going where the ingredients take him.

Baking is a whole different story: you need consistency, exact measurements, the perfect weights, precise cooking times.. it's all a science and I love that. I can make a cake over and over again and know its going to be wonderful every time; not to mention I can share my recipes with people and know they'll work.

When it is my turn to cook dinner I tend to stick with the same kind of dishes- pastas are my forte.

So after deciding to whip up some spaghetti with a fresh garden tomato sauce I thought what better to go with it than some garlic bread..

But not just any garlic bread, garlic & herb knots.


Garlic & Herb Knots
Bake time: 15-20 minute Oven: 400
Makes 16 rolls

1 cup milk
3 TBS butter
2 3/4- 3 1/2 cup AP flour (or whole wheat - I did half and half)
1/4 cup sugar
1/2 tsp salt
1/2 tsp garlic salt
1 package active dry yeast
1 egg
2 cloves of garlic, finely chopped
3 TBS extra virgin olive oil
1 TBS fresh basil, chopped (or dried)
1/2 TBS fresh oregano, chopped (or dried)

In a small saucepan, heat milk and butter until very warm (about 120 degrees).
Pour warm milk into a large bowl and add 2 TBS of sugar and yeast. Allow yeast to activate (about 5 min) or until milk starts to get foamy.
Add 1 cup flour, 2 TBS sugar, salt, garlic salt and egg and mix at low speed until moistened.
Beat 2 minutes at medium speed.
Stir in remaining flour, using just enough to form a soft dough.
Turn dough out onto lightly floured surface and continue to knead dough until smooth and elastic.
Place dough into a lightly oiled bowl, cover with saran wrap and let rise in a warm place (I turn my oven on, once it gets to 100 degrees I turn it off and then place my dough in the warm oven).
Let dough rise for about 45-60 minutes or until it has doubled in size.
Punch dough down and on a well floured surface, toss dough until it is no longer sticky.

Now its time to make the knots.
Preheat oven to 400 and line baking sheet with parchment paper.
In a small bowl, mix oil, garlic, basil and oregano and set aside.
Divid dough into 16 equal parts.
Shape each piece into a long strip by rolling in between hands.


Tie in loose knots, being careful not to stretch the dough too much and place on cookie sheet.


Using a pastry brush, lightly coat each knot with garlic and herb mixture.


Cover lightly with saran wrap and return to warm place, allowing to rise again for about 30 minutes.
Place in oven and bake for about 15-20 minutes or until knots are golden brown.
Serve with your favorite pasta dish.


Happy Baking!!

Thursday, July 28, 2011

Pomegranate Champagne Jelly


It's jam and jelly season!!

Last weekend Mountain Man's mother's friends were kind enough to throw us not one, but two showers.


Mama Mountain Man wanted to do something nice for all the hosts and so I offered to make some jelly to go along with a few other goodies in a gift basket.

As I sat down at my kitchen table brainstorming ideas for new flavor creations, my mind kept wandering to the bottle of champagne left over from the Raspberry Cupcakes I made recently.

With an idea in mind, I hopped on the internet and found exactly what I was looking for.

After looking over a few different recipes, I took the artistic liberty to change some things up a bit and came up with this...


Pomegranate Champagne Jelly
Fills 12 6 oz jars

3 1/2 cups dry champagne (I used Andre- nothing but the best!)
1 cup pomegranate juice
juice from 1 lemon
3 1/4 cups sugar
1 package of low-sugar pectin

Make sure to run your new jars through the dishwasher and let them completely dry before using them for canning.
Fill a small pot with water, add lids, and heat on low as you make your jelly.
Mix 1/4 cup of sugar and pectin in a small bowl and set aside.
Combine pomegranate juice, champagne and lemon juice in a large pot and bring to a boil.
Add 3 cups of sugar and return to boil.
Immediately stir in sugar/pectin mix and return to a rolling boil for 1 minute.
To test for readiness dip a metal spoon in mixture and place in fridge- if the mixture congeals after a few seconds you're ready to go.
Pour hot mixture into jars, making sure not to go all the way up to the top.
Remove warmed lids from water, pat dry and place on top of filled jars. Screw second part of lid to secure.
Place filled and secured jars in a safe place and start listening to those little guys pop.
Let sit at least one night before using.


Happy Jammin'!!


Monday, July 25, 2011

Cherry & Blueberry Mini Pies

Pies just scream summer don't they?

When we had some friends over for dinner the other night I knew a pie was in order.. but not just any pie..

Mini pies!

I love individual desserts.

Not only does everyone get their own pie to munch on, you don't have to worry about a lot of left overs that you may or may not eat for breakfast or nibble on for the rest of the week despite the fact that you still need to be able to fit in your perfectly fitting wedding dress in 3 months... hypothetically speaking of course.

Even though Mountain Man attempts to sway me, cherry pie just happens to be my favorite.

But it just didn't feel right to do something so simple, so I threw in a few blueberries and finished 'em off with a little sugary and oh-so-delicious crumb topping.


Cherry & Blueberry Mini Pies
Makes 4 mini pies
Oven: 350 Bake time: 25 minutes

1 package pie crust (or use your favorite recipe)
1 can cherry pie filling
2 cups fresh blueberries

Crumb Topping
1/3 cup brown sugar
2 TBS butter, melted
1 TBS AP flour
dash of cinnamon

Preheat oven to 350. Spray large muffin pan with cooking spray and set aside.
Make crumb topping by mixing all ingredients in a small bowl until combined and set aside.
On a lightly floured surface, roll out pie crust.
Cut 4 circles using an extra large round cookie cutter (Mine was slightly larger than the muffin cup).
Place cut outs in prepared muffin pan and press into bottoms, lightly pinching the sides.
Add about 1/4 cup of blueberries to bottom of each crust.


Add enough cherry filling to almost reach the top of the muffin cup (about 1/3 cup each).


Add another 1/4 cup of blueberries on top of cherry filling.


Sprinkle crumb topping evenly on each of the mini pies.
Transfer to oven to about 25-30 minutes or until the sides of your crust are lightly browned.
Allow to cool in the pan on a cooling rack for about 30 minutes before trying to remove.
Serve with fresh whipped cream or ice cream.

I wish I had a picture once they were all dolled up, but they were too good and the guests were waiting!

Until next time..

Happy Baking!