Sunday, February 27, 2011

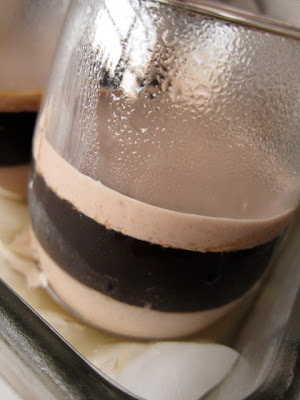
Nutella Panna Cotta with Coffee Gelée and Florentines


"Here's to a Creamy Dreamy Crunchy Sweet February!" caught my eye as I entered the Daring Bakers' Forum this month..

I'm always so excited to see what the host comes up with every month.. I honestly don't know how they do it. I think it would be nerve racking trying to decide on a recipe to be made and enjoyed by so many talented bakers.

The February 2011 Daring Bakers' challenge was hosted by Mallory from A Sofa in the Kitchen. She chose to challenge everyone to make Panna Cotta from a Giada De Laurentiis recipe and Nestle Florentine Cookies.

I think I've mentioned it before, but Giada has to be one of my least favorite Food Network Stars.. there's just something about her large head, annoyingly small frame and over emphasis on every syllable that really gets under my skin; not to mention that she goes from speaking perfectly American-like to extremely accented Italian terms.. BUT.. the fact of the matter is she always makes amazing dishes.

Like these Lemon Ricotta cookies I made a while back? heavenly.

And now this Panna Cotta? creamily delicious.

To accompany the panna cotta, Mallory also asked us to make a crunchy Florentine cookies and gave us the option of using gelées for a very lovely layering look with our panna cotta.

When I finally got around to making this month's challenge I wasn't content with just plain vanilla panna cotta, and chocolate wasn't cutting it for me either... then I remembered the new jar of Nutella waiting for me in the pantry! Oh yes, I went there..

I had to do a little online investigating to make sure I was doing the layering right and hopefully with everything I learned I can offer a little more insight into everything as well. It was actually quite easy, and although a little time consuming, everyone is sure to be impressed with your presentation.

Nutella Panna Cotta
recipe adapted from Bon Appetit
1 cup whole milk
1 TBS unflavored powdered gelatin (1 package)
2 cups whipping cream
1/3 cup sugar
1/2 cup Nutella
1/2 tsp vanilla

Pour milk into small bowl, sprinkle gelatin over top and set aside for about 5 minutes.
Place a medium saucepan over medium heat, stir in cream, sugar and vanilla. Bring to a low boil.
Add nutella and whisk until smooth.
Whisk milk/gelatin into nutella mixture until gelatin is dissolved.
Transfer to ramekins or nice glasses for serving.
*If layering pour about 1/3- 1/2 cup of mixture into each cup and place in the fridge for about an hour before pouring gelée over top.


While panna cotta is thickening, start making the gelée...

Coffee Gelée
Adapted from Gourmet Magazine
2 cups brewed coffee
1/4 cup hot water plus 2 TBS cold water
1/2 cup sguar
2 tsp unflavored gelatin powder
2 tsp vanilla

Place sugar and 1/4 cup hot water in small saucepan. Bring to boil, stirring until sugar has dissolved.
Sprinkle gelatin over 2 TBS cold water and let soften for about 2 minutes.
Stir coffee, sugar mixture and vanilla in a small bowl.
Add gelatin and whisk until dissolved.
*When pouring over panna cotta make sure it is coming cool or it will melt the panna cotta! Once you have your layer of gelee, place back in the fridge for at least an hour.


After the gelee has had a chance to set, pour another layer of panna cotta and place back in the fridge to stay overnight.

 They got a little messy, but nothing a little paper towel cleaning won't fix!


Florentine Cookies
From "Nestle Classic Recipes"
Makes about 2-3 dozen sandwiched cookies* I halved the recipe

2/3 cup unsalted butter
2 cups quick oats
1 cup sugar
2/3 cup AP flour
1/4 cup dark corn syrup
1/4 cup whole milk
1 tsp vanilla
pinch of salt
1 1/2 cup chocolate or nutella

Preheat oven to 375. Line baking sheet with parchment paper.
Melt butter in medium saucepan and remove from heat.
Add oats, sugar, flour, corn syrup, milk, vanilla and salt to melted butter- mix well.
Drop tablespoons full onto prepared baking sheet, flattening slightly with back of spoon.
Bake for 6-8 minutes or until cookies are golden brown.
Cool completely on cooling racks.
While cookies are cooling, melt chocolate or use nutella, and create sandwiches with your cookies.

Now you have your Creamy Dreamy Crunchy Sweet dessert :)

Another fabulous Daring Bakers' Challenge!

Happy Baking! 

Thursday, February 24, 2011

Brown Butter Blueberry Crumb Cake

Mountain Man and I recently embarked on a new adventure: marriage counseling. For the next few weeks, every Sunday afternoon we meet with about 7 other couples to talk about all things marriage.

Speaking of marriage.. want to see some of those engagement photos I traded for??


we couldn't resist.. this tree was so cool!

Normally I spend my Saturday mornings baking up something delicious for breakfast, but I wanted to make sure we had something good to eat before class.

I know I just got done talking about how I wanted to use more of my cookbooks and not get sucked into the wonderful recipes found all over the blogsphere, but I just couldn't resist!

In addition to my enormous collection of cookbooks, I also have 3 folders worth of printed recipes, not to mention a bookmarked folder of recipes on my computer.

This recipe for instance was printed out by yours truly in July and only now am I just getting around to making it! It's getting ridiculous..

When I woke up, I had a huge hankering for coffee cake.. it might have had something to do with the delicious looking Blueberry Crumb Cake that Lindsey of Gingerbread Bagels (really pretty much everything she makes looks delicious) had recently made, but whatever the reason I knew something needed to be done about it.

I started looking through all my recipes and there it was: Joy the Baker's Browned Butter Fresh Blueberry Muffins- I LOVE brown butter- but because coffee cake was still on the mind I opted to pour all the batter into a baking dish. Then it dawned on me.. the crumb that Lindsey had going on?! Fabulous. The perfect addition.

 Look at that crumb! 
Thank you Lindsey for introducing me to the best crumb out there..

Brown Butter Blueberry Crumb Cake
Cake from Joy the Baker
Crumb from Lindsey at Gingerbread Bagels
Makes one 8x8 baking dish
Oven: 350 Bake time: 30 minutes

7 TBS unsalted butter
2/3 cup sour cream
1 large egg
1 large egg yolk
1 tsp vanilla
1 1/2 cup AP flour
3/4 cup sugar
1 1/2 tsp baking powder
3/4 tsp salt
2 cups fresh blueberries

Crumb
1/2 cup butter, melted
1 1/3 cup AP flour
1/4 cup sugar
1/3 cup light brown sugar
1 1/2 tsp cinnamon
1/8 tsp nutmeg

Melt butter in a small saucepan over medium heat. Keeping an eye on the butter, melt and cook down until little brown bits appear in the pan- the crackling will subside and the butter will begin to brown fairly quickly. Remove from heat.
Whisk milk, egg, yolk, vanilla, until combined. Add browned butter and stir to combine.
In a medium bow, whisk together flour, sugar, baking powder and salt.
Add milk and butter mixture all at once and stir to combine.
Fold in blueberries.
Pour batter into baking dish.
Make crumb topping by mixing all ingredients together in a small bowl.
Sprinkle mixture generously over batter.

Place in oven and bake for about 30 minutes or until toothpick comes out clean.


Happy Baking! 

Monday, February 21, 2011

Lions, Tigers, Zerbas & Monkeys (Oh My!) Birthday Cake


Let me just start by saying Mountain Man and I have great friends.

Since we moved to Texas we've had the opportunity to meet even more awesome people.

When all the wedding planning began I wanted to try and make it as personal as possible; using the talents of the amazing people in our lives. Of course my girlfriends have been extremely supportive, especially those that just recently got married or are well into the planning phases themselves- it is invaluable to have people like that around you when you're making the big leap or you would be completely lost at where to begin...

I contacted a friend from college who now has his own photography to do our pictures and could not have been happier when he accepted the job...


A close family friend of MM is an ordained minister and my aunt, who just recently became a nun, are going to perform our ceremony...

And a friend in Texas, who is also trying to begin his photography career, agreed to do a few engagement photos for us.

So what does this have to do with an animal birthday cake?


Well, when we asked our friends here to take a few photos for us we did a little bartering. Our friends Richard and Ursula have an adorable little boy who recently turned 1, and in exchange for a small photo sesh, I agreed to make his first birthday cake.


Completely trusting each others creativity, Ursula simply gave me a napkin of the party favors, requested one cake for the party and one little cake for Lucas and sent me on my way.


Strawberry Cake was requested, with a Strawberry Pastry Cream filling and the Best Buttercream covered the rest of the cake.

I spent the next week coloring fondant, cutting out little shapes and assembling all the little animals for the decorations.


It was all worth it when I got a sweet text from Ursula and saw these pictures all over Facebook...

Playing with his little zebra...

Toooo much cake...

How cute is he?! As for the engagement photos, lets just say I was more than impressed and I can't wait to send out our save the dates now!
Happy Baking!!

ps. If you are having trouble leaving comments could you possibly send me a message (sweetebakes@gmail.com) with the error you're getting? I'd like to get it fixed, but don't have the necessary information! Thanks!

Thursday, February 17, 2011

Berry Berry Good Cake


I can always count on April for some good baking talk during a long work day.

I wish I had a picture of the cake she made me for my birthday, because it was absolutely beautiful and undoubtedly delicious.

Last year I made April a Hello Kitty cake, but this year she requested something very different..something with fruit and cream. I turned to Martha for inspiration.

Martha Stewart always makes the most extraordinary looking cakes- she manages to create these beautiful, yet simple, and very classy desserts that appear effortless. She uses only top of the line ingredients and believes in a nice presentation just as much as the taste.

Nothing but the best for Martha...

and nothing but the best for our April!

A few cakes caught my eye, one in particular featured a Swiss Meringue Buttercream...a new beast in my cake decorating. I've dabbled in Italian Buttercream, but being part Swiss I thought I should represent a little! Although a little more time consuming than your average buttercream and much more finicky ingredients, the result is a ridiculously smooth and oh so sweet frosting for any cake.

But what about the fruit and cream you ask??

A batch of basic pastry cream, split into two- one combined with a quick raspberry puree and the other blueberry.

And so it was complete: my favorite White Cake, smothered between layers of alternating Raspberry and Blueberry pastry cream, covered with Swiss Meringue Buttercream and delicately decorated for my favorite admin.


1-2-3-4 Cake
(My absolute favorite White Cake)
Oven: 350 Bake Time: 35 minutes
Makes 2 or 3 8-inch round cakes

1 cup butter, softened
2 cups sugar
3 cups flour
1 TBS baking powder
1/2 tsp salt
4 eggs, separated
1 cup whole milk
1 tsp vanilla

Whisk flour, baking powder and salt in a small bowl.
Beat butter and sugar until light and fluffy.
Add egg yolks one at a time, beating until incorporated each time.
Alternate flour mixture and milk, beginning and ending with flour.
Beat eggs whites until stiff peaks form.
Fold into batter until incorporated.
Transfer batter to prepared cake pans and bake for 35 minutes or until toothpick comes out clean.
Transfer to cooling rack for 30 minutes before removing cakes to continue cooling for at least an hour.


Pastry Cream
recipe from Baked:New Frontiers in Baking
3 cups half and half
6 large egg yolks
1/2 cup sugar
3 TBS cornstarch
1/4 tsp salt
1 tsp vanilla

In a medium saucepan, heat half and half to a simmer and keep warm.
In a medium bowl, whisk egg yolks, sugar, cornstarch, and salt together until mixture is pale (about a minute).
Whisk half of warm half and half into egg yolk mixture, then pour that mixture into remaining half and half in saucepan continuing to cook over medium heat, whisking constantly until thickened (about 6 minutes).
Remove from heat and whisk in the vanilla.
Transfer cream to bowl and cover with plastic wrap.
Place in fridge for about an hour before using.

Raspberry Cream: Place 1 cup raspberries in small saucepan and mash with fork or potato masher. Add 2 TBS sugar and warm over medium heat until sugar is dissolved. Allow to cool completely before adding to cold pastry cream.

Blueberry Cream: Place 1 cup blueberries in small saucepan and mash with fork or potato masher. Add 2 TBS sugar and warm over medium heat until sugar is dissolved. All to cool completely before adding to cold pastry cream.

Swiss Meringue Buttercream
Combination of recipe from Martha and Bake Wise
4 egg whites
1 cup sugar
1 cup plus 2 TBS butter
7 TBS Crisco
1/2 tsp cream of tartar
2 tsp vanilla extract

Combine egg whites, cream of tartar, sugar and salt in a heat proof bowl set over a pan of simmering water (double boiler).
Whisk constantly until mixture is warm to the touch (120-130 degrees) and sugar has dissolved.
Transfer mixture to stand mixer bowl fitted with whisk attachment.
Starting on low, gradually increase to medium-high speed until stiff peaks are formed. Continue to mix until mixture is glossy and fluffy and completely cool (about 10 minutes).
With mixer on medium low, add butter, one tablespoon at a time, mixing well after each addition.
Once all butter has been added, add vanilla.
Change to paddle attachment and continue to beat until frosting is smooth.


Happy Baking!

Monday, February 14, 2011

Valentine's Day Treats

Happy Valentines Day! 


Truth be told, V-day is not something that Mountain Man and I really celebrate...we don't have big dinner plans, I definitely won't be getting flowers or a box of chocolates and I will absolutely not be getting any jewelry- MM made it very clear I'd reached my diamond quota this year ;)

Despite the fact that I'm not particularly keen on a holiday that could potentially make some people feel pretty darn sad, I'll take any excuse to make cute and delicious treats.

This Valentine's Day I decided to go back to the good old days when it didn't matter if you had a significant other to get you something sweet and I set out to put a smile on everyone's face in the office with a little something special.

One of the girls in the office can't have gluten and I wanted to make something that everyone could enjoy, so as I browsed the aisles of Michael's I picked up some candy molds, a few bags of candy melts and lollipop sticks.


These lollipops couldn't be any easier (the directions are right on the package).. just melt, pour, stick, place in the fridge and voila! homemade candies.

But I didn't stop there.. I had a ton of cake left over from some projects over of the weekend (I can't wait to show you the final products!) so cake balls seemed the perfect choice.


With all the extra lollipop sticks I thought I'd give cake pops a go...

Lets just say that didn't go as planned... I have already admitted my cake balls need work- they never look as good as they should and I can never get them smooth! And now, with cake pops...well, put it this way, I'm no Bakerella and I should have read Carolyn's tips a little more closely to get them to work.

I couldn't get the sticks to stay in the cake balls for the life of me and the silly little things just kept falling apart so a few wasted cake balls later, I gave up and just went back to making cake balls. After my epic fail I went back and researched all thing cake pops (which I should have done from the beginning) and now I know where I went wrong.. so next time those cake pops are mine!

No matter what your plans today, flowers or not, I hope everyone has a lovely day full of sweets and treats :)

Happy Baking!

Thursday, February 10, 2011

Cardamom Coffee Rolls


Dear Yeast,

I'd like to talk to you about your social skills.

I don't know what it is, but you're a little unapproachable...pretty intimidating to be honest.

Patience is a virtue, I get it, but you're kind of a diva with the finicky temperature demands, interesting eating habits and "proofing" time.

The fact of the matter is, after getting to know you I think you're actually quite awesome. That wasn't always the case though...the first few times we worked together I was so afraid of upsetting you and doing the right thing that I second guessed myself constantly; but not anymore.

Now that I've learned a little more about you I'm never disappointed with our time together, but this isn't about me.. it's about you.

You may have a hard exterior, but I know deep down inside you have some wonderful things to offer the baking world like these Cardamom Coffee Rolls. You might scare others, but your antics won't work on me anymore. I know your ways and we're going to have many happy times together whether you like it or not.

Sincerely,
 Evan


Cardamom Coffee Rolls
Recipe from A Baker's Odyssey
Makes 15 rolls (I halved the recipe)
Prep time: 30 minutes Total rise time: 3 hours

Sponge
1 cup whole milk
1 1/2 cups AP flour
1 pkg active dry or instant yeast

Dough
1/2 cup sugar
1 egg
1 egg yolk
4 TBS unsalted butter
1 tsp cardamom
1/2 tsp salt
1 1/4 AP flour, plus more if needed

Topping
1/4 cup sliced almonds
2 TBS sugar
1/4 tsp cardamom
1 egg yolk plus 1 tsp water, for brushing

To make sponge, scald milk in small saucepan over medium heat (look for small bubbles and steam). Remove pan from heat and cool milk till it reaches about 120-130 degrees.
In a medium bowl, whisk together flour and yeast. Add hot milk and whisk until smooth, thick batter.
Cover bowl with plastic wrap and let rise for about 1 hour or until sponge has doubled in volume.

To make dough, scrape sponge into large bowl. Whisk in sugar, egg, egg yolk, butter, cardamom, and salt. Beat vigorously with wooden spoon for about 5 minutes until dough is smooth and very elastic. Stir in flour and beat again for 5 minutes. The dough should be soft, elastic, and just slightly sticky.
Sprinkle work area with flour and place dough on it. Knead with hands for 2-3 minutes, until dough is just slightly tacky and bounces back to the touch. Lightly oil bowl and replace dough in bowl, making sure to coat all sides. Sprinkle dough with flour and cover bowl with plastic wrap letting dough rise another hour or until dough has doubled in size.

Transfer dough to a slightly floured surface. Turn to coat all sides lightly with flour. Divide dough into 15 equal portions with a pastry scraper or sharp knife. Cover loosely with kitchen towel and let rest for 10 minutes.

Butter a 9x13 baking dish or spray with cooking spray. Shape each piece of dough into a ball and place in dish, leaving a little bit of space between each. Coat the tops with cooking spray and drape plastic wrap loosely over them, letting them rise 1 hour or until they have doubled in size (the rolls will be touching by the end of the rise).

Preheat oven to 375.
Make the topping by mixing together almonds, sugar and cardamom in a small bowl.
Once rolls have risen, brush with egg wash and sprinkle generously with topping.
Bake 20-25 minutes or until rolls are lightly browned and nuts are toasted.
Cool rolls for 10 minutes before removing and serving.

Notes
- Remember: yeast is a diva. During the rising times, place bowl in a warmer place like an oven with the light on, a garage (if its warm) or in the sunlight of a window.
- Be patient...yeast rolls are time consuming- if you're making these for breakfast plan on eating later.
- Like the name suggests, these rolls are perfect with a nice cup of coffee or tea mid afternoon.
- Yeast products have a short shelf life- these rolls will last about 2 days in a ziplock bag or plastic wrap at room temperature or about 1 month frozen.


Happy Baking!

Tuesday, February 8, 2011

Chocolate Pound Cake with Mocha Glaze


While the rest of the world was making New Year's resolutions regarding health, making better choices and maintaining a workout regimen, my mind was in a different place.

I already workout 6 days a week.. how else would I stay under 400 pounds with all these sweets?? so no need to go there. And as far as health is concerned, despite what it may appear, we eat pretty healthy in our house as far as actual meals are concerned.

So what was my New Years resolution? I went with something that I knew I could keep: getting through all my cookbooks.

After receiving over 10 cookbooks for Christmas, in addition to the shelves I already have full, something needed to be done.

It's difficult to get through you books sometimes.. I always begin with good intentions, marking various recipes, flagging techniques I want to try, but then I start browsing the internet and it all goes out the window. It's so easy to get caught up in all the goodies on foodbuzz, foodgawker or tastespotting and before I know it, I'm recreating something that I've seen on one of the wonderful blogs I so eagerly follow or taking the easy way out with a recipe from a site like allrecipes.com that already has rave reviews.

But this year is going to be different; I'm going to start using the recipes that adorn the vast pages of my cookbook collection waiting so patiently on the shelves for me.

So that brings us to this delicious recipe for a Chocolate Pound Cake from All Cakes Considered. When I found this book at a local library sale I fell in love with the story behind it. For one year, the author, Melissa Gray, brought in a new cake every Monday for her colleagues at NPR, where she is a producer for the show All Things Considered. Her year long adventure left her with over 50 cakes, tips, tricks and techniques that she now shares with her readers.

A while back I had a reader ask if I had a good chocolate pound cake recipe for them to try. At the time, I did not and although it is long overdue, I hope they're still out there and I hope they'll give this cake a try.


Chocolate Pound Cake
recipe from All Cakes Considered
Fills a 10-inch bundt pan
Oven: 325 Bake time: 1 1/2 hours

3 cups AP flour
3 cups sugar
1/2 cup unsweetened cocoa
1 stick unsalted butter, softened
1 cup shortening
1 1/4 cup whole milk
1/2 tsp baking powder
1/2 tsp salt
1 tsp vanilla
5 eggs

Preheat oven to 325. Spray bundt pan with cooking spray and set aside.
In a large bowl, whisk flour, sugar, and cocoa.
Gradually add butter, shortening, and milk and beat on medium speed until smooth.
Add baking powder and salt, beating until incorporated.
Add vanilla and then add eggs, one at a time, beating after each addition.
Pour batter into prepared pan and bake until thin knife comes out clean.
Cool cake in pan for 10 minutes before removing by flipping onto a plate.
Optional: Pour mocha glaze generously over cake

Mocha Glaze
1/2 cup hot water
2 TBS instant espresso or coffee
1 TBS unsweetened cocoa
1 cup powdered sugar

Prepare right before serving.
In a small bowl, mix powdered sugar and cocoa.
In a mug or measuring cup mix 1/2 cup hot water and instant coffee/espresso until dissolved.
Slowly add instant coffee to sugar/cocoa mixture, adding just enough coffee to make a thin glaze and whisking smooth (You will probably not use all the instant coffee that you made)
Pour generously over top cake.


Happy Baking!! 

Thursday, February 3, 2011

Lemon Cake with White Chocolate Buttercream


For a few weeks it seemed like we were having a birthday (or 2) in the office at least once a week.

I didn't want to bombard you all with cake after cake though, so I've been trying to space them out a bit.

Now that everyone in the office realizes I'll never back down from a challenge, the cake flavors keep getting more and more fun.

When I told one of the new girls at work that she could have any type of cake she wanted for her birthday, she got all excited and said she needed some time to think on it.

"Lemon and White Chocolate," she said when she found me in the halls of the office the next morning.

Game on.

I went with a light Lemon Cake filled with fresh Lemon Curd and a White Chocolate Buttercream and couldn't have been happier with the result.

I also used the opportunity to try a new decorating technique that I had seen recently on Martha Stewart (ps. if anyone is planning a wedding.. her website is ah-mazing). The ruffle technique looks really neat and is sure to impress.. and it was pretty easy too!


Light Lemon Cake
recipe from epicurious.com
Oven: 350 Bake time: 35 minutes
Makes 2 8-inch cakes

1 cup oil
2 cups sugar
4 eggs
2 1/2 cup flour
1/2 tsp salt
2 tsp baking powder
1 cup whole milk
1 tsp lemon extract
1/2 TBS lemon zest

Preheat oven to 350. Grease and flour cake pans and line bottom with parchment paper.
Place sugar in large bowl and while mixer is on low slowly pour in oil until well combined.
Add eggs one at a time, mixing after each addition.
Add lemon extract and lemon zest, mixing well.
In a small bowl, whisk flour, baking powder and salt.
Add flour mixture to wet ingredients, alternating with milk- beginning and ending with flour mixture.
Pour into prepared pans and place in oven for 30-35 minutes or until tester toothpick comes out clean.
Transfer cakes to cooling rack and allow to cool in pans for about 20 minutes before removing from pans to complete cooling.

Once cooled, level and fill with Lemon Curd and frost with White Chocolate Buttercream.

White Chocolate Buttercream
1 cup butter, softened
4-6 oz white chocolate
4-5 cups powdered sugar
1/2 tsp vanilla extract
1/4 cup whipping cream

In a large bowl, beat butter and vanilla until light and fluffy.
In a microwave safe bowl, melt white chocolate for about 2 minutes or until smooth, stirring at 30 second intervals.
Add melted chocolate to butter and mix until combined.
Slowly add powdered sugar, one cup at a time and whipping cream until smooth frosting consistency is reached.


Happy Baking!