Showing posts with label Christmas. Show all posts

Wednesday, December 21, 2011

Chocolate Bourbon Pecan Pie & Christmas Cookies


Has this Christmas snuck up on anyone else?

Seems like just yesterday I was walking down the aisle and now, all of a sudden, it's Christmas time!

Can I let you in on a little secret? I just finished my Christmas shopping this week...like as in Monday afternoon..thank goodness for the internet.

And you can imagine if it took me that long to get my stuff together to buy gifts, that my cookie/holiday baking also took a hit.

In addition to the busy-ness that was my whole month of Decemeber, my cake business has been booming recently (yay!) and with two cakes to bake and decorate every weekend I really haven't had the chance to spend any other time in the kitchen.

By this time last year I was smooth sailing till Christmas- I had all my cookies baked...


and Jeweled Lace Cookies (only 35 calories a cookie!)
Not this year though... I just started baking cookies this past weekend! Would you all still want to see what I've made even after the holiday is over??

So while I'm not sharing any new cookies with you this year (yet)...If you're anything like me, and you've been slacking this year for one reason or another, I have the perfect dessert to make it up to you. This is sure to be a crowd pleaser at any Christmas dinner- a little twist on a holiday classic, this pecan pie infused with bourbon and chocolate chips will put a smile on anyone's face.
Chocolate Bourbon Pecan Pie
Adapted from myrecipes.com
Bake: 425/350 Total time: 1 hour

3 eggs, beaten
3/4 cup light corn syrup
4 TBS butter, melted
3/4 cup brown sugar
3 TBS bourbon
2 TBS AP flour
1 tsp vanilla
1 1/2 cup chopped pecans
1/2 cup semi-sweet chocolate chips
1 package prepared pie crust

Preheat oven to 425. Press pie crust into 9-inch pie dish as directed on package and press/crimp edges.
In a large bowl, mix eggs, corn syrup, butter, brown sugar, bourbon, flour and vanilla until well combined.
Fold in pecans and chocolate chips.


Pour mixture into prepared pie shell.

Bake for 15 minutes at 425, then reduce temperature to 350 and continue to bake for 45 minutes.
Transfer to cooling rack and allow to completely cool before serving.

Happy Holidays
and
Happy Baking!

Monday, December 27, 2010

Christmas Stollen


When I told my Oma (Swiss grandmother) that I was going to be making Stollen this year she was so excited.

The 2010 December Daring Bakers' challenge was hosted by Penny of Sweet Sadie's Baking. She chose to challenge Daring Bakers' to make Stollen. She adapted a friend's family recipe and combined it with information from friends, techniques from Peter Reinhart's book and Martha Stewart's demonstration.

There are a few traditionally Swiss treats that my Oma makes every year during the holidays. If you're wondering what Swiss treats may be, think German but with a few twists; Swiss sweets are much like German sweets just don't say that in front of my Oma or any Swiss for that matter!

A few years ago, when the baking bug was just a mere sniffle, I asked my Oma for a couple of her Christmas recipes. She agreed to give me the recipes of course, but with a catch: I had to bake them with her first so I could see exactly how they were done.

So one chilly winter day in Northern Virginia, we spent a long afternoon making Viennese Crescents and Zopf (a post to come soon I hope). I think this might have been the afternoon that my love of baking started to grow into what it is today.

Now that I have a blog and have shared my love of everything baked to include the dream of opening a bakery one day, Oma is one of my biggest supporters. While home last weekend I overheard her tell my cousin (the gorgeous one below) that one day I would own a bakery with the biggest smile on her face.

So back to the Stollen.

I was lucky enough to get some of Oma's bread while I was home, even though she was hesitant to give me a loaf after I told her I was going to attempt my own. I assured her it would get eaten and also wanted to use it in comparison to my own.

For this bread I used the recipe Penny gave us, but I would eventually like to get Oma's recipe as well.

I can definitely see this bread becoming a Christmas tradition in our house now too.


Stollen Wreath
Making Dough: 1hour
Rise/rest: overnight
Shaping: 15 minutes
Proofing: 2 hours
Bake time: 30-45 minutes Oven: 350

1/4 cup warm water (115 degrees)
2 packages (4 1/2 teaspoons) active dry yeast
1 cup milk
10 TBS butter
5 1/2 cups, AP flour
1/2 cup sugar
3/4 tsp salt
1 tsp cinnamon
3 eggs, beaten lightly
grated zest, 1 lemon and 1 orange
2 tsp vanilla extract
1 tsp lemon or orange extract
3/4 cup mixed peel* make your own
1 cup golden raisins
2 TBS rum
2 TBS orange juice
1 cup flaked almonds
powdered sugar for coating
melted butter for coating

Making the Dough
Soak raisins in 2 TBS rum and 2 TBS orange juice- set aside.
Pour warm water into small bowl and sprinkle with yeast. Mix lightly to break up yeast and let sit for 5 minutes or until mixture starts to foam. (If it doesn't foam discard and start over)
In a small saucepan, combine milk and butter over medium heat until butter has melted. Let stand until lukewarm- about 5 minutes.

Lightly beat eggs in a small bowl and add extracts.
In a large bowl, stir together flour, sugar, salt, cinnamon and zests.
With a paddle attachment (or stirring by hand), add yeast/water mixture, eggs and lukewarm milk/butter mixture. This should take about 2 minutes. Your dough should be soft, but not too sticky. Once the dough starts to come together, cover the bowl and let rest for about 10 minutes.

Chop mixed candied peel into small pieces.
Drain raisins.
Add mixed peel, raisins and almonds. Mix with hands to incorporate.

Sprinkle flour on counter, transfer dough to counter and begin to knead dough (or use your dough hook to mix and distribute fruit evenly* I found the dough to be too heavy for the machine and it started making funny noises so I opted to do it the traditional way by hand), adding additional flour if needed. The dough should be soft and satiny, tacky but not sticky.
You will know when the dough is done when a few of the raisins or peel start to fall off the dough and onto the counter- at the beginning of the kneading process the dough is sticky and the raisins are held in place, but once the dough becomes tacky the raisins will no long have anything to hold on to.
Knead for about 8 minutes.

Lightly oil a large bowl and transfer the dough to a bowl, rolling around to coat it with oil. Cover the bowl with saran wrap and refrigerate overnight (or up to 3 days). The dough will become very firm, but it will definitely still rise in the fridge.

Shaping the Dough
Take the dough out of the fridge and let rest for 2 hours in order to warm slightly.
Line a sheet with parchment paper and set aside.
Transfer dough to kitchen surface and punch dough down.
Roll unto a rectangle about 16 x 24 inches and 1/4 inch thick.
Starting with the longer side, roll dough tightly forming a long thing cylinder.
Transfer cylinder to prepared sheet pan. Join ends together, trying to over laps layers to make seam strong and then pinch your fingers to make stick, forming a large circle* Use a small bowl and form wreath around it to keep its shape
Using kitchen scissors, make cuts along outside of circle, about 2 inches apart, cutting 2/3 the way through the dough.
Mist dough lightly with cooking spray and loosely cover with saran wrap.

Proofing/Baking Wreath
Proof your wreath for about 2 hours or until its about 1 1/2 times its original size.
*I placed my wreath in the oven so it was off the counter and in a warmer place.
Remove wreath after 2 hours and preheat oven to 350.
Bake stollen for 20 minutes, then rotate the pan 180 degrees and continue to bake another 20 to 30 minutes.
The bread will bake to a dark color and should sound hollow when thumped on the bottom.

Transfer to cooling rack and brush top with melted butter while still hot.
Immediately tap a layer of powdered sugar over the top through a sieve or sifter.
Wait for a minute and tap another layer over the first.
The bread should be coated generously with powdered sugar.
Repeat this 1 or 2 more times.
Let bread cool at least an hour before serving.

Storage
Stollen freezes beautifully for about 4 months.
The baked stollen stores well for 2 weeks covered in foil and plastic wrap or about 1 month in the fridge.

*Stollen toasts wonderfully and tastes great with a little butter and some jam!


I hope everyone had a lovely holiday!

Happy Baking!

Thursday, December 23, 2010

Don't Forget to Leave Some Cookies for Santa!

Are you a last minute shopper/cookie baker/present wrapper like me? 

I can't go shopping for you or wrap your presents for that matter, but I can at least help you in the cookie department. 

I have one more quick and easy recipe for yall that I wanted to get to you before the big day!


Chocolate Cookie Bark
Covers 1 cookie sheet

2 cups semi-sweet chocolate, melted
2 cups white chocolate, melted
10 mint oreos, crushed
1/2 cup holiday M&Ms

Line cookie sheet with parchment paper.
Mix crushed oreos with white chocolate.
Place spoonfuls of chocolate mixtures on parchment paper, alternating chocolates.
Using a knife, cut through spoonfuls creating a marbling effect and smoothing chocolates together.
Sprinkle M&Ms over bark and lightly press into chocolate.
Place in refrigerator for about an hour or until firm.
Remove from fridge and break into pieces.


And here's a little recap of some effortless holiday favorites!


And there you have it folks.. Christmas is right around the corner and I still have a lot of cleaning and prepping to do before both sets of parents get here!

I hope everyone has a wonderful holiday spent with plenty of friends and family. I can't wait to see what Santa brings everyone :)


Happy Holidays!
and
Happy Baking!

Wednesday, December 22, 2010

Pecan Caramel Surprises


Only 3 days till Christmas! Can you believe it?  

Big moves are being made in our household in the coming days..

My parents get into town tomorrow.


Mountain Man's parents are getting into town tomorrow.


That's right, Christmas is going to be at our place this year...with both families.

[insert music here] Dun-dun-duuuuun.

Since both of my brothers are on the other side of the world, it only made sense that my parents should come to Texas for Christmas and since MM's family only lives a few hours away they're going to make the trip as well.

[insert music here] Dun-dun-duuuuun.

This is going to be the first time both families are meeting! And I'm in charge of all the food and entertaining!

To be honest I just added the music for dramatic effect.. I'm not that worried about it at all. Yes, it will be a little nerve racking just making sure everything goes smoothly, but I'm actually quite excited.

And how could you not have a good time at our house when you have cookies like these to eat??


Caramel Pecan Surprises
Oven: 325 Bake time: 13 minutes
Makes 24 cookies

1 cup whole pecans (or 3 1/2 oz ground pecans)
1/2 cup butter (1 stick), slightly softened and cut into cubes
1/3 cup + 1 TBS sugar
1 cup flour
1 tsp vanilla
1 package of soft caramels (24)
1 cup powdered sugar (for rolling)

Preheat oven to 325 and line two baking sheets with parchment paper.
Unwrap 24 caramels and set aside.
Place pecans and 1 TBS sugar in food processor and grind for 20 seconds.
Transfer pecans to large bowl.
Place butter, vanilla and sugar in food processor and pulse 4 or 5 times to combine. 
Add flour and pulse until blended.
Add butter/flour mixture to pecans and mix with your hands until ingredients begin to form a ball*
I found that using my hands to mix was the easiest..it's a slightly sticky dough and you really have to work with it to make sure it all sticks together.

Now comes the surprise!

Using a tablespoon, roll dough into a ball and place on parchment paper about 2 inches apart.
Press individual caramels into each ball. At this point you're going to have to re-shape your cookies a little bit to make sure caramel is completely covered (so it doesn't come oozing out the sides while baking).*
I found it easiest to slightly flatten the cookie, wrap the caramel in the middle and then roll the ball in my hand until the caramel was covered.

Transfer to oven and bake for about 13-15 minutes or until lightly browned.
Don't worry if your cookies kind of crack on the top or a little bit of caramel oozes out because you're going to drench them in powdered sugar.
Place 1 cup powdered sugar in shallow bowl.
Allow cookies to cool for about 10 minutes, then roll in powdered sugar.
Let cookies cool again for about 15 minutes then roll one more time in powdered sugar.


A little disclaimer.. this was the second batch of these cookies I made because the first were an epic fail. Caramel was all over the place and the cookies had completely fallen apart. You really have to watch these little guys so around 10 minutes just make sure you don't have lava cakes oozing out caramel in your oven. This time around I watched them very carefully to make sure the cookies stayed intact. You also might want to try putting the prepared cookies in the fridge for about 15-20 minutes before placing them in the oven which may help in the oozing caramel department.


The good thing is, even if the caramel does ooze out all over the place they're still delicious cookies!


Happy Baking!


Monday, December 20, 2010

Tacky Sweaters and Gingerbread Men

 Mountain Man and I recently hosted a Tacky Christmas Sweater party.

We wanted to look as tacky goofy as possible.. what do you think?

Flash-back or Flash-forward? 

In case you were wondering, yes, those are dark green valor track pants and no, MM will not be rocking that 'stache for very long. And don't worry, when I got warm that top sweater is removable and I could sport the matching sleeveless sweater.

With a house full of very tackily dressed friends, we feasted on a good spread of food, partook in a few adult bevs, played some games of catch phrase and laughed the night away.

But the best part of the night? Having everyone decorate their own Gingerbread Men

When I first thought of the idea I was tickled...right next to the dips and apps there was to be a Gingerbread Man station complete with icing bags and candy accents.


I was a little worried that our friends wouldn't find it as amusing as I did.  I totally understand that some people don't find baking and decorating as much fun as I do (crazy people),  but I was pleasantly surprised at how much they got into it...

Not to mention the quality of the cookies they decorated! I was so impressed..


I even got to try out another recipe from my newly received Tate's Bake Shop Cookbook. These gingerbread cookies had just the right amount of spice and the texture was amazing.

Gingerbread Men
Recipe from Tate's Bake Shop Cookbook (Ginger Hearts)
Oven: 350 Bake time: 10 minutes 
Makes a lot of cookies

2 1/2 cups AP flour
1 TBS baking powder
1/4 tsp baking soda
1/2 tsp salt
1/4 tsp allspice
1 TBS cinnamon
1 tsp ginger
1 tsp cloves
1 egg
1 cup packed brown sugar
2/3 cup dark molasses, unsulphured
1/2 cup salted butter, softened (I just add a little extra salt and used unsalted)

Preheat oven to 350. Line 2 cookie sheets with parchment paper.
In a small bowl, stir together flour, baking powder, baking soda and spices.
In another large bowl, cream egg and sugar. Then add molasses and butter- beat until mixed well.
Add flour mixture (dry ingredients) to wet ingredients and mix until well combined. *You might need to add a little more flour if the dough is still very sticky.
Roll dough into large ball, cover in saran wrap and chill for about a 30 minutes to an hour.
Once chilled, cut ball in half, keeping one half in the fridge while you work with the other half.
Transfer gingerbread to lightly floured surface and roll rough till about 1/4 inch thick.
Use Christmas cookie cutters to cut out shapes and transfer cut cookies to prepared baking sheet about 1 1/2 inches apart.
Repeat with reserved dough in the fridge.
Bake cookies for about 10 minutes or until they're slightly firm to the touch.
Don't let the edges brown or they'll be too hard!
Remove cookies and allow to cool on wire rack.
Once cooled, decorate with royal icing, candies and sprinkles.

I reserved a few cookies and decorated them myself, but I felt no need to share those because the ones our friends decorated are way better anyways :)

 It's almost Christmas!!
Happy Baking!

Friday, December 17, 2010

Jeweled Lace Cookies


As I scoured my December/January issued magazines for Christmas treats, I came across an Everyday with Rachael Ray from a year or so ago with a spread of cookies that I just had to try.

Despite the fact my collection takes up a few rows on our bookshelf, I knew saving all those food magazines would come in handy one day!

This is just one of the few recipes I marked to try this year and I'll definitely be making them again.


These little lace cookies are ridiculously simple and get this.. they're only 35 calories a cookie!

Not that I'm counting calories or anything... believe you me, I do NOT count calories, especially during the holidays. I think I told you this before, but there are no such thing as calories during the months of November and December. It's a fact. I pinky promise.

I still have a few more cookies to share with you all and I'm hoping I can get them to you before the holidays are over.

Can you believe Christmas is next weekend?!

I haven't even finished  started my Christmas shopping yet! Can I hire one of you to do that for me?


Jeweled Lace Cookies
Oven: 325 Bake time: 10 minutes
Makes 3-4 dozen cookies

1/3 cup brown sugar
1/4 cup light corn syrup
4 TBS butter
1/2 cup rolled quick oats
1/4 cup flour
1/3 cup dried cranberries
1/2 cup shelled pistachios, de-shelled then chopped

Preheat to 325°. Line to cookie sheets with parchment paper and lightly grease top.  
In a medium saucepan, over medium heat, stir together the brown sugar, corn syrup and butter until smooth and bubbling, about 4 minutes.
Remove from the heat.
 In a bowl, whisk together the oats, flour and salt; stir into the pot, then stir in the cranberries and pistachios.

Drop rounded teaspoons of the mixture about 3 inches apart onto the prepared cookie sheets. 
Bake until bubbly and a shade darker, about 9 to 10 minutes.
Let cool for about 1 minute before quickly transferring each cookie to a rack using a thin metal spatula; let cool completely. 

*One teaspoon doesn't seem like a lot but they definitely spread out. 
By using the parchment paper instead of just greasing the pans (which you could also do) you eliminate the risk of having trouble getting your cookies off the sheet. Just transfer paper and cookies to a rack to finish the cooling and the cookies will come off with ease once they've hardened.


These cookies are paper thin, crunchy and highly addictive. They're a crispy caramel and the salty and sweet from the cranberries and pistachios are a lovely addition. When I brought these into the office for lunch the ladies and I  talked about other things you could add to the base to make them extra special. Any ideas?

Happy Baking!

Wednesday, December 15, 2010

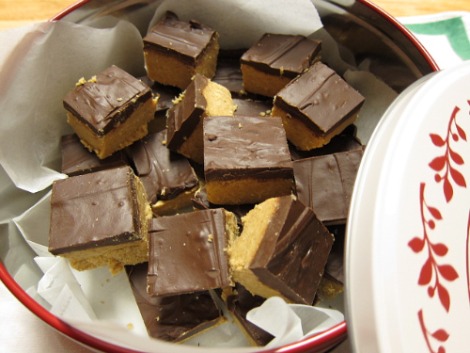
Chocolate Peanut Butter Squares


Do you have one of those treats that you know is always going to be there during the holidays? 

One of those cookies that your mom makes sure to have made by the time you get home to visit?

That sweet that just goes perfectly with a warm cup of hot chocolate and christmas music?

To me, these Chocolate Peanut Butter Squares fit all above criteria.

For as long as I can remember my mom has been making these during the Christmas season. I can always be sure to find them nestled somewhere in the giant cookie tin my mom uses during the holidays, snuggled up between the raspberry squares and chocolate dipped shortbread.

I think it's amazing how something as simple as a cookie can elicit a feeling or a memory.. just another reason why I think I love baking so much. You never know when you'll be creating an edible memory for someone.

Everyone remembers that special birthday cake, the brownies they got from a girlfriend after a bad breakup or the dessert that no one could make like their grandmother.  Food can be powerful...

I honestly think about that kind of stuff when I'm baking- is this going to be the cake they remember? the cupcakes they talk about years down the road? "You know, no one could make a chocolate cake like Evan.." 

I sure hope so.

What can I say, the holidays make me sappy.

But seriously, I look forward to these squares every year... and who knows, maybe they'll create a new holiday memory for you.


Chocolate Peanut Butter Squares
Oven: 350 Bake time: 5 minutes 
Makes a 7x11 pan

1 cup peanut butter 
8 oz graham crackers, crushed (about 2 sleeves crushed)
1 cup butter, melted 
4 cup powdered sugar
1 12oz bag of semi-sweet chocolate chips

In a large bowl mix crushed graham crackers, melted butter, powdered sugar and peanut butter until combined. 
Press mixture into pan and sprinkle chocolate chips on top. 
Bake in oven for 5 minutes.  
Using a spatula, spread melted chocolate chips evenly.  
Place in refrigerate for about 10 minutes so chocolate can harden.
Once cooled, warm a knife under hot water, pat dry and cut into small squares.


Note: If you leave it in the fridge too long your chocolate might separate from the peanut butter part when you cut them into squares. 


Happy Baking!